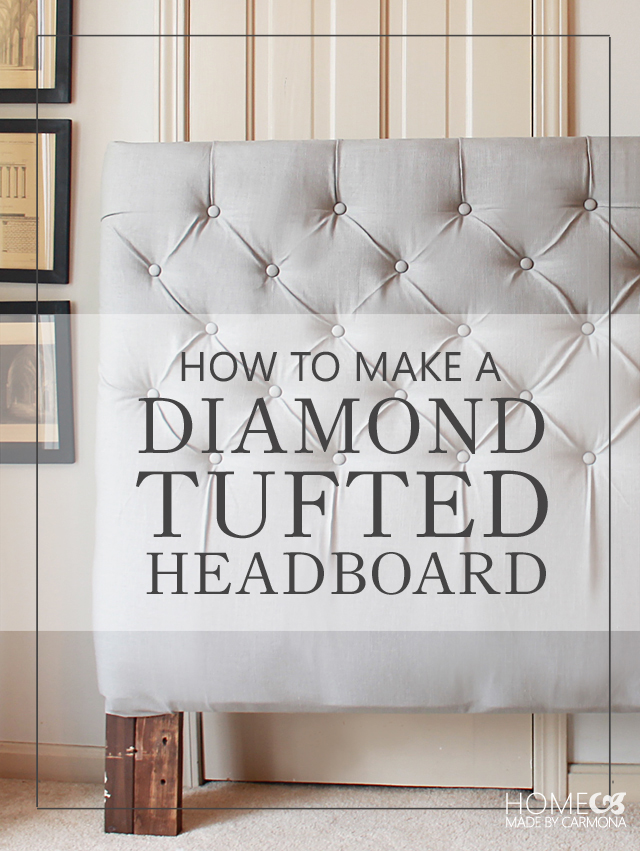
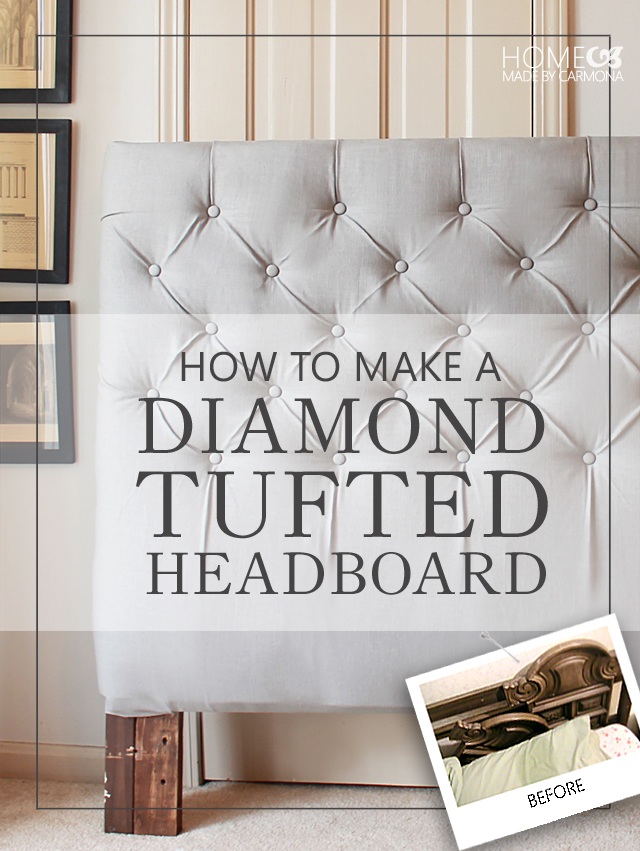
Diamond tufted headboards are stunning but expensive. It wasn’t in my budget to buy one, but in a single day I MADE the headboard of my dreams for under $50!!
If you are on a really tight budget but want a sophisticated upholstered headboard, this tutorial will help you make your own stylish custom headboard!
This detailed tutorial will show you the easiest and cheapest methods possible using my DIY hacks and some clever money-saving alternatives from the norm.
Materials & Expected Cost
The total cost was only $44 to make this queen sized diamond tufted headboard. Rounding up, I spent $17 for the fabric (Jo Ann’s after coupon), $11 for two button cover kits (the first kit from Walmart, the second from the craft store after coupon), $11 for one egg crate mattress topper (Walmart), the rest of the materials were either salvaged or I already owned.
I will include links if you prefer to order supplies online. You might spend more or less than I did depending on what you already have available to you and current prices.
Here’s What You Need (Queen size bed or King size bed)
Affiliate shopping links below for online shopping:
- An old headboard frame & salvaged boards OR 2×4’s to make a frame
- Egg crate foam mattress topper (2 twin sized = king size and is usually cheaper)
- Upholstery fabric of choice
- Small button kit (5 buttons) or Large button covering kit (18 buttons) (3/4″ buttons) (I used a total of 37 buttons)
- Regular buttons (any color, these won’t show)
- Waxed upholstery twine or hemp cord
- Gorilla glue
- Staple gun
- Decorative upholstery tacks or regular upholstery tacks
I spent only $44 making my queen-sized diamond tufted headboard. Rounding up, I spent $17 for the fabric (Jo Ann’s after coupon), $11 for two button cover kits (the first kit from Walmart, the second from Jo Ann / after coupon), $11 for one egg crate mattress topper (Walmart), the rest of the materials were either salvaged or I already owned. I will be sure to include links if you prefer to order supplies online. You may spend more or less than I did on my headboard depending on what you already have available to you and current prices.
1. Creating A Headboard Frame
How To Strip An Existing Headboard
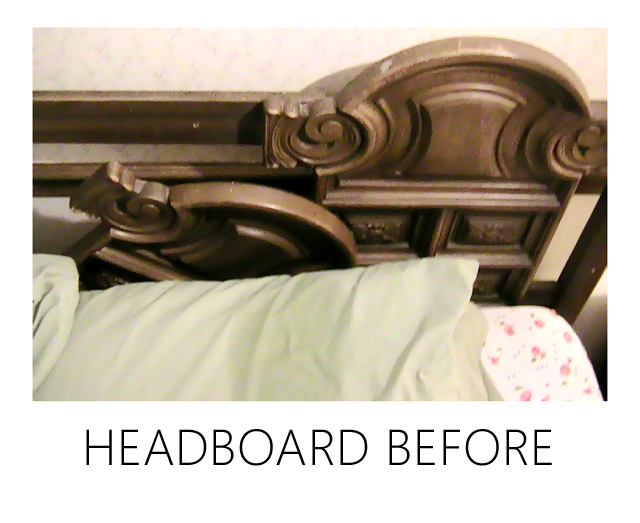
Have a hideous headboard like I do? Perfect! Strip your existing headboard down to its frame instead of buying wood to build a frame. Reuse what you already have and save a few bucks!
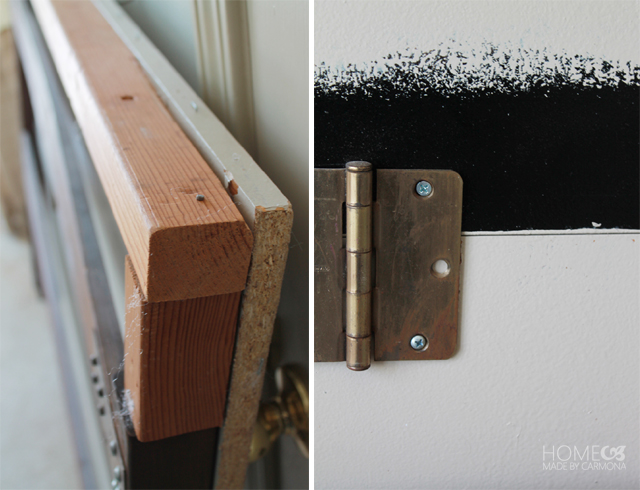
This truly awful headboard is what mine looked like before. It was a hand-me-down from the Grandparents that was as uncomfortable as it was ugly. I only had to remove the ugly plastic panels in the front to get to the bones.
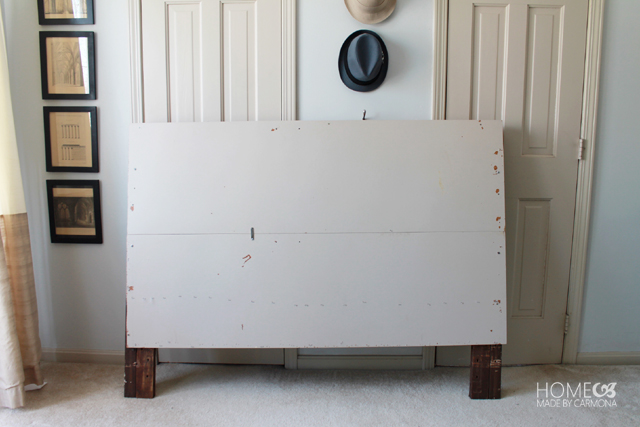
You don’t need to use anything fancy, it isn’t going to show! Use scrap wood (any type will do) cut to the length of the headboard frame. I had two MDF doors from an old broken wardrobe that I cut to length and nailed onto the frame. Nothing fancy or pretty, just nail through the boards to the frame to secure it…screws will do if you prefer.
This particular headboard was lower than I wanted, so I nailed the wood to the frame higher up (so it overlapped), and simply framed out the added height with scrap 2×2’s.
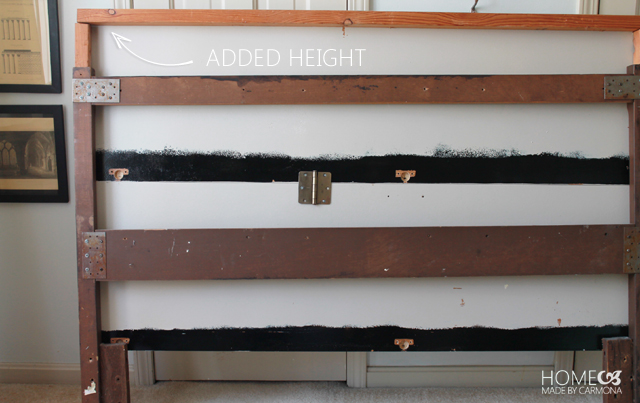
As you can see from the back, this is the most ghetto frame ever. Use whatever salvaged items you have. Yes, that is a door hinge connecting the two pieces of salvaged wood. You can even see that the 2×2’s (2×4’s would work fine too) do not even line up perfectly… again perfection isn’t important when it comes to your frame, just that it is sturdy.
How To Build A Headboard Frame From Scratch
You don’t need building experience to make a headboard frame. There are a lot of ways to make it.
Use 1/2″ thick plywood or MDF the size you want your headboard to be, and screw 2×4’s along the top, bottom, sides (with extra length for feet), and across the middle to stabilize it. The most sturdy method is first to connect the 2×4’s using pocket hole joinery, then screw the plywood onto it. But if you don’t know how to do that, you can also screw the 2x4s together normally and additionally use galvanized steel tie plates to secure them.
2. Marking & Drilling Holes For Tufting Buttons
Next, you need to mark holes for tufting.
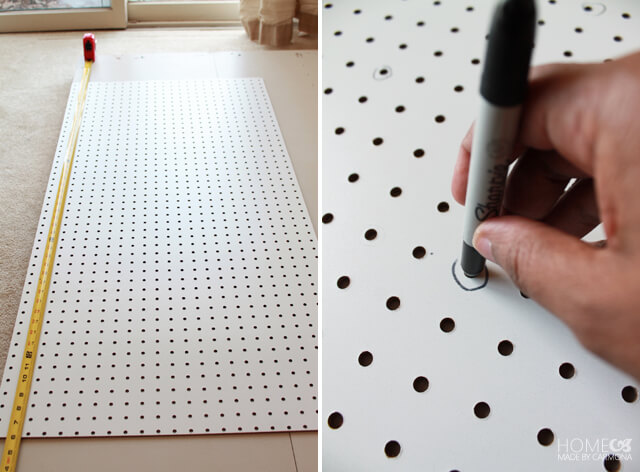
There is nothing I hate more than measuring, so I borrowed the pegboard from my craft room wall and used it as a template to mark a diamond pattern on the wood that acts as the front of your headboard.
Here’s what you do:
1. Measure and mark the center of the wooden front of the headboard frame
2. Use that mark to center the pegboard on the headboard
3. Start from the marked center, but three holes down, and work your way across that row
4. Use a sharpie to dot the headboard wood beneath; it helps to circle the outside of the dotted peg hole so you don’t forget where you already dotted
5. Dot and circle a hole, then count 8 and dot and circle the eighth. Do this all along your row horizontally, and also vertically.
6. The second row should be staggered and start down and across from the fourth hole to create a diamond shape (see image below)
7. When you run out of pegboard, simply move it over and line it up with the dots that you have already created. Continue until the entire top half of the headboard is marked.
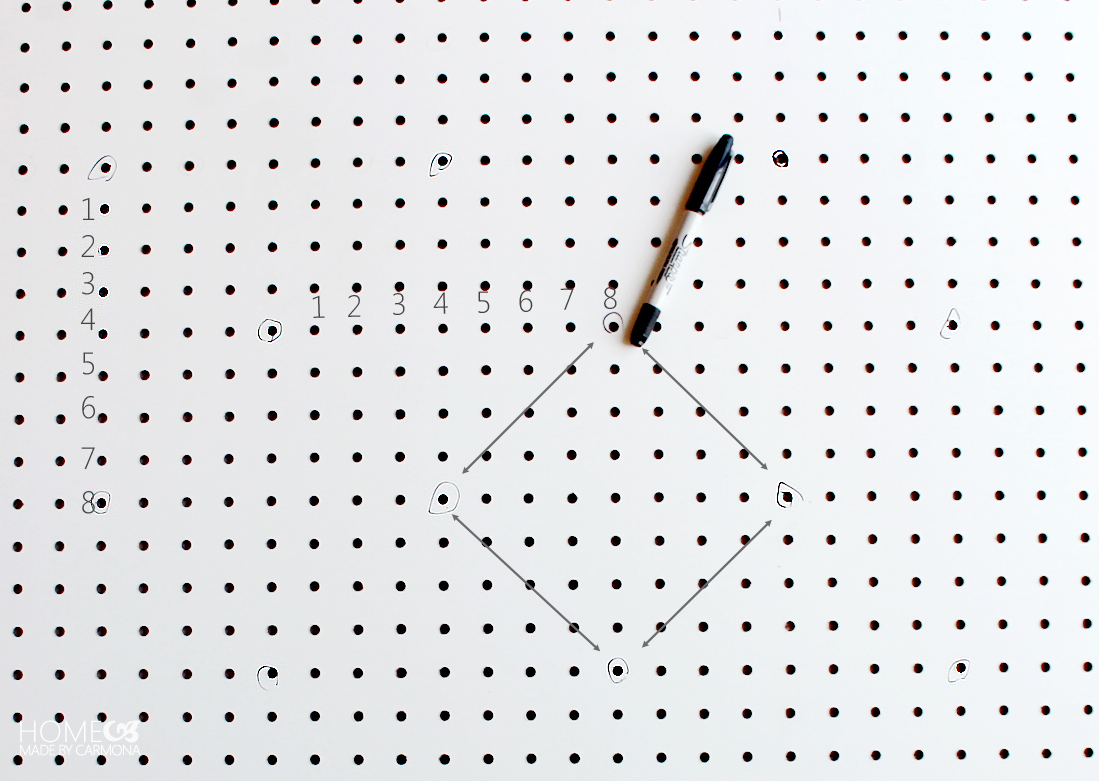
Once you have finished dotting the surface of the headboard, take a moment to double check that you haven’t missed any spots. Having circled the hole you just dotted will help you with this! Nothing is worse than removing the pegboard only to discover you forgot a hole and having to line up again. TIP: Don’t create dots right up to the edges of the headboard, stop several inches short and give yourself a small perimeter.
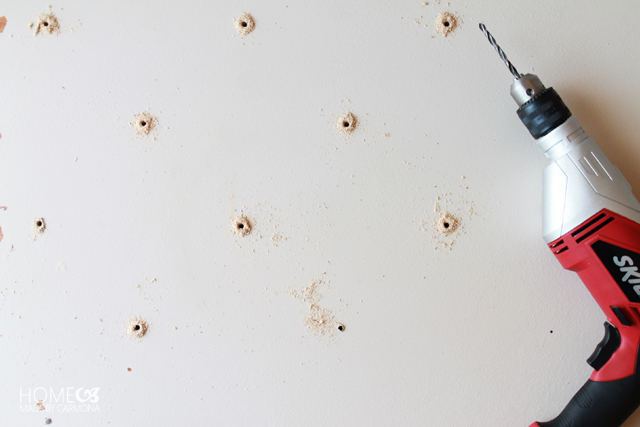
Next drill through all those dots! Don’t make small holes or too large of holes: I used a 1/4″ drill bit. The holes must be wide enough for a needle to poke through easily.
TIP: If there are any holes blocked off in the back by the frame, drill all the way through the frame itself so you have full tufting access.
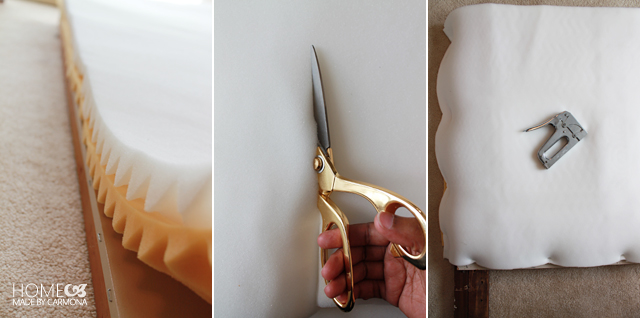
3. Padding The Headboard & Covering It
Clever money-saving tip: Use twin-sized egg carton mattress foam (a cheap mattress pad) instead of upholstery foam. It is SIGNIFICANTLY cheaper than buying 2-inch foam. I had one old one I never really used, and one I bought from Walmart for $11.
This will give you a couple of inches of foam, but for deep tufting add a couple of layers of batting.
Place it on top of the headboard, egg carton side down. Line it up with the top and sides of the headboard and trim any excess not needed. Next staple the sides and bottom (not the top).
Be sure you have enough fabric for the size of your headboard, deep diamond tufts will require more than the width of the headboard. You’ll want 10-12 inches of extra fabric on all sides (that is 20-24 inches longer than the width of the headboard).
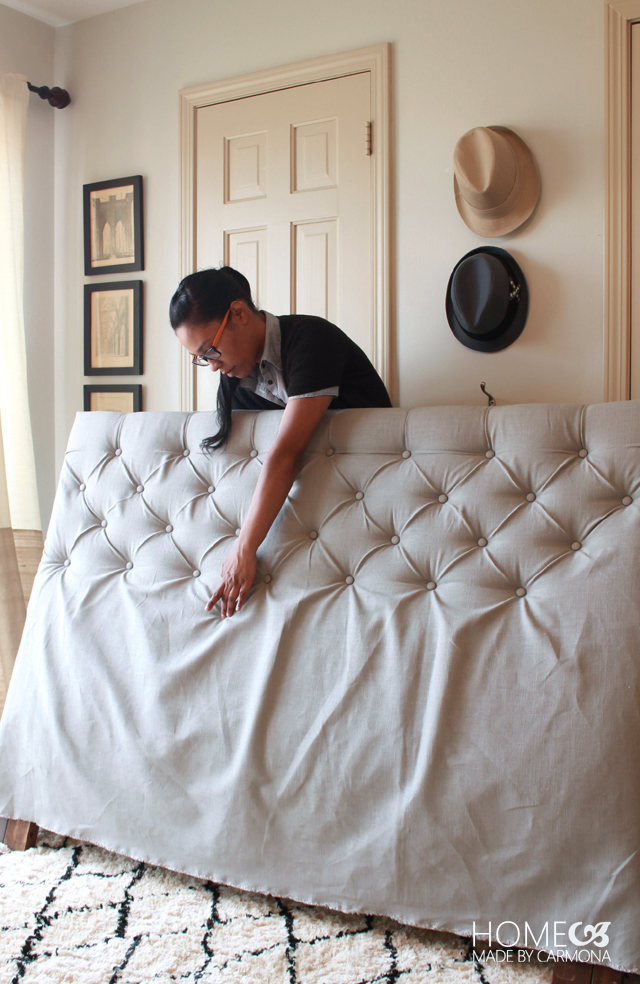
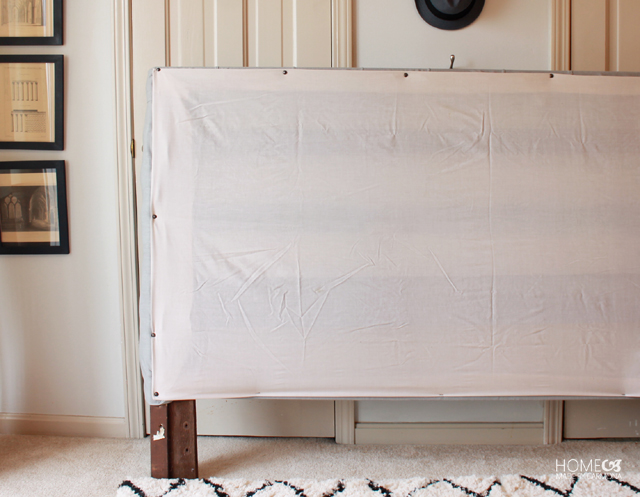
Drape the fabric on top of the egg carton foam and layer of batting. You can use clamps or push pins to help hold the fabric in place along the edges.
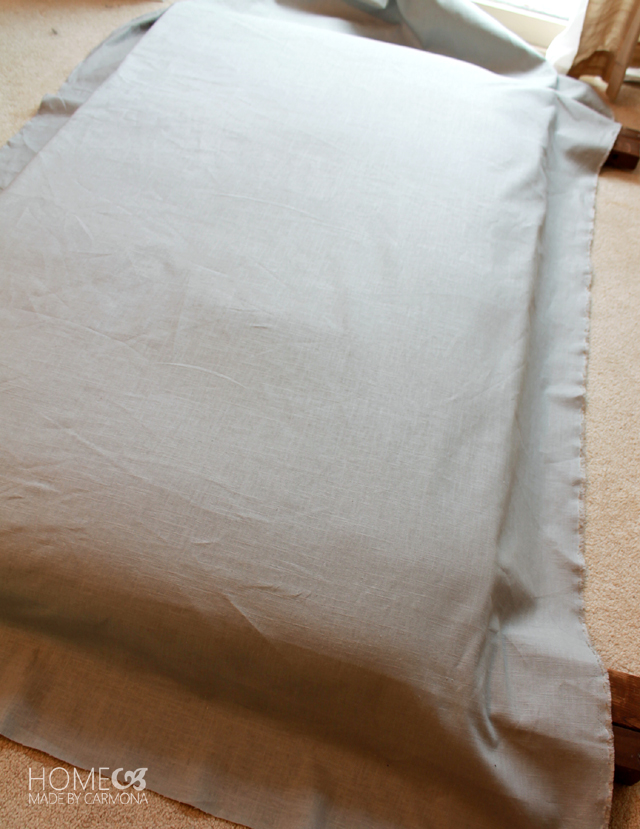
While keeping the fabric draped/clamped in place, raise the headboard upright and prop it up against a wall at an angle for later. You need to be able to access the back and front.
Design TIP: Choose pretty fabric, but a solid fabric design is best for tufts and upholstery fabric is the most sturdy option.
4. How To Make Custom Covered Buttons
It’s time to start covering your buttons. This is the hard part of the project.
Read the instructions on the back of the button covering kit, then return here and read these tricks to make the process easier.
Oh, and be sure to use my Gorilla glue tip, you do not want button covers popping off…ever.
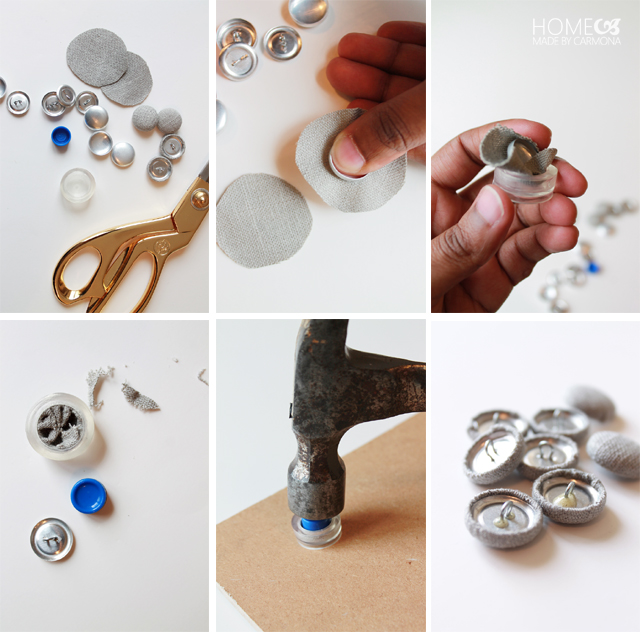
Button Covering Tips:
Not all kits are created equal, I bought two of the same brand, but the rubber mold was a better fit from one kit than the other. You will need to buy more than one kit anyway, just try all the rubber molds until you discover which you like best.
- Cut the fabric slightly bigger than the template that comes with the kit. It is better to trim off excess fabric once you get the button inside the rubber mold than struggle to get the fabric centered.
- Slide the button shell and fabric into the rubber mold on its side, then slowly work the rest of it in. It doesn’t just pop in otherwise.
- You don’t want ever to have to do this again, so before you insert the back with the shank, lift up the fabric and add a dab of Gorilla glue around the inside edges. Put the fabric back down, add a small dab of glue to the center, and THEN add the button back with a shank. If you add too much glue, it will foam out the shank a little; that is ok as long as you don’t add too much. If too much glue comes out, sop it up with a napkin. See the image above? You will see a little Gorilla glue that dried in bubbles outside the shank…which I prefer because it dries hard and fortifies the button. Allow the glue to dry overnight before using the buttons.
- Holding the pusher over the button to hammer it in place is very hard! It slides out. My super smart tip is to hot glue the pusher to a wooden paint stir stick so you don’t catch your fingers while hammering it in place!
5. How To Tuft The Headboard
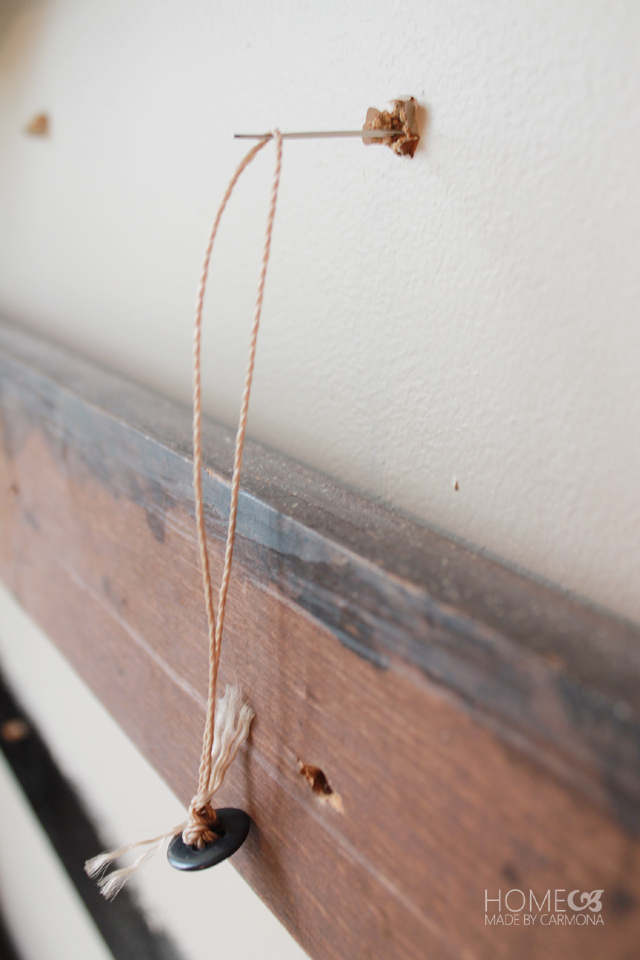
Use a long upholstery needle with a fat eye, regular buttons, and upholstery twine. This twine is thicker than upholstery thread and smoother than some types of twine, which causes it to unravel easily, but it is the best for pulling through the foam and fabric. Just be sure you knot it well (and many times) so it won’t unravel or loosen over time.
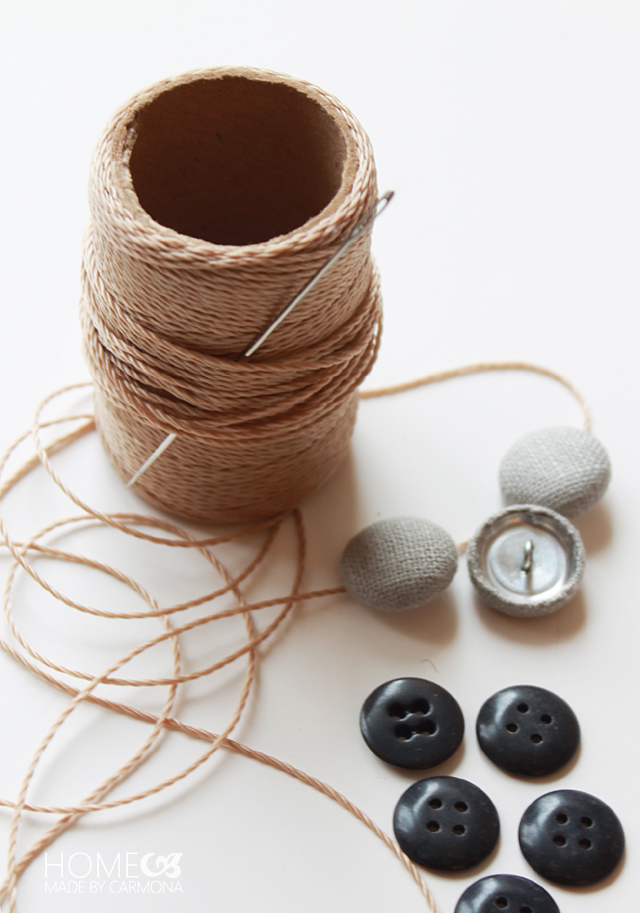
Start by threading a long piece of twine through your needle, then threading a button through to the ends. You’ll want to really make that button stay securely at the bottom. Go ahead and thread it through all 4 holes securely (as if you were sewing on a button) and tie several knots.

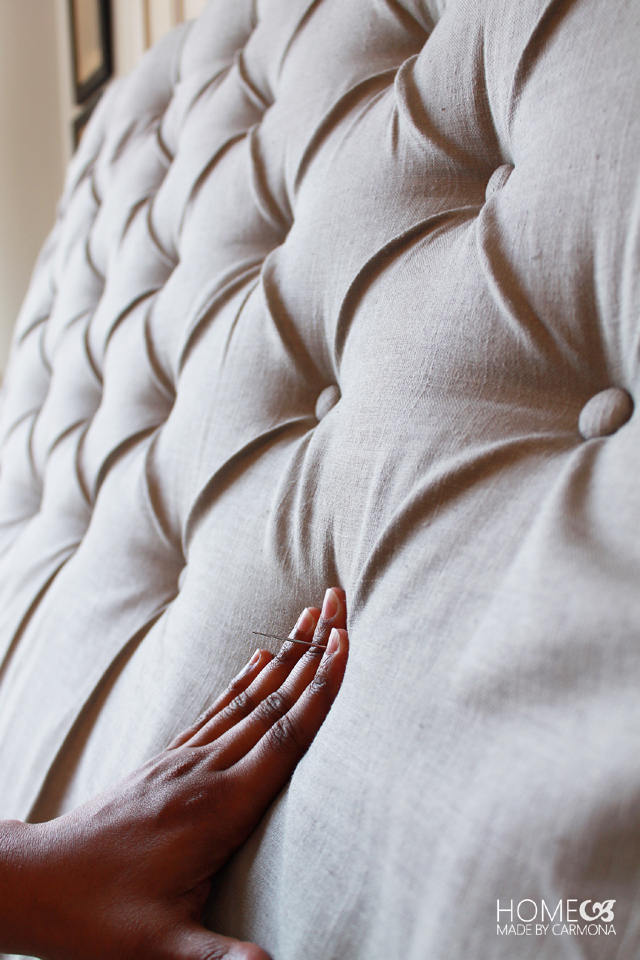
Push the needle through the drilled hole from the back to the front. Start at the top and center-most hole, and be sure to keep your needle straight.
While you hold the needle from the back, carefully press down on the foam from the front until the needle protrudes through the front. Pull it out slightly. Then you will be able to walk around to the front of the headboard and pull the needle all the way through.
Now you can thread your covered button in the front.
Threading the covered button in the front:
1. Thread the needle through the shank of the covered button (the hole).
2. Loop it around and through the shank again.
3. Pull the button down the thread and tight, as deeply into the foam as you can. The loop should cause it to hold in place for a bit; if not, just pull it tight again.
4. Cut the thread end and pull the needle off.
5. Tie (like you would shoelaces) the two pieces of twine tightly into the underside of the button.
6. Pull the two twine strings to the opposite side of the button and tie off again. Do this several times alternating between the two button sides so it is secure.
7. Cut off the excess string and tuck it under the button.
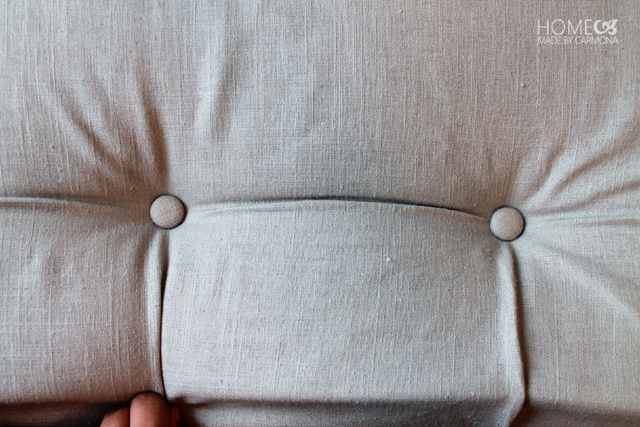
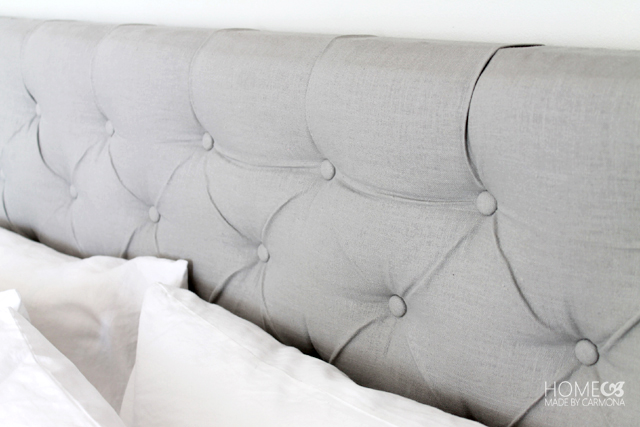
8. Pinch the fabric to create a pleat.
Before you move to the second row, there is a bit of information you need to know about the first row. The one thing I messed up was the first row, so sadly not every tuck in my headboard is flawless, but yours can be!
The Critical First Row
Through trial and error, I began to realize that I didn’t do one important little step at the beginning, but in my defense, when you are creating the tutorial rather than following one, you don’t always get it right the first time. So be sure you do this step correctly so that every single diamond is perfect. Some of my diamonds lack that perfect tuck and deep tufts.
Make your tufts deep (minimum 1/4″), and ensure they maintain that tuck when starting the second button.
Right after you do your first button, stop and pinch the tuck to create a fold-over lip that goes up to the top. Now add the next button, then create the pleat again… this ensures you have exactly the right amount of “give” needed between each button moving forward. It allows that perfect little pleat tuck between each button in the top row, and affects the rest of the rows as well.
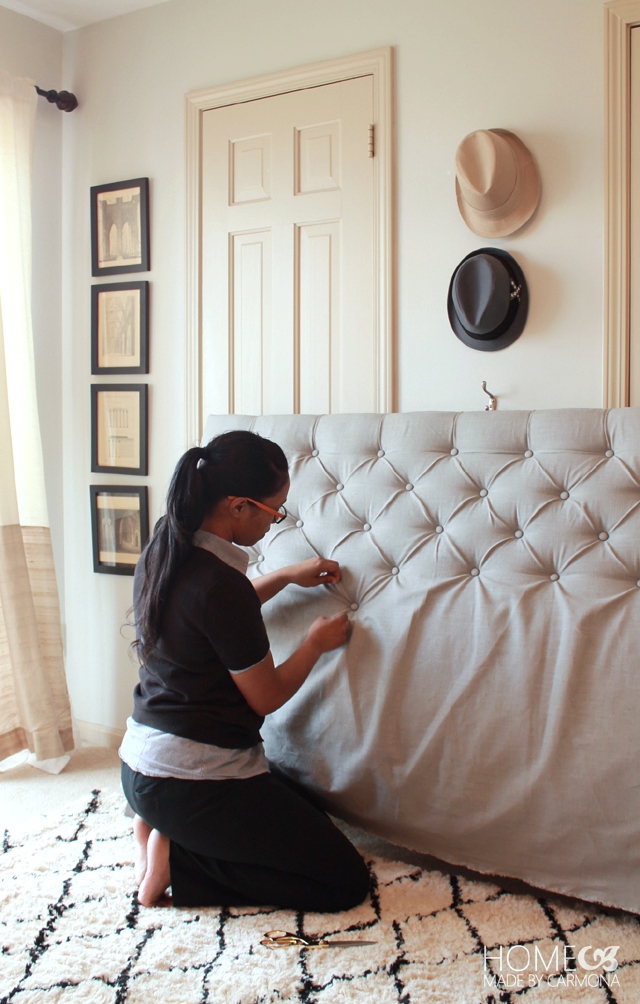
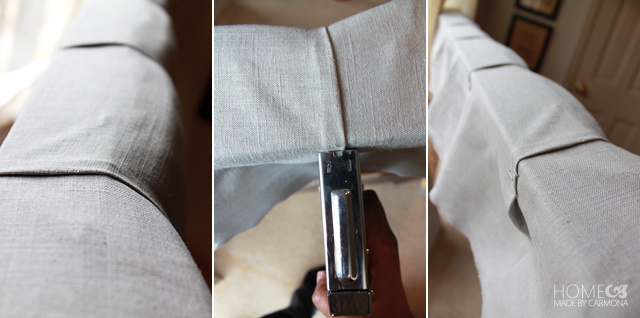
Once you have completed the first 3 or 4 buttons, pull the top pleats tight and staple in place at the back. Make sure all your tuck pleats are facing the same direction. Continue with the other buttons in the top row, then be sure to staple those pleats in place as well.
Now that you are done with the first row, you can move forward tufting the rest of your headboard normally. This time you are going to pinch sections to get that perfect diamond shape after you add each button.
Securing The Fabric
Once you have completely tufted your headboard it is time to secure the fabric all around. Lay the headboard face down on the ground for this step. You have already completed the top, but it doesn’t hurt to add a few extra staples. To achieve nice corners on your headboard, fold and tuck the top sides down and pull across to create a perfect top-to-side seam, then staple in place. Continue down both sides, pulling the fabric taught as you go. It must be straight and look good from the front, not the back.
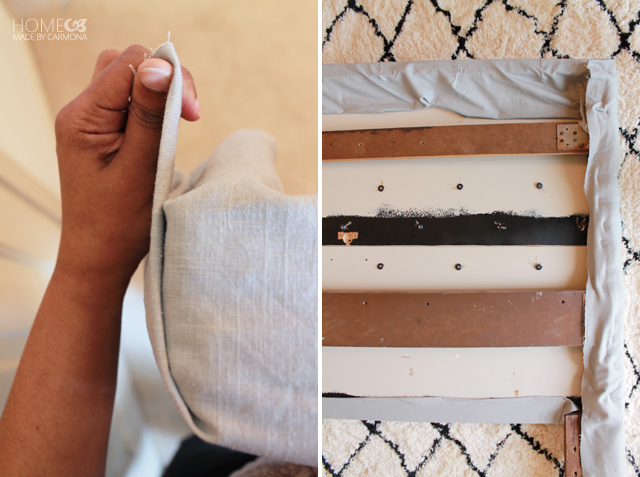
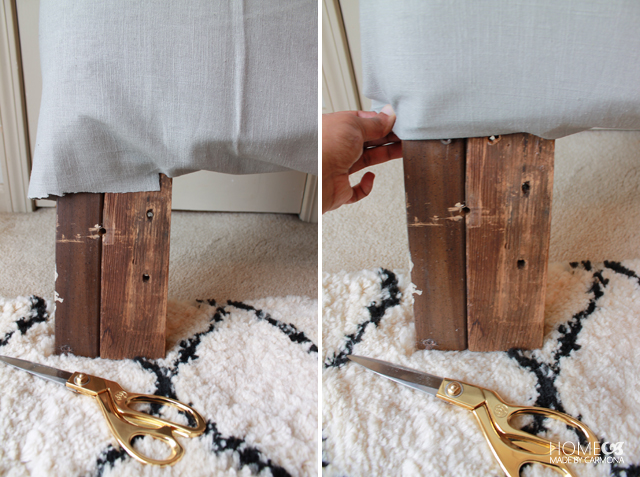
Before you staple the bottom, lift the headboard upright again and trim any excess around the legs. Tuck under, pull tight, and staple from the back. No need to staple the front of the leg, it is pulled tight from the back.
6. Adding A Backing (Optional)
The front of the headboard will look amazing, but the back of the headboard shows all the rows of buttons with knotted thread. Use an old sheet and a few upholstery tacks across the back of the board to hide it.
I spaced my tacks fairly far apart to easily access the back if needed. TIP: If one of your buttons starts to look a bit loose (or you didn’t tighten it enough in the first place), go into the back, pull the string with the button tight, and staple it a little further down. Now the staples are holding the string with the button so it is pulling tight…no need to restring that button.
Enjoy Your Stunning New Headboard!
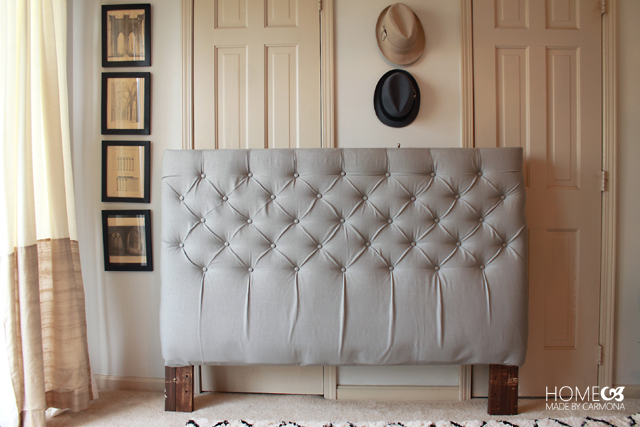
I hope you love your DIY diamond tufted headboard as much as I love mine! Now make that bed plush and lovely with just the right bedding.
If DIY isn’t your thing…Shop These!
On the other hand, if you are feeling a tad intimidated about this project, here are some tufted headboard finds you can order today! (Affiliate links below)

Like This? You’ll Love These!


Learn how to make a custom nailhead headboard | Easiest way to turn a door into a headboard | Tips for making the coziest bed ever! | Learn how to plan the perfect bedroom layout | Budget styling for a girls bedroom | Check out this sophisticated teen girl bedroom style | Tips for styling a bedroom lounge


Hi there Carmona, I thoroughly enjoyed your blog and will make a diamond tufted head board just like yours that will go with my end lift ottoman bed perfectly. Thanks for showing us each steps along with the pics, that will really help
Ursula, you are an amazing instructor. I understood everything and feel pretty sure I could imitate the project. I can’t say that for many of the bloggers out there. Great job and you should be proud.
Thanks for sharing great information with us. Its really helpful and i really appreciate you efforts.
Great great tutorial! It seems to be very easy but in reality I’m afraid it’s not:D however, the resoult was warth this work <3
Looks great. I can’t wait to do mine at some point. I’ll be starting from scratch as I have no headboard at all at the moment.
Truly amazing! I am looking for ways to change my room and this headboard is going to be a good addition.
You really did an amazing job! I always wanted to decorate my room with diy projects. I love what you did with your old headboard. I will try this too😍
Hi, I was just curious how much fabric you got to cover both the headboard, AND the buttons?
It didn’t take much, a couple fat quarters worth will cover the buttons…then just measure for at least half a yard extra for your headboard.
Hi Ursula! Thank you so much for his tutorial!!! I was so intimidated by making a tufted headboard till I saw your post. It was so helpful in making my own! I used faux leather (cream color) and gold irridecent silk fabric for the buttons. I would love to show you the end result but don’t know to post a picture with my comment here.
Hi,
Since I don’t have an old headboard to go off of, what type of board could I buy that’s strong enough from Home Depot or Lowes?
Thanks
I used 1/2 inch plywood from Lowe’s! it’s nice and sturdy (1/4 inch was too flimsy), without being too heavy (3/4 inch was insanely heavy)!
good afternoon! i am getting ready to tackle this amazing project you put together so nicely! my question is where on earth did you find an egg crate mattress pad for $11?? i checked my local WM and theirs are all $25 or more…
I got the cheapest mattress topper I could find at our walmart…the Twin was $10, I opted for the Queen ($15) so I could double up the softness since its for my toddler. I also wrapped some excess around the top to keep it from banging against the wall (her current headboard does this, and I’m pretty sure its one of the reasons she wakes up so much)
Hi, I’m following your tutorial but got carried away stapling all the edges, I’m planning to hang mine on the wall and am not sure why it says to only staple sides and bottom? I have 2 egg crate mattress covers and batting before my fabric, the indentions from my staples are evenly spaced also.
Do you think this would work if i used a giant piece of thin wood panel and attached it to the wall? You know kinda like hotels have the headboard attached to the wall…..OHHH and one more question….could i just make the indentions by stapling into the panel (through the foam) and glue the buttons to the indented area?? I know that sounds super ratchet LOL but I can not sew well.
Yes, a piece of wood to attach the headboard would absolutely work! I would use screws or a nails (not regular staples, but maybe long nail gun staples). Although, I will say this is a whole lot less like sewing and more like a ton of knot tying! lol! Good luck!
Hey,
I am assuming you had a divan base bed. How have you attached the head board to the bed ?
My headboard is freestanding. I never found the need to attach it to the bed since it sits against a wall.
En español por favor.
Can you tell me what thickness mattress foam you used?
Hats off to you Lady!! Thank you for your time and help with creating this fantastic opportunity to have detailed information on how you’ve made this 💝
From the materials needed to essential tips on how to get done perfectly
Many thanks Rain x
Thank you for creating such a detailed tutorial. I’m in the process of remaking my guest bedroom and the thought occurred to me tonight that a tufted headboard or upholstered one would take the room up a notch. I currently have a mission style headboard and was thinking it would be the perfect frame for a project such as this. Qs. Do you recall what type of fabric you used? It looks lightweight, but sturdy.
My pleasure! It is a home decor fabric…specifically designed for upholstering. 😉
Girrrl, Wow, just wow. your ability to get these steps across so clear and unintimidating are an amazing talent in itself. What a blessing you are to DIYourselfers. Ill be following and excited to learn more from you. Fab!
I’m a fellow DIYer and this just motivated me to start my headboard today! I will use your blog as a guide through the process. Thanks!
So helpful, just ordered a new bed and needed pointers on how to modify the headboard 🙏🏽
You made this look so easy! Cross you fingers for me that mine turns out as well as yours! Thanks for all the tips!
Thanks! I’m sure you’ll do amazingly! If you do make this, feel free to share your project…I loooove seeing everyone’s take on this headboard!
Hello,
I’m from abroad and saw your tutorial and want to make it. I just want to know if the button set is sold on Amazon and the rubber molds as well, what would I search for them as? This is an awesome tutorial and I hope I can make it before my wife gets back! Thanks! 😀
Hi! yes the button set and rubber molds are sold on Amazon. You can find a link at the top of this tutorial in the “Materials” section. Good luck!
Ursula,
I build a lot of things and invent ways to make almost anything.
This was an amazingly thorough and clearly explained process.
I can’t wait to help a friend of mine, who wants this headboard!!
Thank you soooo much.
Bluebird
That is a high compliment indeed! Thank you, I’m glad you found it clear and thorough. Thanks for following!
You’re awesome
Aw, thanks! <3 I think you guys are awesome...all my super amazing and supportive readers who make every project worth it!
I am in the process of making this. I am having a hard time getting the fabric to stay pleated. I get it to pleated but then it doesn’t stay and just looks like I didn’t get the material tight enough. Any advice?
What type of fabric are you using? The heavier ‘home decor’ fabric is ideal…it’s a thicker fabric that is used traditionally for upholstering furniture. It also helps to make sure the padding is thick enough and the buttons are pulled tight and deep enough to create a nice deep crease. Hope that helps!
Did you get your fingers hurt with the string???
No… But your fingers will be sore from pushing the needle through plus from button making. So use a thimble to help do that, and save your fingers! 🙂
Yes!
I so love thiis. One day i will make my own diamond tufted headboard. It’ll be made of midnight blue silk! ❤️ thanks again!
That’s brilliant! Really good job!
Hi! One question, can I just buy fabric buttons?
I don’t see why not, I used 1 inch crystal buttons for my daughter’s and they worked great! I just skipped the section about button covering and followed everything else…if you need them to match the fabric, you may want to do it her way though just to be sure they match.
Hi, I’m in Nz and those pegboards are incredibly expensive. Can you tell me the measurement of the diamond- I’ll have to mark it on my plywood… And can you slow down the frame of threading the headboard button to tie it off. Thank you
Yes please! I do not have peg board and would need measurements please.
Hi. I love your tutorial for headboard. I’ve watched many. When we made our headboard my husband pur it together and he didn’t do buttons likeI wanted. Do you think if I undid it I could add buttons? It just makes it so much better. Thanks
I used a thick memory foam mattress pad i already had and to use the needle and thread on my king size bed having RA was too much for me. I used screws and washers to make the foam tucks deep enough and glued the buttons into washers and used gorilla glue to attach them. Nobody has a clue until i tell them.
Thats smart!
Absolutely Stunning! Love the re-use of items. I may just have to make one of these:-)
Hi Ursula
Always wanted one of these – and now I can make it myself! Thanks a lot. The same thing as with you – champagne taste on a beer budget…
I did it! Best tutorial ever! Cost approximately $65 for fabric buttons and mattress pads. Waited for 20% off total and coupons and WOW! The only thing I added was using the extra fabric to cover the legs with s glue gun. Totally cosmetic but a nice finish. We made the frame from old wood in the garage! Wish I could upload a photo to show you #imsoproud
High five! You should be proud, talk about rocking the project and the budget! #waytogo
I enjoyed reading this so much – not only was it informational, but you are so funny! Thanks for sharing this. You’re a champ!
Hi Ursula,
Thanks for sharing this. I did one in grey velvet. Mine ended up costing a bit more than yours, at about $120, mind you that Is in Canadian dollars, so that probably works out to about $25 American 😉 Loved your tip about using the paint stir stick for the buttons. I found using the waxed button thread helped a lot.
Thanks for sharing
Button tip: Instead of a hammer, grab some pliers and squeeze that button together around the edges. (I actually used my teeth. Works the same way)
This is SUPERB!!! I’m doing this! Going to look for a cool fabric
Thank you so much for sharing
Love from Paris
I’m just seeing this for the first time and would love to give it a try! My question is… my headboard is attached to by bed! Do you think I can do this without removing that piece?
You probably could, although I’m not sure I advise it. I think it would be more professional and less raw edges of fabric left exposed to tuft it first, then re-attach the headboard to the bed sides.
You are Amazing! A girl after a DIY heart! When you said you have expensive taste you have to be a DIY! I ABSOLUTELY LOVE the way you used items from around the house. I think we are twins. I don’t throw anything away. Because I am DIY. I always say I can use this. I don’t know how but I know I can. My friends laugh because I can fix any and everything. Especially with all the gadgets I don’t throw away! I’m doing tufted king headboard. This has helped me immensely God Bless you girl!
Aw thanks! I meet more kindred spirits because of this blog than I could have ever imagined! So great to “meet” you. And thanks for following along! <3
I keep coming back to this tutorial and I now just moved into our new home and I think we forgot a piece of our headboard somewhere in the move because it won’t stay straight up now! So, now I am thinking I am going to just put it in our storage and use a pegboard (you can get them at home depot for next to nothing) reinforced with wood and actually attempt this! I want to be brave and be able to say I did something like this, but it makes me so nervous too!!
I used a wooden door I bought at Habitat for Humanity for my King Size bed. Fit the width perfectly without any trimming. I did not tuft the fabric, but used Velcro to attach fabric to the back of the door. I can remove and wash the fabric when needed. Love the look of the tufts and may have to re-do on my next bedroom re-decorate.
I am right smack in the middle of this project! The frame is made, but I can’t find a fabric in this same similar color — I love that it’s a warm light gray. Do you remember the type/color of this at Joann’s? I did go to the store but it seemed like all their choices were not gray enough to be this. Thanks!
I wonder could I make that I am a bit of a useless type of person
You are amazingly talented. I would love to do a project like this.
So i have a few thoughts: 1st of all, WOWWWW! That is really beautiful 🙂 – i am a little awed, haha! And I’m a DIY girl at heart too, but…. I don’t know… i feel a little amateurish right now. OK, 2nd – you crack me up as well! I really enjoyed reading your intro and directions. Thanks for this post! (I’m going to read all of your others now!!)
Aw, thanks! You’re a sweetie! I won’t lie, it is a big project on the fingers…but worth it!
Is it necessary to use the glue when making the buttons? currently making a similar headboard, and made the buttons without using glue… I hope they will hold !
Thank you so much for this DIY tutorial, definitely going to try it myself. How much fabric did you buy or can you provide me with the dimensions ?
Thank you
Hi, Thanks for the tutorial. Would you mind telling me the beautiful off white wall and cream wood/trim colors you used that I see in the background of this tutorial? Lovely…All of it! Any help you could give would be greatly appreciated.
Thank you kindly,
Susan
Oh, I wish I could! I’m so sorry, but I used discounted mis-tint paint from what I call the “Oops” section of the paint store. I no longer have the cans either.
Thanks!
You are the bizness girlfriend! Excellent job, I so enjoy seeing women use their intelligence and mind to accomplish goals, create stuff and get things done. A woman’s mind is so underrated, our body IS beautiful but we have so much more to offer than beauty and your representing us intelligent, witty, creative women very well! Much respect!
Excellent work…
I would to see more pics on step by step on the process…
Thank you
JC
I am gratefull for the tutotial.
It was work…but worth every minute of it. Carmona’s tips were life saving, especially for a novice diy-er like myself. I don’t even own a sewing machine. Lol! After 3 full days of hard work I’m almost done ( My goal is a tufted wingback Cal King headboard & frame. Crazy ambitious, right!:))
Here’s a peak at my project so far.
Many many thanks as I could not have done it without you. 🙏🏽
I’m so happy to hear the tutorial was helpful! You are crazy ambitious, a DIY’er after my own heart!! High five!
Such a wonderful tutorial! I’m going to make moment in your shadow! Thank you for all your details and pictures, phenomenal job!
Well done! I am a custom upholsterer going on 20 years and you did great all around, from explanation to workmanship for your first. For some tufting can be tricky but once you get the hang of it youll be a tufting queen! One trick is to start in the center center then a top row and a bottom row then the side to keep your fabric loose and create the crisp diamonds as you go instead of a whole row at a time. 😉 keep up the great work and i love seeing people dit! We are a dying breed so thank you for keeping us alive! If you ever need any advice eel free o contact me!!!
Oh wow! I wish I had your incredible skills. Thank you so much for the extra information, and the kind compliment! I am learning more slowly but surely, and excited to share every step of the way!
Please can you give measurements for the button position as I do not have pegboard. All diy sites only use it. Please help. Thank you. Champagne taste and lemonade budget!!!
Hi Belinda, really you can make it any size you wish… I chose to make my holes about 9 inches apart from top to bottom, and about 8 inches hole to hole horizontally.
You did a wonderful job Ursula. Love your creativity. If I was younger I would give it a try but the hands don’t work so good anymore. Thanks for sharing your talents. I wish younger people would do more with their own creativity. We all have it. Why buy at Walmart, Ikea, Target etc. when you can do it yourself and it is better quality.
Still trying to find a cheap bed frame so that I can make this beautiful headboard. I noticed that you have a cross-wise board from the old frame – was there space for you to do any tufting that may have lined up with this or did you have to make sure that holes in the front boards didn’t go in that area? I hope this question makes sense – it would be so much easier to draw a picture than try to describe!
Great question! I think I understand what you are asking. 😉 The boards across the back of the old headboard did make it harder to tuft, but the boards were narrow enough for me to do my tufting by reaching around it.
Totally loved this!! If I have a wood twin headboard, I wonder if I need the reinforcement like you did? Hmm is this upholstery fabric available only at a craft store? Really great work you did thought thank you for showing me something fab!
Thank you! You may not need reinforcement, I just added height to mine since the headboard was shorter than I wanted. I sometimes buy curtains and use that as upholstery fabric! 🙂 I find such pretty prints in wide curtain panels…
Beautiful! I’ve been wanting to make a tufted headboard, but all the DIYs I’ve liked have seemed to require more sewing skills than I have – until now! I can definitely get behind precut foam and a staple gun vs a sewing machine. Thanks so much for sharing!
Do you make any to sell
No I’m afraid I do not. I just teach. 🙂
Ursula….girl..YOU NAILED IT!!!
Thanks chica!
If you buy the materials I will make it at no extra cost. The practice, the pics, and a review would be awesome for my portfolio.
Thanks very much. Followed this religiously and now have a fabulous grey silk tufted headboard at home 🙂 Great tutorial.
Wow! High five!! Please do share your marvelous creation with us over on Facebook!
How many yards of fabric did you use to make the queen sized headboard? Thank you for the tutorial!
3 or 4 yards will be adequate. 🙂 Thanks for following along!
Wow this is such a great idea!!! I love this and definitely going to have to try it out in the future. I have always wanted this, but how you stated early they are just super expensive and not in my college budget. Thank you
This is amazingly beautiful!!! I’m planning to do this on the back of my settee for my new dinning table 😲😍 btw I love those gold frames where can I find them??
Thank you! I got some of these frames from JoAnn’s Fabric stores. They were brown and black and I spray painted them gold!
excellent job. i also like your carpet and how you hung the hats to the wall:) i am really considering doing this. we just moved into a home and there is not much money left for a fancy bedframe. how long did this take you?
Thank you! I took a lot longer than it needed! Lol! I was being lazy and took my time on the buttons…I would do a couple, and then get a snack, and then do a few then surf Facebook, then… well you get the idea. I’m afraid I don’t know exactly how long it will take.
Hello,
Great jo. on the headboard. I’m going to work on mine this weekend! it wasn’t quite intuitive for me from the progression of the tutorial regarding the tufting. Did you start with the first row, then stapled the fabric to the top of the headboard?
Thanks!
Why can’t I copy or print this page? The font won’t show and I can’t change the color ?
How much fabric did u need? I am going to try this out on a King size headboard this weekend.
I would like to know this too but on a Queen headboard! I know that the width of the Queen is 60″ so the length of the fabric will have to me more than that, but the height (width of fabric) is tricky because my research says it depends on the style of the bed.
Hi. I love this. Can you tell me what kind of fabric you used?
It is a home decor fabric, so it is a thicker cotton blend, like that used on upholstery. Thanks for reading!
What would you say your height of the headboard is?
How big would you say your headboard turned out to be?
I made it to be wide enough for a King or a Queen sized bed. 😉
Hi,
Thanks for the great tutorial! I just finished a twin sized headboard for my daughter! You had the best tutorial for this project!
Hi I have a King Size Victorian Headboard with two columns on the sides footboard has smaller columns attached as well do you think I could also make a tufted headboard design too? It seems it will be much more difficult but I’m almost sure I can head on to succeed, I can sure use some tip’s please. Thanks much looking forward to hearing from you!:)
With enough creativity and skill anything is possible! 😀 I imagine the columns would make it a little harder, but not impossible. You will definitely have to tweak your approach to it. Hm, without seeing a picture of it, I’m afraid I can’t provide tips…feel free to share a pic with me via FB or email, and I’ll give the best advice I can offer. Best of luck!
I own an upholstery shop and if you have arthritic etc. hands just go to a shop near you and take some fabric and ask if they will make you some buttons (prong or loop).Of course the price will vary. Ask for a price before you tell them to make them. Really saves on your hands. I agree with the person that used the prongs because the thread you use can be harsh to your hands too. Love the tutorial !!
We made this and LOVE IT!!! Your directions were excellent. Thank you so much! After pricing headboards like this and realizing they were upwards of $500, we were crushed to realize we’d never be able to buy one for our daughter, who was using a broken headboard that was missing pieces and barely held together. We beefed up the frame and made your head board. LOVE it! Took 13 hours to make, but worth it. Your tip on using a paint stir stick hot glued to the button cover pounder thingy was key. Thanks so much! Smiles all around!
Awesome! You guys rock!! I’d love to see a picture…if you are every inclined to share your work of art with me and the rest of the Home Made by Carmona readers, upload a photo to my Facebook page!
I’m so glad you like it and found it helpful! <3
Love this!! How much fabric did you buy to cover the frame? I have a Queen size headboard that is about 36″ high and 48″ wide roughly…
Beautifully done! I have been looking for a great tutorial for a long time now. Thanks so much 🙂
Great idea, Loved how you’re thinking outside the box to save $$! Looking forward to more of your ideas.
Ursula!!! What an amazing job. I keep coming back but I have been scared to tackle this project. I am going through your tutorial with my check list but I am lost on one thing – why do I need the regular buttons? Are they used to secure each covered button (on the back)?
I know it is simple but I am lost.
Thanks so much Liza!
You are spot on, the regular buttons are used to secure the covered buttons from the back of the headboard. I found it a nicer (more secure) solution to stapling and tying the waxed thread…much easier to replace should a covered button come loose as well! 🙂
Yes, a big project like this can be scary to take on…but budget yourself lots of time, and when you are done you’ll feel like you can do anything!! 🙂 Good luck!
This is a great tutorial and just what I was looking for! My fabric looks to be a thicker weave than what you have – do you think it will still pleat?
Thanks Marlene! I have used a pretty thick fabric on another project…so I’m pretty sure it will still work nicely! 🙂
I loved this. I did mines with Crystal for my daughters glam room! I got Prong buttons instead. You just stick them through the holes and bend the back end. It made it super easy!
This was a very well written and designed tutorial. I am going to try this for my daughter.I can do it thanks to you. I just found you on a Pinterest pin and I will be a forever new fan. Thanks for the inspiration.
Thank you! I’m so happy you are here! I love connecting with other creatives. 🙂
Very good…
Thanks a lot.
Big hug from Brasil…
Said
Please come help me, Please
Beautiful! Did you just attach this to a metal bed frame once it was done? Thanks!
Thank you! Even better…I simply “placed” it behind the bed (yes it is a metal bed frame)…It is nice and hefty, nice and long, so no attaching necessary. The mattresses pushed up against it holds it in place perfectly. 😉
I think you have done a very good job well done from me a person that do things in my house that some time never done before .
Thank you for the great tutorial! We were able to follow it with beautiful results! After looking at others I decided yours was the best method and I certainly made the right choice. We made ours in a queen size, 63″ tall with around 45 buttons. Gorgeous!
Fantastic! You rock!! If you want to share a picture on my Home Made by Carmona Facebook wall, we’d love to see and share your incredible talent! <3
Hi Ursula. Can you tell me what tyoe of fabric did you use? And for this shade of grey, what exact grey. I love your project. It’s awesome. Thanks)
Hi Kaye, unfortunately I don’t know the shade of grey…but it is a home decor fabric (designed for upholstery, etc.). Thanks!
This is extremely awesome, thanks for the tutorial
Divinooo!!! Me encanta, además te da muchas ideas… podés usar cuerina, telas gruesas de tapicería o podés reciclar pulóveres viejos, mantas o frazadas o tejer cuadrados de lana y usarlas… Precioso! Gracias por compartir!!!
job well done… I will defiantly try to make this ….you have inspired me….thank you
Love the headboard and I will be doing this with my wife as soon as possible. Since I don’t have a peg board, can you tell me how far apart each button is and how far apart each row is (approximately)? Thank you for your very detailed instructions and supply list.
No worries about answering this. I found the answer. I just needed to read more of the comments.
Lol! No problem Thomas! Thank you for the compliment by the way! I bet you must be husband of the year to do this project with your wife. High five!
Well done, loved it but I am not as brave as you. I know a friend who would give this a go . Will send it to her and maybe one day she will make me one 😀
Do you make headboards for other people
No I’m afraid not. Sorry! 🙂
Where did you purchase your staple gun?
You an purchase one from a hardware store (The Home Depot, Lowes), the craft section of a superstore (Walmart, etc.), or from a craft/fabric store (Jo-Anns, etc.).
Great idea! Thanks so much
Io not have a headboard and was wondering if you could just use peg board… Maybe the holes would even line up to connect it to the bed frame too?
Absolutely! I would be sure to still create a frame around the pegboard with 2×4″ wood, and a supportive strip of wood down the middle too. This will keep it sturdy. 🙂
Ingenious! I always wanted a headboard that looks fancy but never knew how to make one! thanks a bunch for your help!
Thank you so much for such detailed step-by-step DIY headboard instructions. So easy to understand with a beautiful outcome.
Thanks for sharing your talent!
Angela
I used this tutorial and it was amazingly detailed and gave me a gorgeous headboard! A few things that might be helpful that I encountered were this;
I made a cal King- because of that the twin foam pad for was JUST long enough to reach the sides of me headboard. I had enough to fold the foam over on the top and it does look better on the top vs the sides. Not a huge difference, but if I did it again I would get something long enough to wrap it on all sides. I also live in a very small town so I picked a great upholstery fabric when visiting a bigger town with a Joann’s. Once I got home it looked too busy- sigh- so I was stuck going to Walmart and as much as I love the color the fabric was a lighter weight and it was hard to get the pleats because of that. Spend the extra money (and time choosing) and get a heavy weight fabric. Finally, I needed a lot of button covers due to the cal King and that ended up being really pricey- listen to the tutorial and get a coupon before heading shopping. Thanks for the awesome tutorial!!
Thank you for your comments, I will be taking them into account when I make mine!
thankt – beautiful job 🙂
Yours bed befor wery nice, but i love nye look too 🙂
You did a wonderful job. Wish you were here to help me. Of all the how to s. Yours is the best. Thank you. Now I’m going to get started on my own ;-).
Oh thank you! That’s so sweet. 😉 Good luck on yours!
Hi there!
I was wondering, is it possible to use a metal head board instead of wood? Would the outcome be much different?
Thank you,
Caitlyn
I imagine you can’t staple metal.
Dear Ursula,
You have just made life much simpler and tolerable for my sweet husband and I. Bustling through the process with him created many questions, and after all the “inquiry’s” left me doubting myself. Magically your fabulous tutorial was unveiled. Thank you!!! The slow video feed for the button, genius! Now I am looking forward to discovering the assistance for which I fashioned right here on your website.
You are too sweet! I am so happy to have been of help with such a big project. I look forward to seeing your handiwork! Feel free to share it with me on my Facebook page! 🙂
You did a great job!
I just wanted to say thanks for posting this. It was your blog that made me decide to do mine and I just finished it yesterday. I loveit and I’m so proud of my accomplishment (I’ve even decided to refinish some bedside tables too since I’m in DIY mode.) I used my old bed frame which I upholstered and made a few headboard from scratch. Was hard work and putting the buttons on nearly drove me insane (I used upholstery thread about local craft store didn’t have waxed) so I couple buttons popped off during the process but they’re all good now.
Thanks for the inspo 🙂
You sure know how to warm a blogger’s heart! <3 I'd looooove to show off your headboard on my FB page! If you like, upload a picture to my Facebook wall, tag me, and add #HMCmaker . I’d love to see your handiwork! 😉
Hi Ursula! I love your work, you did a beautiful job. I’ve always wanted to try my hand at this and actually already have the foam from another project. I don’t have an old headboard to work with but I do have a frame from a full length mirror that I’ve been thinking of using instead. Thing is, I love the woodwork and craftmenship of this frame so don’t really want to cover it. Rather, I’d like to make a smaller version of your headboard to set inside the frame. Do you think this would work and if so how would I get the upholstered part to be almost flush with the outside frame? any tips?
Sounds amazing! So you are looking to inlay it with the diamond tufting and leave the frame showing? I think it would work and look beautiful! If it were me, I’d simply use pegboard (or wood as thin as pegboard) to tuft, then insert it. I’d love to see how it turns out!
Sorry for the late response and thank you so much!! Yes, this is exactly what I was thinking. I will be sure to let you know how it goes when I finally attempt it!! Thanks again!
How refreshing to read a do-it-yourself post that is detailed, ambitious and results in something highly professional looking! Thank you!!
This is absolutely beautiful and you made it look so easy – excellent tutorial and pictures. Thankyou so much. I am anxious to try it but first I will have to find and old king size headboard to use as the frame (I’ll try thrift stores). Thanks again
Hello! If you do not have a peg board, what else could you use to mark your dimond shapes?
Unfortunately measuring is the only other way, or creating your own template.
Thank you so much ? I’ve just finished my pelmet! Next the headboard, only thing I’ve struggled with is getting a pleat in every diamond? Sarah
Ah yes, I did too, the first time I tufted (this headboard), you’ll notice two of my diamonds on the end didn’t end up with a pleat. What helps is to make sure the fabric isn’t pulled too tight when you first start…then keep moving from the center outwards.
Thank you for the wonderful tutorial. We shared this great weekend DIY project on our Facebook page.
What size buttons did you use for this project? Does it really matter a whole lot between a size 30 vs a 36? Thanks much!!
It is really all about which you personally prefer. I chose which happened to be available in a high enough quantity at my store! lol!
i can’t believe I did this 🙁 🙁 !!! I was at button#18, and I was so happy how it was all coming together…it looked like yours :). As I was putting in my pleat and doing lucky button 18, I discovered that I had draped the material wrong side up, I could not believe it. Buttons off, material flipped to the “right side out” and I start over today. I just look at it as having had a practise round lol
Oh no! :O
Wow, I probably would have just kept going and pretended it was my intention all along. Lol!
Well, that “practice” round makes you officially a pro now. 😀 Do share a pic when you are done over on my FB page! Love to see it!
Hi Ursula, I’m so freaking inspired by this project, after 1 false start I’m almost complete! when I say almost i mean I’ve done the woodwork, marked out and drilled the holes. Just purchased my button kit 3×25 buttons I only need 45 but I’ve allowed plenty for the learning stage. I brought some beautiful creamy linen, this was the most expensive cost for my project but I don’t care because I saved in most other areas. As a man I’m reasonably handy with the tools, hammer, drill etc etc, I’m only a little concerned about the crafty work the pleating, the buttons but I’m sure I’ll make it right… I pick up the buttons tomorrow after a long effort in source them at the right price. I can’t wait to share the results with you. Cheers David
Hi David,
Color me impressed! Yeah, I think upholstering buttons is the hardest part…my fingers pretty much hated me. Otherwise the rest of it is pretty straightforward! Best of luck! If you feel inclined to share, post a pic to our FB page so we can show off your work. We’d love to see the result. 😉
I have came to the point where I will be adding the buttons and start the actual tufting process. The “big, big” problem I am encountering, is that the top edge of the headboard, where I have pulled the foam over, is not going to leave a nice even straight line. It is not level, kind of wavy from where the foam has been pulled and stapled. Please help 🙂 I need a solution before I continue. Perhaps not wrapping the foam over the top edge would Help? thanks
Ah, I see. You have the right idea…I did not wrap the foam over the top edge…although I did on the sides without any problem. If it isn’t smooth, definitely don’t pull it over…if you used a bit of batting over top of all of that, then that is what can be pulled over and stapled in place to hold everything together while you tuft. 😉 Good luck!
I love your tutorial so much! It inspired me to make my own headboard even though I didn’t have one to repurpose. We have a California king bed, so the headboard needed to be six feet (72”) wide. That was a little tricky when I tried to cover it with the two pieces of twin-size foam, as they weren’t long enough to wrap around the sides. I ended up staggering them and then it was lumpy, so I bought a queen-size foam to go over the top. This made it very plush, but also very tricky to pull the buttons through and create an even depth. Oh well… it’s not perfect but I love it because I made it myself. I’d happily make another one, and take with me all the little lessons I learned along the way. Thank you SO much for this wonderful idea!
Oh wow, you really worked through it! I’m sorry I couldn’t help you avoid some of those hiccups, but I’m so proud of you! I have the craftiest and best readers ever. 🙂 I’d LOVE to have you show off your headboard on my Facebook page! If you choose to, tag me and add #HMCmaker so I can also show you off. 🙂
I want to do the same tufted look with two futon mattress. Have you ever done that?
I have no idea how well that would work since a futon mattress is usually so dense and thick, but let me know if it does! I love creative solutions!
Perhaps if it can’t work with tufting you can just use it as a padding to make a non-tufted version? Or a bench!! Oooo. 🙂 Good luck!
Thanks! I just wish to transform my old plain futons with a new fabric and the tufted cushioning look! I’ll keep looking for a solution! Thanks for your answer 🙂
What material did you Use?
A home decorators line of material, perfect for upholstery. 🙂
How much extra fabric do you think you got for the buttons?
It doesn’t require much, a couple extra feet should do. 😉
Hello, could you tell me where I get the buttons? Please :3
Awesomee job!
This is where i sourced my buttons but there’s so many internet options
http://stores.ebay.com.au/buttonstop?_trksid=p2047675.l2563
Thank you so much for your tutorial! I noticed in other tutorials they have cut out the foam where the buttons are going. You did not do that correct? I just want to make sure I didn’t miss a step. Thank you very much for your time!
You are correct, I did NOT cut holes in the foam. I went with the simplest and cheapest process. 🙂
Please excuse me if you’ve already answered this question. I am literally dying to attempt this project but I am at a loss when it comes to picking the fabric. I love the fabric you used. Can you advise of the material choice and how many yards you purchased? Thank you for your help.
Thanks for asking! I have used heavy duty upholstery/home decor fabric for this project…but I have also used linen curtains in another diamond tufting project. I think the most important thing is that the material isn’t so thin that you can see the foam under it, you don’t want it to thin after a few years of use. 😉
2.5 – 3 yards should be perfect depending on the size. Good luck!
Awesome, thank you for your feedback!
this is great! been wanting to do DIY o my headboard. One thing though, do you think I can use leather fabric for this?
Oh I love that idea! But honestly, I have NO idea whether leather would work or not…I have never worked with leather. One of these days I’ll have to try working with it! 🙂 Sorry I’m not help on that front, but good luck finding out! 🙂
Beautiful work. Sure wish I had thought of using eggcrate mattresses when I did my two bergere chairs several years ago. Your tips are so helpful, too.
Will incorporate some of your ideas into my next project. I am getting rid of the multiple large pillows that are currently my sofa’s back, and replacing with a long, slimmish, tufted back, all one piece.
Okay, so I am knee deep in this project and I am stuck. 🙂 (BTW, your headboard is wonderful! Hoping my turns out as nice!) So I have my king size frame made and all my holes drilled, but my twin egg cartons are definitely not big enough. My king size headboard is 80″ long and the twin egg crates are only 72″ long so do I piece them together on the headboard to cover the additional 8″? I am worried about doing that and having the seems of the foam show through. Does that make sense? Or will it be fine once I cover them with the fabric?
Hey, i made king size bed but its measure at 77….i used queen size egg crate and it fit perfect with little trim on bottom, if its too small you can put half and half on one but be sure to cover maybe quilt batting cover so the “line” won’t be noticeable…im not finish with mine, i did math wrong and I’m short by 9 buttons so I’m hoping to finish in a day or two….im so exciting.
Oh your blog is amazing! But in this case (diamond headboard) a video will be great!!!
Thank you! I will see if I can put one together! 😉
I am in the process of getting a new bed, and this headboard is absolutely gorgeous, and I am going to give it a go. Hope it comes out as good as your.
I absolutely love your tutorial. Super easy and awesome. I have watched many and couldnt fully grasp the tufting bit but now i totally get it thanks.
Thank you! I truly appreciate you sharing that! 🙂
I love your tutorial and how your headboard turned out. It’s beautiful and you have inspired me to make one for myself. As I’m calculating, I’m wondering how you were able to use a twin topper on your headboard when it’s measures smaller than your headboard of 45.5″ high? And how did you with only the material height of 54″ how did you use one piece when you suggested 10-12″ extra material for each side?
Thanks so much!
Thank you! Oh haha, I see how that can be confusing. Actually the twin topper sits sideways across the headboard. When you place it cross wise it turns out to be more than you need, you’ll probably have to trim some off. My headboard also has has “feet”, so I required less material from top to bottom. I still recommend having extra material on either side, with leftover rather than not enough. You can never be too careful. 😉
Good luck on your headboard! If you have any questions, feel free to ask.
I finally have everything built and now I have to drill the holes. I don’t have a template so I’m wondering how many inches from the top and sides did you start the holes? And what is the distance between each hole? Thanks!
If you were to draw a plus sign between my holes (horizontally and vertically), they are between 8 to 9 inches apart. Good luck!
Hey Carmona,
I’m following your awesome tutorial and have gotten up to tufting. The problem I’m running into is that I don’t have a needle long enough to go through the wood foam and fabric. Where did you get a needle long enough to go through all the material?
Thanks for any input you can offer!
– Doreen
Hi Doreen,
You can find a long upholstery needle at most fabric/craft stores…I got mine at Walmart. Even so, mine didn’t pierce all the way through without carefully pushing in the front at the general vicinity where the needle would be coming through. Then you can grab the emerging tip and pull it all the way through.
Hope that helps! 🙂
My next DIY project! Something to beat the winter blues and to stay busy!
You did a wonderful job. It’s beautiful!
I just finished making this for my daughter. Your tutorial was great. We ran into problems because she picked a heavy thick material and it was impossible to get the thickness pushed into the button cover. Instead of buying new fabric we bought antique metal buttons instead and it gives it a great look too.
Hi
You Can also sew the dimands on the back side of the fabrick before you put it on whit the buttons. It Will loock a bit lige the same.
You Can also male holes in the foame where the buttens should be it wil give a different look also.
Brilliant! I’m going to be making a dining booth in my kitchen and I was not sure what to do about the back board re upholstery – now I know, thanks!
I love your idea! Sounds amazing! Be sure to share a pic of the final product! 🙂
Hi, I’m so inspired by your talent ! always wanted to make a tufted head board.. I bought one in stead but your is much nicer. Do you make other tufted things like furniture.. couches and stuff?
Thank you so much! That is some high praise. 🙂 I did make a tufted bench/ottoman for my dining room. You can see it here: https://homemadebycarmona.com/diy-tufted-bench/
Just to clarify… each piece of egg crate foam you used was an inch and a quarter thick? So you had double that making your egg crate foam 2 1/2 inches thick?
And do you know how wide your home decor fabric was?
You got it! The foam was a total of 2 1/2 inches. And the home decor fabric was 58 inches wide. 😉 Good luck!!
Hi Ursula! I’ve lived in my apt for a year now and I’m ready to spruce it up. A tufted Headboard is number 1 on my list. DIY also. I’m wondering, since I don’t have a base to start with, can I use pallet wood for the frame. I’m sure a home improvement store has some to spare . Trying to cut cost everywhere since I have to buy all the materials. Thank you and beautiful work!!!
Love how you’re thinking outside the box to save $$!! A DIY’er after my own heart. 😉 If you could find pallet wood that would have the length you are looking for, absolutely. But simple 2×4 studs cost about $2, and you would only require 3-4 studs…then you could use strand board (which is often $8-10) for the back board. Good luck on your headboard!
Just a thought, instead of putting legs on you could purchase a French cleat from the hardware store for $15 and hang the headboard securely to the wall. You can still get at it when you want and it also allows you to make it as tall as you like. Just secure it to the studs.
yep! im officially a fan!!
Hi Ursula,
I have been wanting to do a tufted headboard for ages; however, I did not think I could master it. Your tutorial is fantastic and I am going to go for it. One question: How did you attach it to the wall?
Thanks.
Mine is so big it rests flush up against the wall, and the bedframe and mattress is pushed against it…no need to attach it! 🙂
So glad to hear that! Well, if you need any help, feel free to leave a comment with any questions you have as you go along. I’d love to see picture of your final project when it is done! If you share to Facebook or Instagram, tag me and use #HMCmaker so I can show off your handy-work! 😉 Good luck.
Hi just finished my headboard using this great tutorial. My headboard had to be mounted on the wall with no legs. I used a french cleat to attach it to the wall. You can buy them at a big box hardware store in the picture hanging aisle. The one I used can hold up to 100lbs.
Thank you by the way for this awesome step by step tutorial. I could not have done it without your help!
Hi
I am Danish and not familiar with your sizes. Are theese mattrases the right height and sizes? or too big?
http://www.amazon.co.uk/Memory-Mattress-Topper-Profile-Shell/dp/B0047IMRRU/ref=sr_1_7?ie=UTF8&qid=1443533860&sr=8-7&keywords=egg+foam
Best
Sarah
Hi Sarah, thanks for reading!
The one you have listed can work…the thickness is good, but you will likely have lots left over since it is King sized. Twin sized is cheaper, and still enough material. 😉
I made this headboard this week and I absolutely love it! Wish I could post a pic of it! Thank you so much! 🙂
High five!! Oh I’d love to see it! Please do share! Upload to Instagram or upload it as a comment on my page, tag Home Made by Carmona, and add #HMCmaker, I can’t wait to see and share. 😉
This is a really great, detailed tutorial! I’m looking to do something similar! Thank you so much for sharing!
I’m so inspired by your tutorial!!! I was wondering what else I could use if I didn’t have a pegboard? How would you measure the spaces between? This is the only part I’m a little stuck with.
Many Thanks in advance. Xx
Hi Sammy, I just made this headboard this week without a pegboard.. what i did was make the holes 8inches apart and i started from the middle. I also made my first row 5inches from the top
I love this headboard. Exactly what I’m looking to make. What size headboard was that once you added height?
Thank you! The original was very short (not sure how it qualified as “headboard”); the added height brought it to about 46″.
I loved your tutorial. I’m going to make this over the holiday and was is the width of the frame?
Thank you! It is designed for a Queen sized bed. It is 5ft 3in across, and stands 3ft 9 inches tall.
If you make it, I’d love to see pictures! 🙂 Good luck!
Dear Ursula,
I finally finished my headboard – can’t wait to post the pics. I didn’t have a base to start off with so I made my own frame using 2″x4″‘s and brackets and screws – very easy. I wanted to be able to sit up in bed and not feel the wall behind my head so I made mine taller as well. It took me a little time to get all the pieces (foam, fabric etc). Since I was working with limited space and by myself, it took me ~3 weekends to complete. . This weekend I did the majority of the tufting and man are my thumbs and index fingers sore. I follow you on IG so I’ll will tag you in my post. Thank you again for the great tutorial – best one on the web 🙂
High five! I can’t wait to see the results of your hard work!
Thank you so much for sharing! <3
On the egg crate topper, you used two twin size toppers on top of each other? just for a deeper tufting? Also, what kind of fabric did you use? and how many yards did you get? Sorry for so many questions I just want to do it right the first time! lol.
No problem! Yes, I used two twin sized toppers on top of each other for deeper tufting. Much cheaper than buying foam per yard! I used regular home decor fabric…nice and thick, however I am using a linen curtain on another tufting project I’m working on right now. The yardage will depend on the size of the bed, I bought 3 yards for my queen sized bed and had some left over.
Good luck on your project! I’d love to see it when you are done…do share on FB or IG and tag me, then add #HMCmaker!
Oooooo just found this… you have saved me a fortune! Please can you tell me why you used egg crate foam, plain foam is cheaper in England. I was just wondering if the egg crate was necessary? Thanks. 🙂
Lucky you! Upholstery specific foam would have cost me well over $30+ per yard! Plain foam will work just as well (if not better) than egg crate foam. 🙂 Good luck!
Thank you for your reply! 🙂 How thick do you suggest the foam should be and would I need to cut holes or anything in the plain foam for where the buttons go? Thank you so much for your blog and advice. I have just bought a new bed and I am so excited to be able to make my own headboard.. that I like for hundreds of pounds less that buying one! I am going to use pink grey tweed! 😀
My pleasure! I’m so glad you’re here. 🙂 I would go with anywhere from 2-3 inches of foam (even if you have to stack two pieces of foam on top of each other)(mine was 3 inches). No need to cut holes for buttons. Good luck!
Going to finally make this over the holidays. Just a couple of questions… did you require a lot of extra fabric to allow for the pleating and do you know how to cover buttons with a facing wool? (I have found the perfect colour but its in the wrong fabric!) Thank you
Hi Ursula,
Quick question… How do maintain the diamond pleat once you’ve attached the buttons?
Thanks,
Thomas
Hi Thomas,
As you insert each button the diamond pleat somewhat naturally occurs. You have to help create it by teasing it along (pinching the fabric to where you want it), as you insert each button. Be sure to start from the middle button and work your way out…also give yourself plenty of “give” and keep the fabric lightly loose so you can gather up a pleat as you go. Hope that makes sense. Good luck!
This is the nicest tufted headboard I’ve seen! I’m so inspired I want to start shopping for supplies. Mine will be for a king size, but I’m curious how many buttons you ended up needing for the queen? I really like the spacing on yours!
Thank you! I used 37 buttons. 🙂
Excellent Do you think this would work on a door? I am creating an all out Home Theater and I want a Tufted door to the entrance to the theater any advice? Thanxs
Very cool idea! If you can drill holes through the door it would work. You will need to consider that the back and front would both have to be tufted (since the back is also comprised of buttons to hold it in place). It would be tricky…instead of tufting all the way to the edge, you might need to tuft within a window of space (since you need to be able to close it), and then use something to create a trim over the nailed down fabric edges..yep, it would take some thought and planning, but I imagine it is doable. If you take on such a big task, I’d love to see the results! If you like, share a pic via Facebook or Instagram and tag #HMCmaker when you are done. Good luck!
Instead of drilling holes all the way through the door, and threading the buttons…use wood screws that won’t go all the way through the door do do the tufting. Then glue the buttons to the screws. If you wanted, you could use decorative nails (tacks) around the edges. Then you could close the door without a problem, and leave the outside of the door as is.
How many rows total do you have horizontally?
That’s a great way to save money. I’ve done tuffting for30yrs. When you do the buttons cut the string in 10″ pces. Thread the button to the center of the string then thread both ends through the needle and pull through the back of the hb. Tie in a slip knot so you can adjust later if needed.
Email me if you have any question .
Fantastic tip! Thank you for sharing! 🙂
Thank you so much for your blog! You inspired me to make my own and I am obsessed with it! It’s so beautiful! I wish I could show you!!
I’m so glad to hear that! Thank you for sharing! If you ever take pictures, do be sure to share and tag me via Facebook or Instagram, I’d love to see! 🙂
Would it be more economical for me to purchase a single 3″ egg foam mattress topper? I found one here http://www.walmart.com/ip/Simmons-Beautyrest-BigSleep-3-Convoluted-Foam-Topper/34961198 just wondering what the total width of your two foam pieces is.
The egg crate foam I got measures 1 – 1/4″ each, and cost $9.94 at Walmart. I used two foam toppers. I think the deeper the tuft the more beautiful the headboard is, so if I saw that at my Walmart when I was looking, I probably would have sprung a few extra dollars for the extra fluff!! 🙂
Good luck on your project! If you take pictures, do share with me via FB! I love sharing, and we’d all like to admire your handiwork!
This is an incredible tutorial! Have been wanting to do this for years! Thank you so much! Can’t wait to see some of your other projects! Ursula, you’re just great!
Thank you for your kind words Karen! So glad to have you here!!
This is simply amazing! So glad I found your blog. Feeling ambitious and want to make this for my 4 yr-old daughter’s room (poor girl currently has old IKEA hand-me-downs…want to get her room playdate ready 🙂 Just out of curiosity, how long did it take you to complete this project?
Thank you! Glad you are here! I’m not exactly sure how much time I spent (as a mom you are constantly distracted), but if I had to guess I probably spent about 2 hours each day…and I only worked on it for 2 days. Good luck with your project!
That is freakin’ fabulous! Thanks for suggesting the egg crate foam. That definitely saves some cheese. Also, how about buying a linen or faux silk drapery panel instead of fabric by the yard. Often you can find some nice solid color curtain/drapery panels for less than the cost of fabric by the yard. I think I’m going to do this.
Thank you!
That is such a great suggestion…I’ve used drapery panels when recovering dining room chairs! 🙂
Awesome headboard! Do you think you definitely need two egg crate mattress toppers, or would it look okay with just one? Just trying to save a little extra cash!
The more egg crate toppers the deeper your tufts…so it is really more a matter of personal taste. I would check Walmart since they have them for only $11! 😉 Good luck!
wahhh soo nice and amazing…love it…wish to have one..
I think you did your tufted headboard every bit as well as any out there! You have previous upholstery experience? wonderful, neat, and inspiring project!
That’s very sweet of you! This was my first time with upholstery, but it was worthwhile. 🙂 Thanks for reading!
You are awesome, you could’nt explained the process any better than that. Because of your tutorial my wife and I will try and duplicate your head board for our room..;) thanx for the time it is greatly appreciated
Oh thank you, I’m really glad to hear that! Best of luck on your headboard!
Amazing ! So beautiful….
http://bujaren.com
This is so cool! Any advice for making a twin-sized headboard?
Twin sized? Awesome, half the work! lol! I would use the opportunity to add extra height for a bigger wow factor. 😉 Good luck!
Wow! This is amazing! I just picked up an old headboard and can’t wait To Use Your tutorial. It is fabulous!
Thank you! I hope you find the tutorial simple to follow. 😉 Good luck with your headboard!
Very detailed tutorial. Thanks. I have everything to do my daughter one now. The pegboard tip is awesome. So simple! I plan on hanging hers on the wall by a cleat, two pcs of board cut on a 45 and screwed into the wall and back of the headboard. ‘Hope that it works. Thanks fot the info. It was great and your headboard is beautiful.
Thank you! Good luck with your headboard. I bet it will be stunning! 😉
I have looked at many tutorials on how to diamond tuft a headboard. This one has THE best way of securing the buttons I’ve come across. Trying to pull the thread, and staple it while it isn’t lying flat, and while on your own is so hard. I think I could do this though!
What was the actual height and width of the headboard? I don’t have any salvage materials so I am going to buy the wood. Thank you!!
Hi! Sorry I’ve been out of town! The actual height and width of the headboard is 63″ x 45.5″. Good luck on your build!
well that is just plain awesome. look at you go, lol.
b
This is stunning! And your tutorials are SO good. Thanks so much for linking up to the Pretty Preppy Party this week. I’ll be featuring this project later this week 🙂
That’s so sweet! Thank you Sarah!
Wow ursula! You made this so beautiful and so . luxe! I can’t wait to make mine!! I’m glad you did covered behind. .:)
Thanks dear! Good luck on yours!! 😉
This is a great tutorial. I have made a tufted headboard before but didn’t take the time to do a tutorial! You have done a fantastic job with this!
How much actual fabric did you purchase? I would love to make this for my room, and I’m going to purchase a queen size bed soon, so as far as measurements I’m clueless! Thank you so much for doing this tutorial.
Thanks for reading! I used 3 yards of upholstery fabric (which is quite wide!). Good luck on your headboard!!
Beautiful! Great tutorial. Turned out FANTASTIC!!!
So beautiful! Wish I saw this tutorial before I started mine. I’m doing mine in a much harder way and it’s driving me crazy. It hurts my hand so much I keep on taking breaks. I started it last summer and it’s still not finished! Sigh. I’ll use this method for my next headboard for SURE! Thanks again.
This is amazing!!!!!
Also where is your rug from- it’s just beautiful
Thank you! The rug is a Better Homes & Gardens line at Walmart… very reasonably priced too! I have a link to the rug and other BHG @ Walmart products I used in this room here: https://homemadebycarmona.com/master-bedroom-makeover/
This is absolutely beautiful! How much actual fabric did you purchase? I would love to make this for my room, and I’m going to purchase a queen size bed soon, so as far as measurements I’m clueless! Thank you so much for doing this tutorial.
Thank you! I’m so glad you like it!
I have a queen bed and bought 3 yards, but really only used 2 and a half…still, it never hurts to have more left over than less!! 😉
This is stunning! What type of fabric did you use? And can it be ordered offline? My local fabric stores don’t have anything reasonably priced to do this. Looking to build one soon! 🙂
Thank you! I used a home decor fabric from JoAnn’s… however you could think outside the box and purchase a pretty curtain panel as fabric! I have done that many many many times! 😀 Just make sure it is a thick enough material or at least has a built-in cotton liner. 😉
Qué gran tutorial! Me encanta tu blog y la claridad con la que explicas cada DIY. Tienes muy buen gusto. Felicidades!
Thanks for such a thorough tutorial! Can’t wait to make one for my guest bedroom!
amazing work,very good guide and photos
Thank you! I appreciate your kind words.
Seriously beautiful and the BEST tutorial I have ever seen…AND I have been looking for a long time for a good one! This is on my project list now
Oh my, thank you! That is high praise! 😉
WONDERFUL job you did on this! It looks exactly like one of those really expensive beds you’d see in a magazine, so I’m blown away that you were able to do it for such a low price. Thanks for sharing your tutorial. New follower on the blog having found it via this project, on Pinterest.
Welcome! Thank you, I truly appreciate that!
What type of fabric did you use is the linen?
Yes, I used a linen based home decor fabric. 😉
I’ve always wondered how this would be accomplished, and your tutorial is perfect! Love the detail and tips, and not to mention, it’s gorgeous 🙂
What a great headboard! I am going to make one following your wonderful instructions. Do you think it can be made from a denim weight fabric? Thanks Katherine
Seriously AMAZING!! Thanks so much.
This is GORGEOUS Carmona!! Love how you used the old headboard frame too! So smart!
WOW! Unbelievable! I’m in awe! Beautiful headboard!
Awesome job! Thanks for the detailed tutorial!
What a beautiful headboard! You did an amazing job and I can’t wait to create one of my own. Thanks so much for the great tutorial!
Thanks for the tutorial! I want to use black toile but missed the yardage. About 3 yards or so? This is on my to do list:)
My pleasure! My headboard is a queen, and 3 yards was what I got… it was more a little than I needed (which is ideal in case of incident)! 🙂
A note for this tutorial, you’ll want to make sure your folds face down from top to bottom, and to the right when you’re setting the buttons. It’s for more than looks, it’s also so dust won’t catch if the folds of the diamond face up. I usually just pull the threaded button needle through and staple it on the back to avoid the buttons, but I use plywood for mine. For added softness and depth to the folds, you can add a layer of batting, I recycled old duvets for a while as well instead of batting. Great tutorial. Love the transformation!
I love this so much! I especially love that you let us have a peek at that “ghetto” back. 🙂 That is usually how the back or inside of my projects look, but it is nice to see something rough that turns out amazing!
This is stunning! It’s really pretty, I love it!
WOW! this is amazing Ursula
Wow….absolutely gorgeous headboard,and one of the best tutorials on how to do this, that I have ever seen!
Oh that’s so sweet, thank you Anne!
A-mazing!!! Thinking I might attempt tufting in my daughter’s room! This looks SO profesh. 🙂
Okay, this is seriously awesome! You did an amazing job!!
Thank you Krista, that means a lot to me. 🙂
I completely love what you did with this headboard. And it caught me off guard when your pictured changed to show the progression of the project. Very nice! Very happy I found your blog. 🙂
Thank you! Haha, I try to keep everyone off kilter once in a while… 😀 Glad to have you here!
This could not be more stunning! Excellent job, friend.
Aw, thank you Amy! Your thoughts always mean a lot to me since everything you do is stunning! 😉
Ursula, You did an amazing job, and really captured all the details. Love it!
Thank you Mary!
Looks great. I can’t wait to do mine at some point. I’ll be starting from scratch as I have no headboard at all at the moment.
Thanks for the tutorial.
Cheers!
Ursula!! This headboard is absolutely stunning! It looks super plush and expensive!! Wonderful tutorial!
Thank you so much chica! 🙂