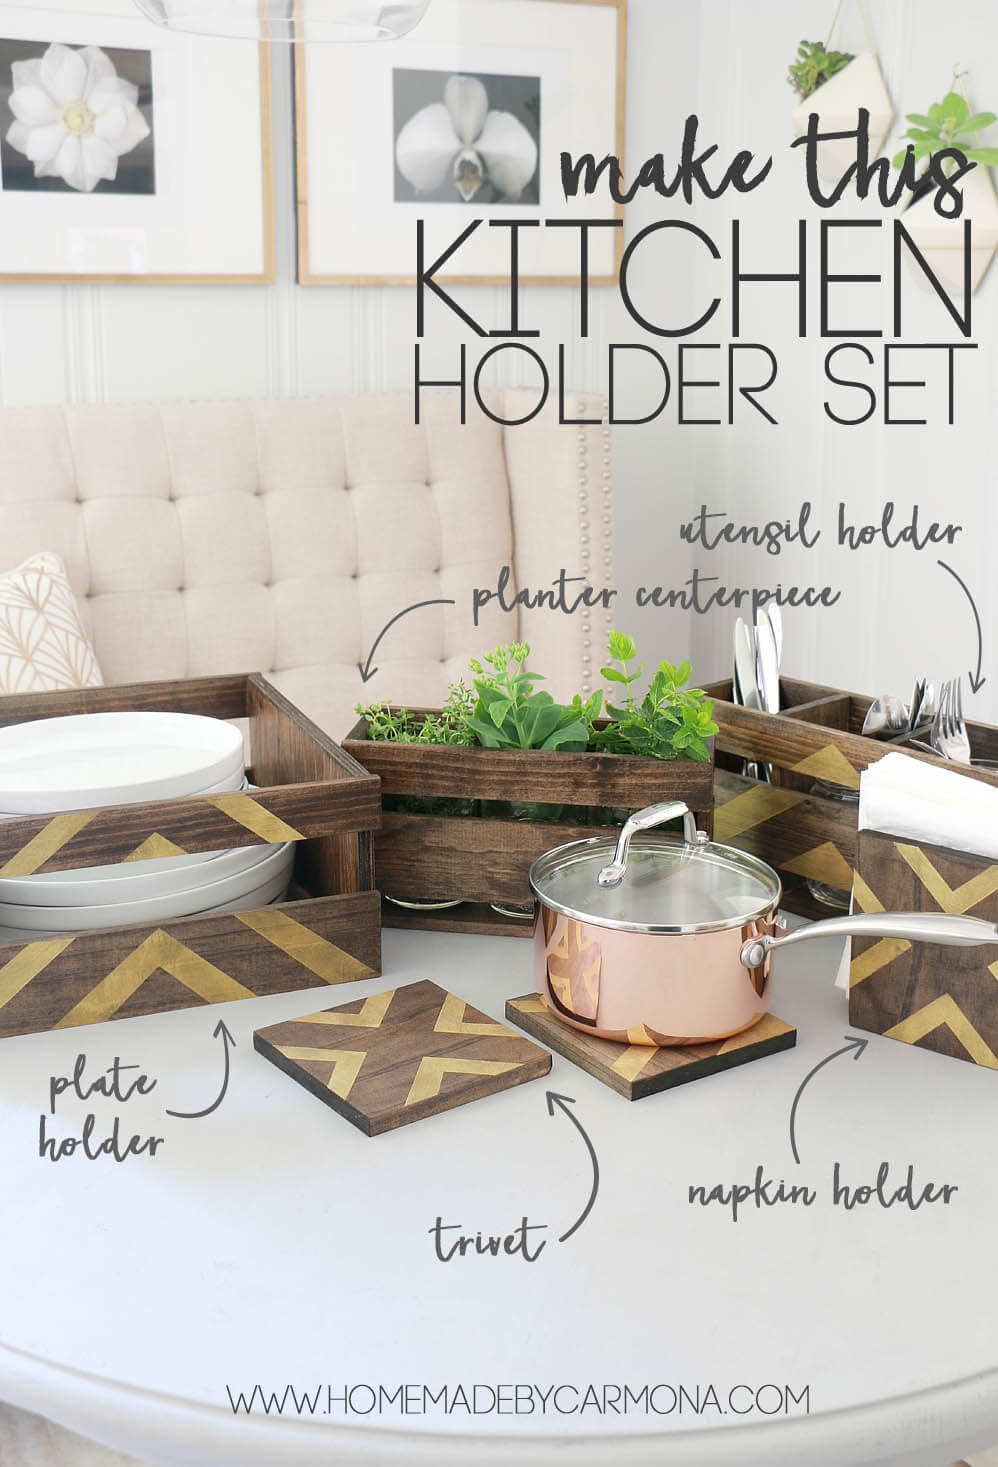
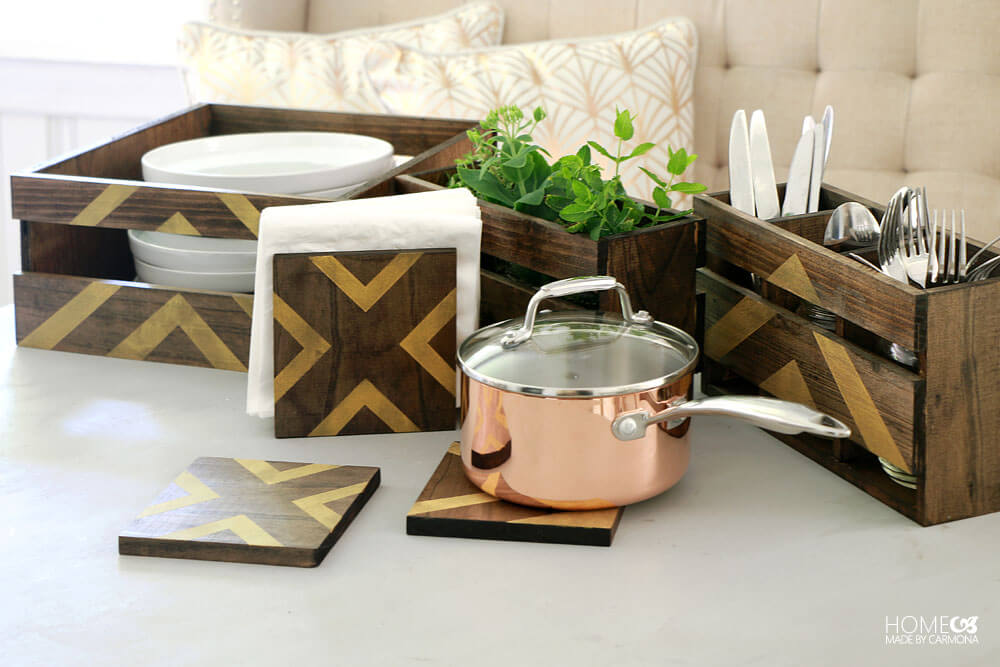
Make the cutest kitchen set complete with a DIY utensil rack, dish holder, trivets, and matching napkin holder! It only takes an afternoon and is the perfect project for a beginner DIYer!
Easily customize this project for the look that best fits your home and style.
This post was awesomely sponsored by my peeps at FrogTape®
Why Buy It When You Can Easily Make It?
I recently saw the cutest kitchen holder storage crate- with a price tag that wasn’t so cute. You know how crafters are. I saw it and thought, “I could totally make that for half the price!”
That doesn’t always turn out to be true, but this little project is quick and easy.
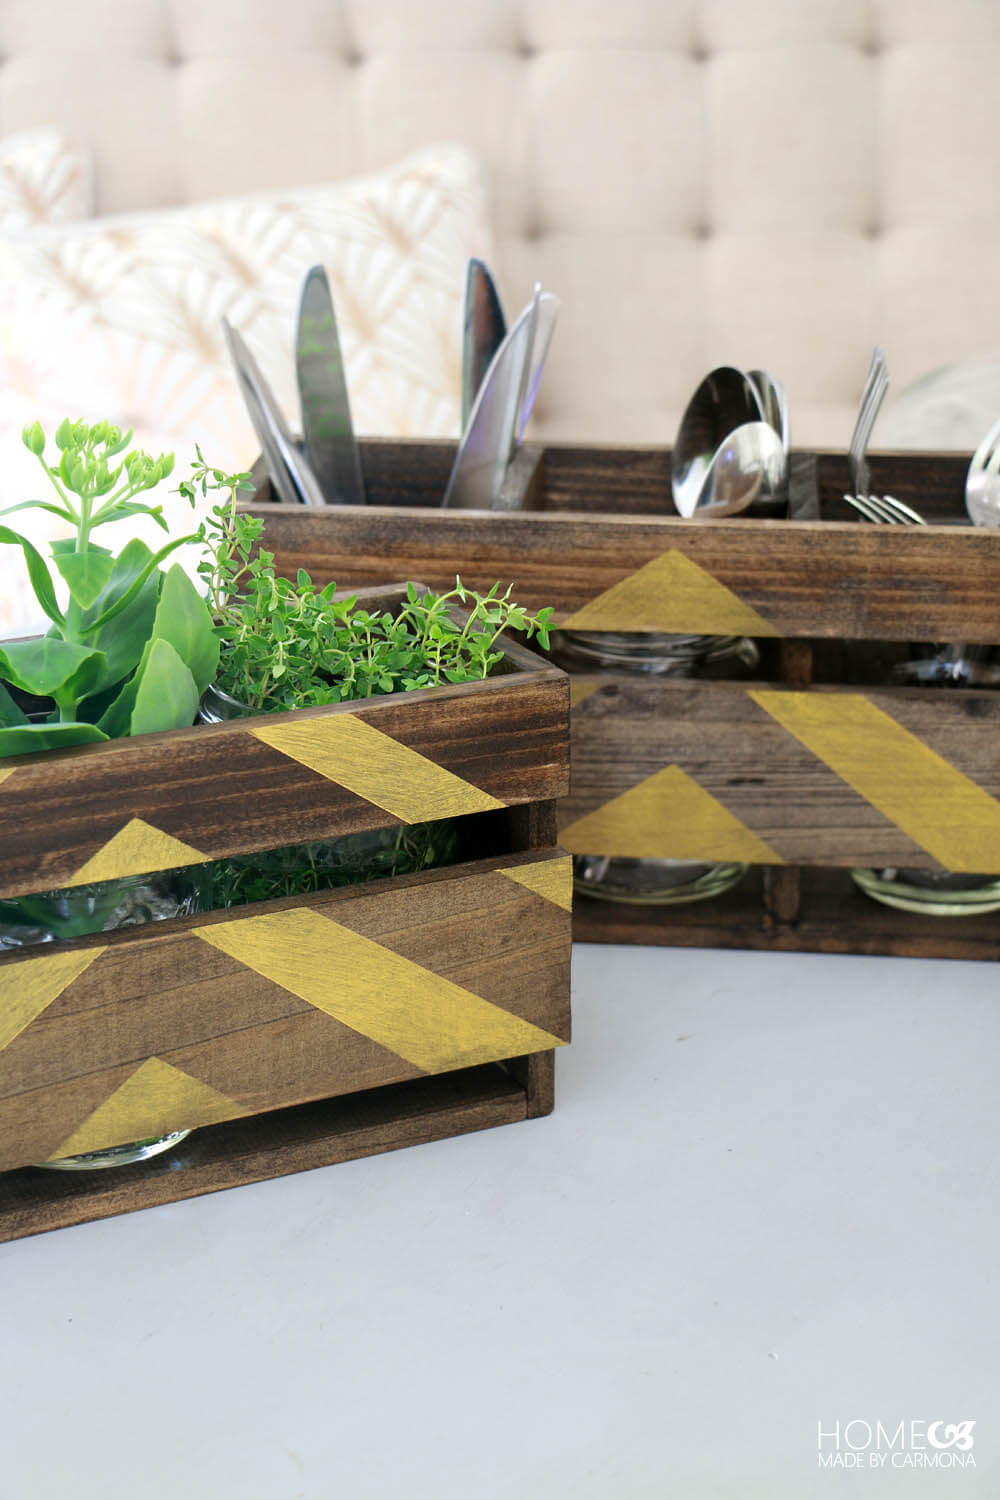
I wanted to use it as a dishware holder when guests were over for a hosted buffet-style party. Then it got me thinking how great it would be to have an entire kitchen holder set that matched. We’re talking utensil holders, plate holders, planter centerpieces, napkin holders, and trivets to match!
So today, I’m sharing how I made this entire set! And it is so much cheaper than buying it in the store…it’s worth it!
Here’s What You’ll Need:
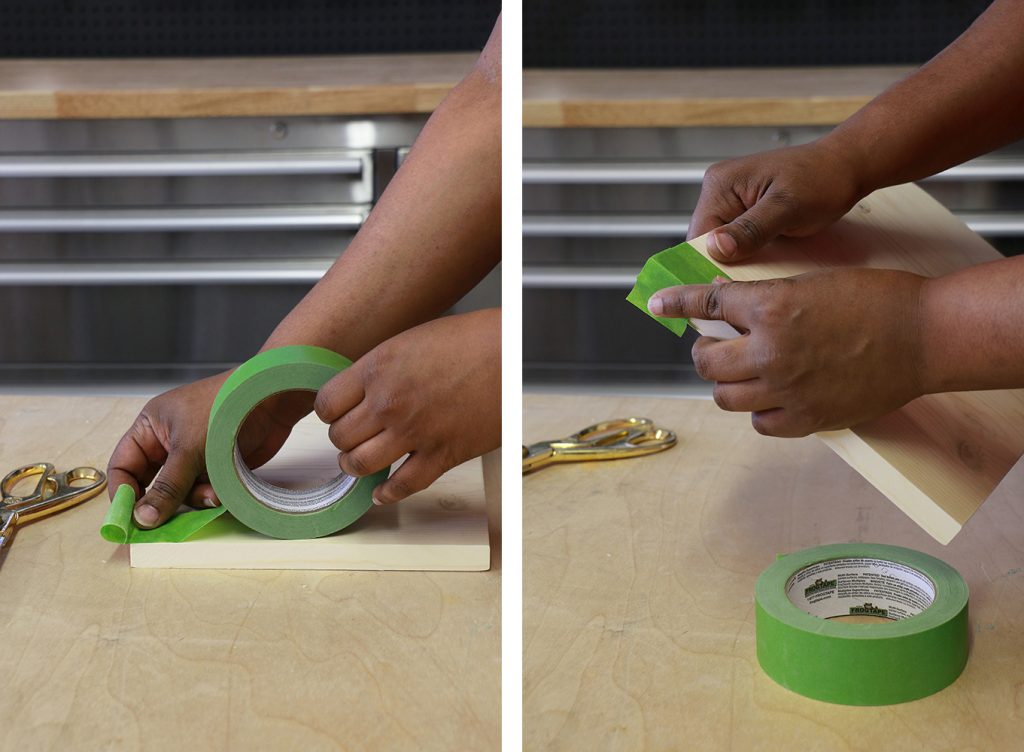
FrogTape®, which (by the way) is the only painters tape up to this task for clean professional paint lines, so grab some before you get started, you’re going to need it.
You’ll also want to pick up some wood stain, gold patina, 1/2″ finishing nails (or wood staples), wood glue, and craft wood in these sizes:
- (1) 1/2″x24″x24″ plywood
- (3) 3/8″x2″x24″ craft wood
- (3) 3/8″x3″x24″ craft wood
- (2) 3/8″x4″x24″ craft wood
- (1) 3/8″x6″x24″ craftwood (for Trivets & Napkin Holder)
Ready to get started? Let’s rock this!
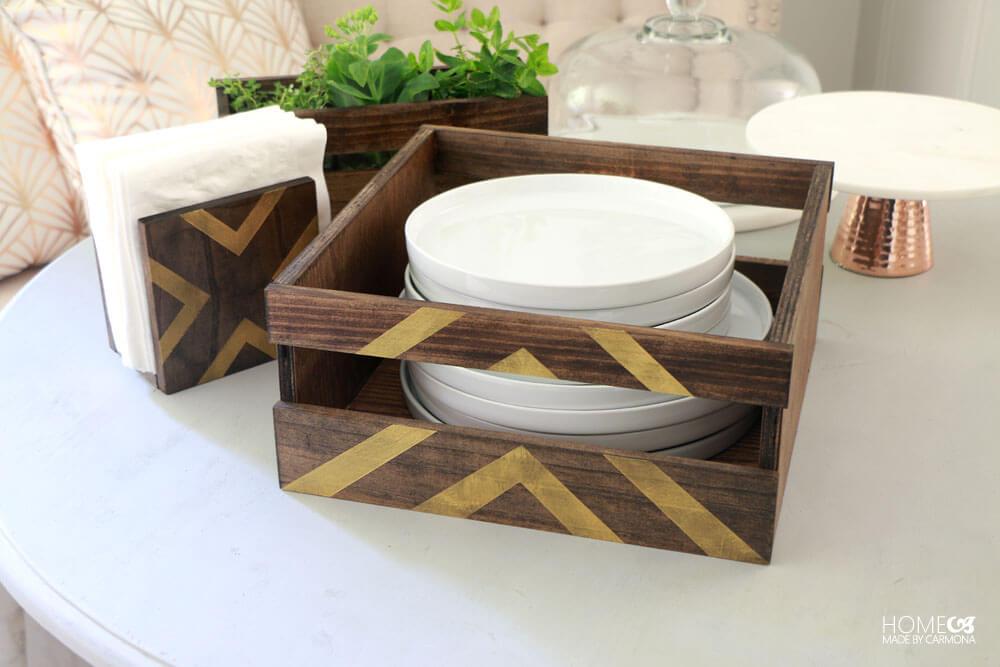
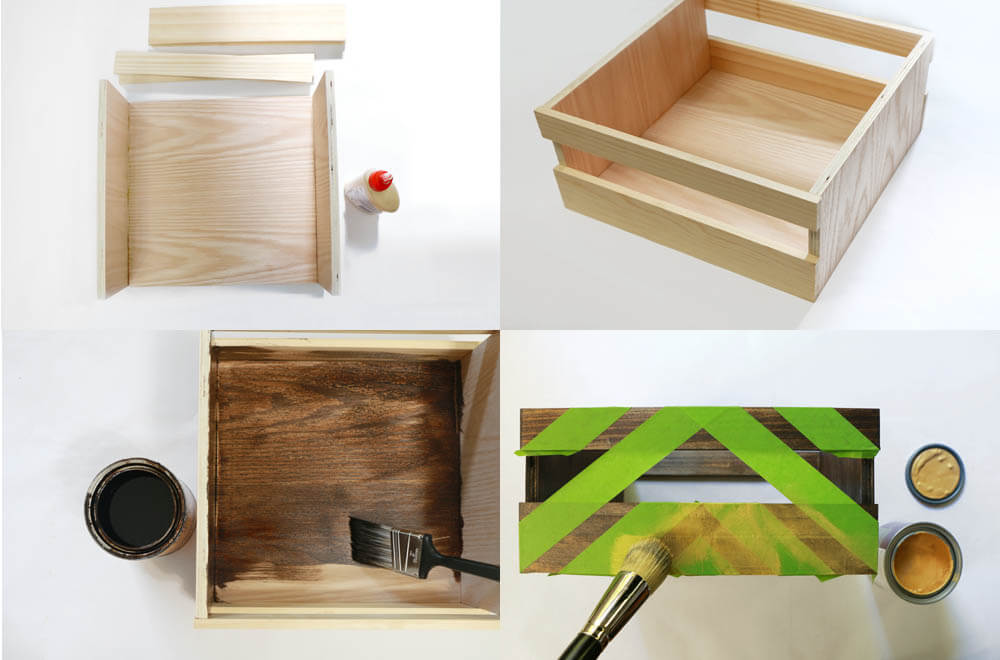
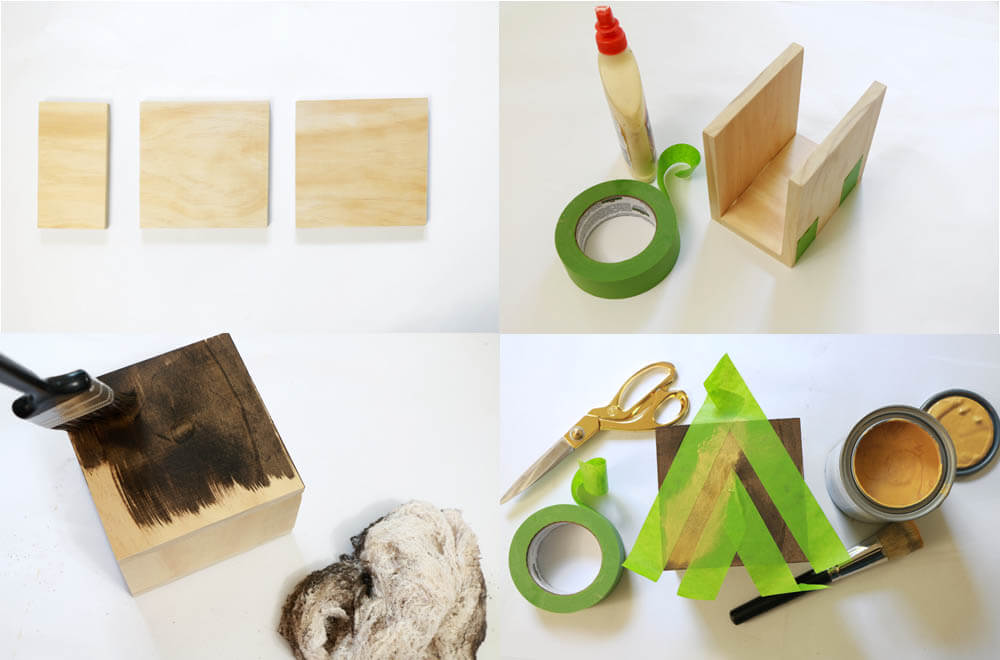
How To Make A DIY Dish Holder
The dish or plate holder is built from a regular 1/2″ thick board, but you could use thicker wood if that’s what you have.
The easiest way to make these cuts is to use a miter saw, but you can also use a jig saw, a hand saw, a table saw…whatever you use for cutting wood.
Use fine-grit sandpaper to smooth any jagged edges.
Below are the sizes of each piece, but you can customize it to meet your needs.
Cut List:
- Base: (1) 1/2″x11″x11″
- Sides: (2) 1/2″x6″x11″
- Slats: (2) 3/8″x2″x12″
- Slats: (2) 3/8″x3″x12″
FYI: if your plates are larger than 11 inches, you’ll want to custom-make your plate holder to a bigger size.
Steps:
- Glue the two 6″ sides onto the 12″ base and let dry
- Flip on its side and glue the 2″ and 3″ slats to the front. Allow it to dry
- Glue the final 2″ and 3″ slats to the back and let the glue dry
- Nail or staple all the glued sides together for added security
- Stain. Once the stain is dry use FrogTape® to create the design of choice and paint on a metallic patina
NOTE: If you plan to carry lots of heavy plates, use wood screws instead of nails for added security. You will need to drill a small pilot hole to ensure the wood doesn’t split when screwing into it. For the experienced DIYer using thicker scrap wood, you can use pocket holes to attach the base of this piece
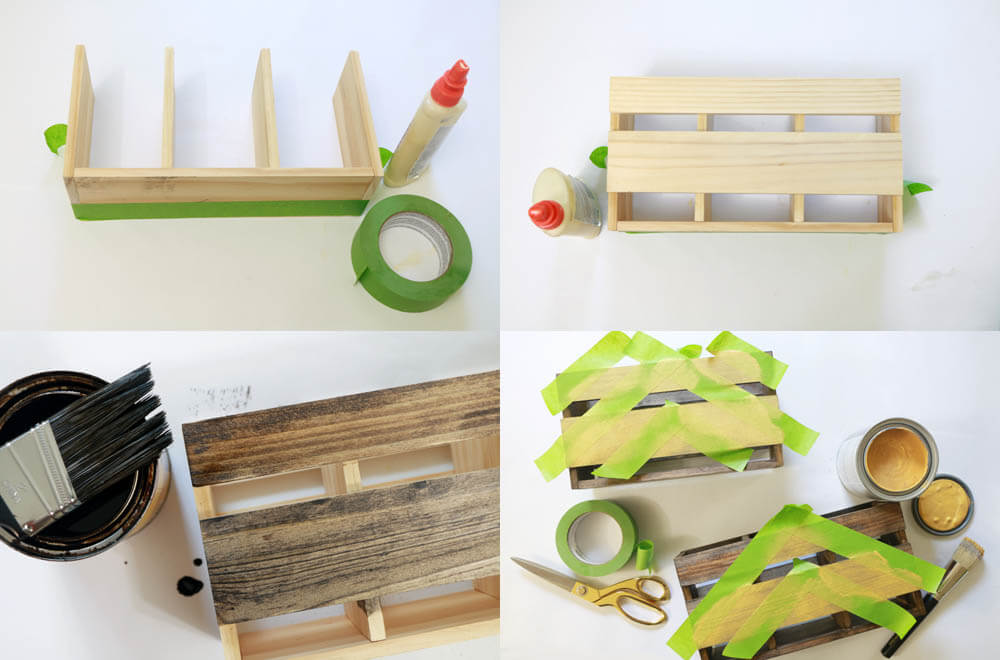
How To Make A Wooden Utensil Holder
The DIY kitchen utensil holder is made much in the same way the dish holder is. The only difference is the addition of dividers.
Oh, and a quick little FYI, if you don’t love the look of mason jars inside your holder (or think it is redundant), place your bottom slats flush with the bottom edge of the holder (that open space may look cool, but your forks and knives will slide right out if you aren’t also using jars).
Cut List:
- Base: (1) 3/8″x”4″x11-8″
- Sides: (2) 3/8″x4″x6″
- Partitions: (2) 3/8″x4″x5-5/8″ (optional, used for utensil holder)
- Slats: (2) 3/8″x2″x12″
- Slats: (2) 3/8″x3″x12″
FAQ: I used a gold patina I found on sale, but yes, regular gold paint will totally work. Just thin it out slightly with a little water so it is slightly translucent-looking. Gold spray paint or gold rub-n-buff also works!
Steps:
- Glue the 6″ sides to the 8″ base, use FrogTape® to hold the sides together while drying.
- If adding partitions (for the utensil holder), also glue the 5-5/8″ partitions.
- Glue the 2″ and 3″ slats to the the front and allow the glue to dry, then do the same with the back.
- Nail or staple all the glued sides together for added security
- Stain. Once the stain is dry use FrogTape® to create the design of choice and paint on a metallic patina
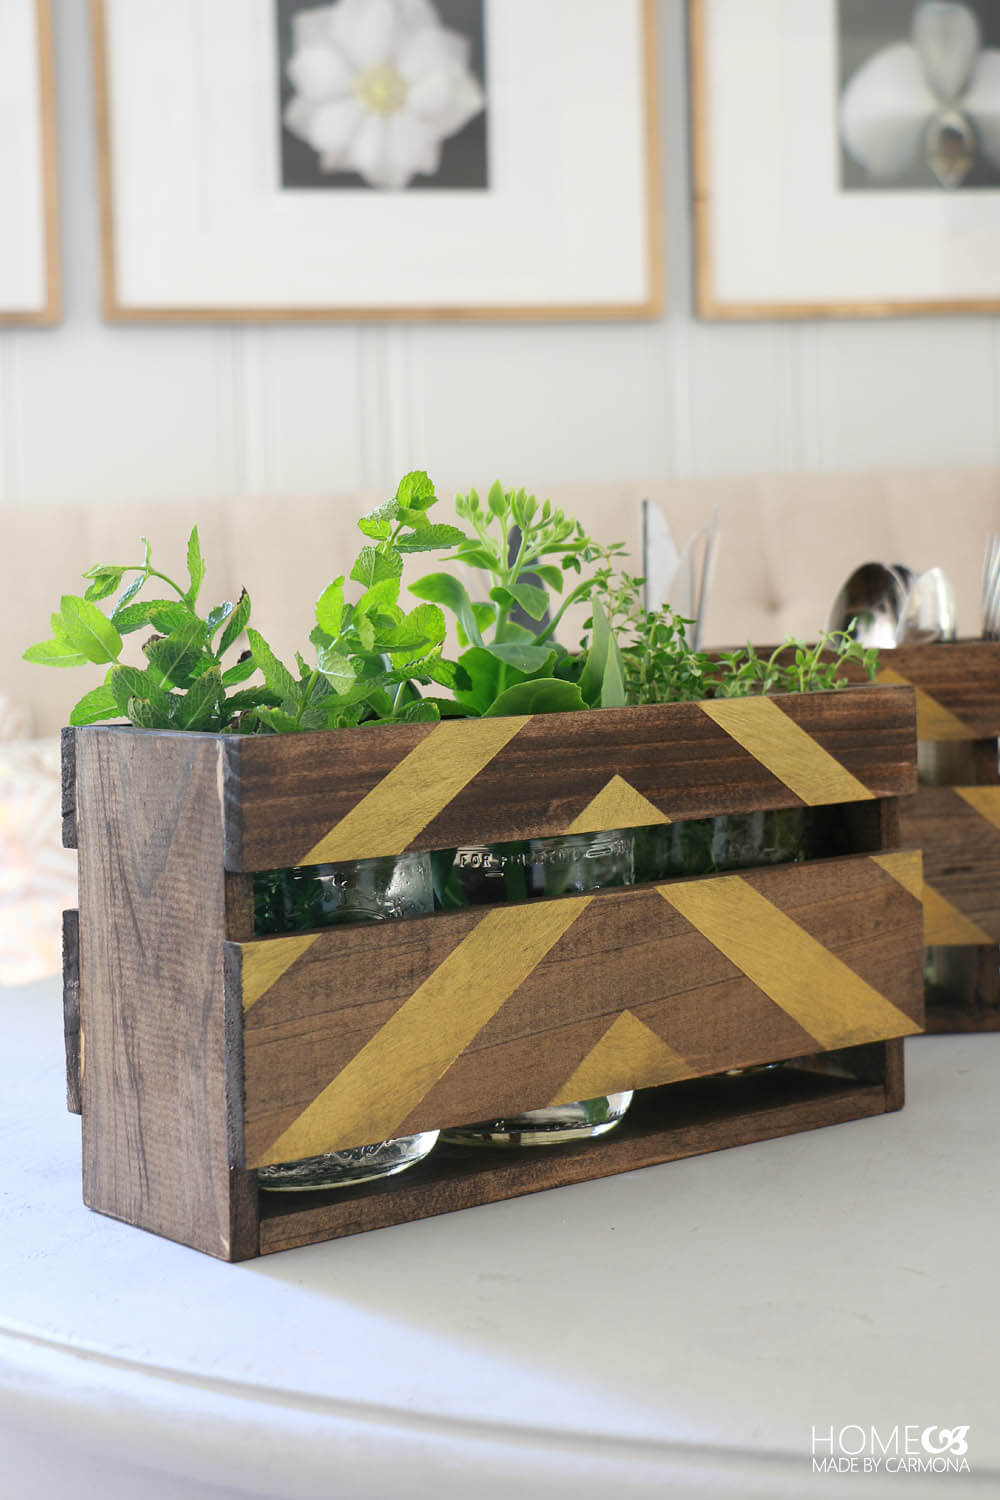
Make this shorter than normal to store cooking utensils like measuring spoons in a drawer. Or make it taller to display kitchen utensils like whisks and spatulas in a pretty way on the kitchen countertop. This DIY utensil holder is also a great way to display herbs and flowers as a centerpiece!
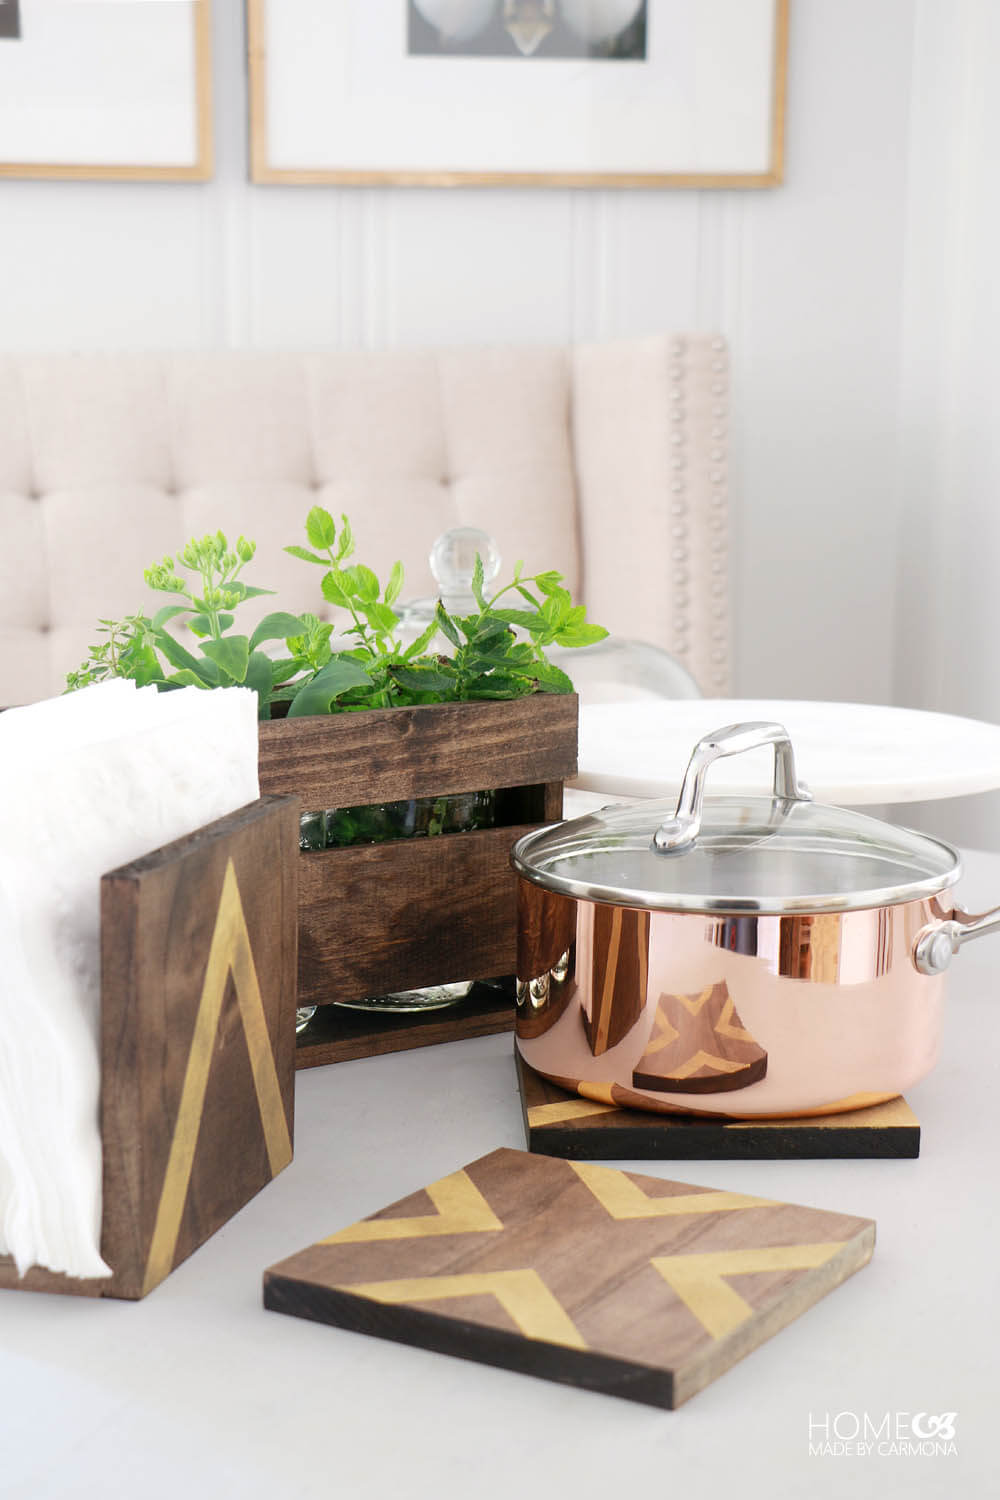
How To Make A DIY Wood Napkin Holder
An attractive napkin holder may seem insignificant, but it pulls the entire buffet table together.
There are lots of DIY napkin holder ideas, but we’re going with wooden DIY napkin holders because they are the easiest to customize and make your own!
Cut List:
- (2) 3/8″x6″x6″
- (1) 3/8″x6″x3″ (or whatever size you prefer)
Steps:
Glue the sides to the base, let it dry, secure it with nails or staples, stain, and finally, add an awesome paint pattern.
For extra credit, make more than one wood napkin holder, and design one for every season. Add a snowflake motif for winter, a leaf for fall, and a flower for summer. Also make DIY napkin rings and take your dinner table to the next level!
How To Design DIY Trivets
Wooden trivets are the easiest to make, and super cute. You could even make them smaller as DIY coasters!
You don’t have to be a woodworker to make wood trivets, which are basically a 6″x6″ square piece of wood you sand, stain, and paint a design on.
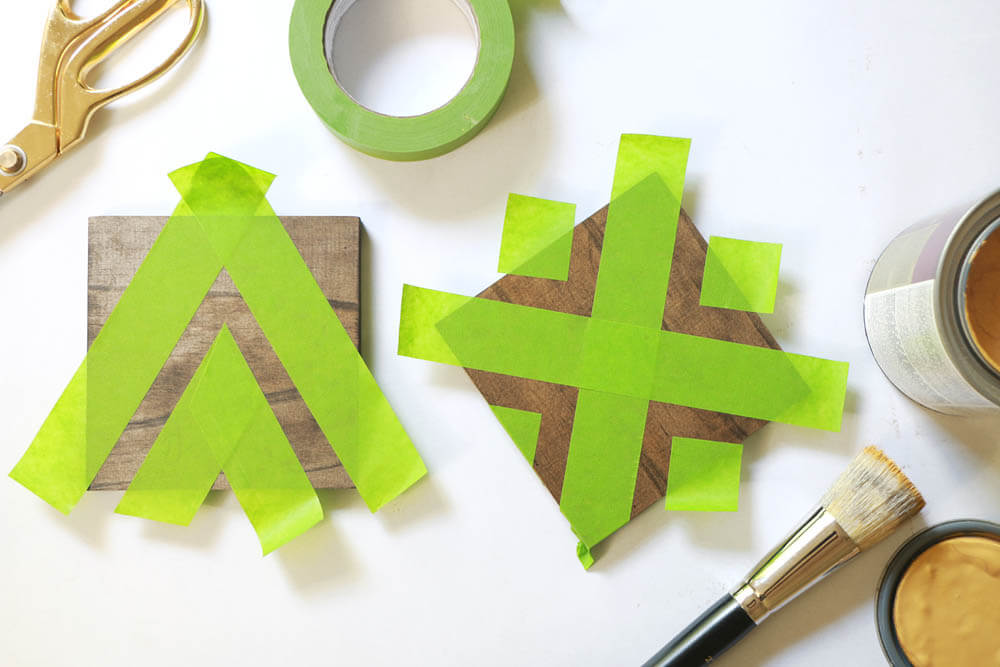
FAQ: No, I didn’t sit and measure out where my FrogTape® should be placed to get it exactly centered and make a perfect design. Lazy crafter here…I totally eyeballed it.
Gah, I love how cute these are for how stupidly easy they are to make. Protect your countertops from hot dishes in style!

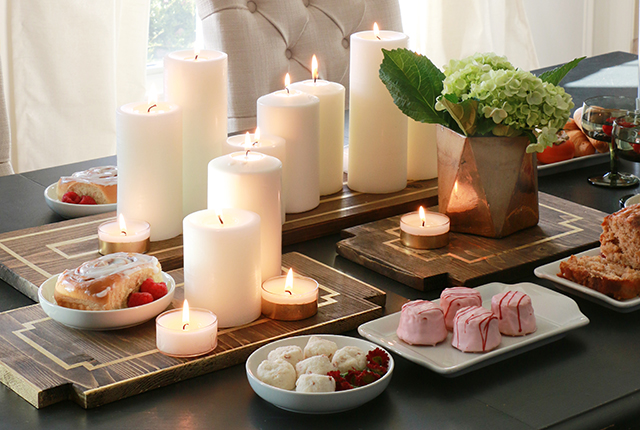
Style The Cutest Buffet Dinner Table
So, what do you think of your new kitchen holder set? Doesn’t this make you want to throw a buffet-style party just so you can use them?
These holders can also be used for other areas of the home. Use them in your craft room as attractive storage for ribbons, scissors, and other crafting tools, or in the workshop! Add a mounting bracket to the back of each piece to create a stylish storage wall.
Related Posts: Tweak These Designs
Another great project that is very similar to the trivets is these gorgeous candle holder trays. It sports a more sophisticated design, but it is also an easy craft project!
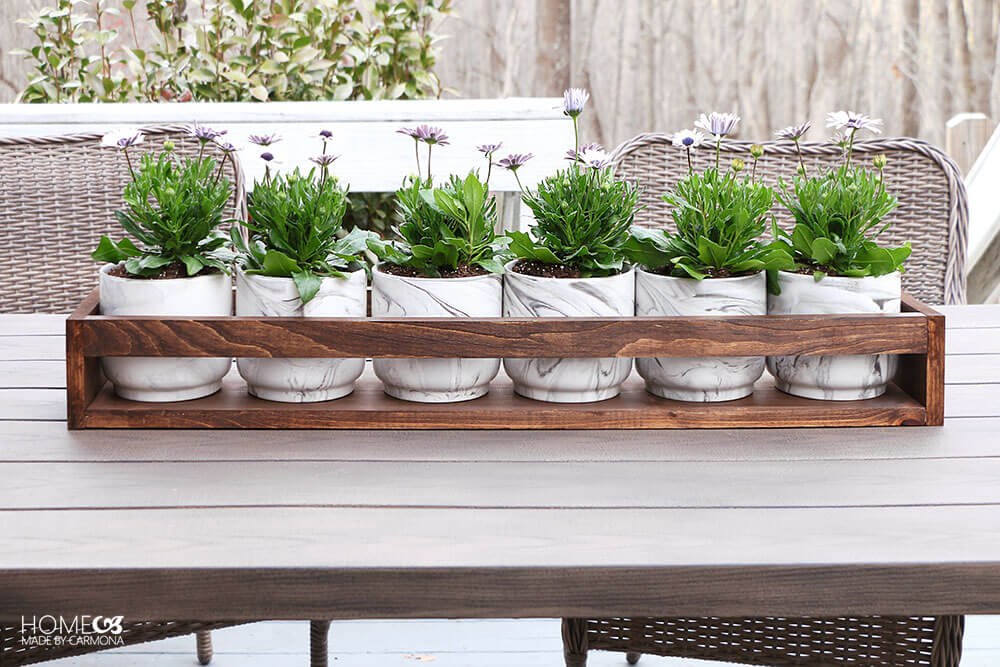
If you like the flatware holder or flower holder, make a version of it as an outdoor plant holder. It uses thicker wood and pocket-hole joinery to support heavy planters.
*This kitchen holder project has been brought to you by FrogTape®– seriously, the most awesome painters’ tape in the world! No, they didn’t make me say that, and while I was compensated for sharing my FrogTape® project, I’ve been using their painter’s tape for years and sharing my own thoughts and opinions.
Like This? You’ll Love These!
Craft leaf-motif wire napkin rings perfect for a Thanksgiving table |Make your own napkin rings out of PVC pipe!| Create shot glass candle stick holders | Try your hand at metalworking with these geometric plant holders! | Steps to create a nature-inspired centerpiece | How to arrange an orange pomander floral centerpiece |

RELATED POSTS | Decorate your kitchen counters for both style and function!


Leave a Reply