This is a sponsored post written by me on behalf of Cricut. All opinions are 100% mine. Affiliate links below
For years I’ve been a fascinated onlooker when it came to the world of all things Cricut. I don’t know why I didn’t just jump in and get my own right away, but I’ve always wanted one. Well, I’m excited to finally take the leap and own a Cricut!!
There are so many projects I’ve wanting to do with the Cricut (my list is so loooong), so I’m diving in head-first with a set of garden signs in partnership with Cricut.
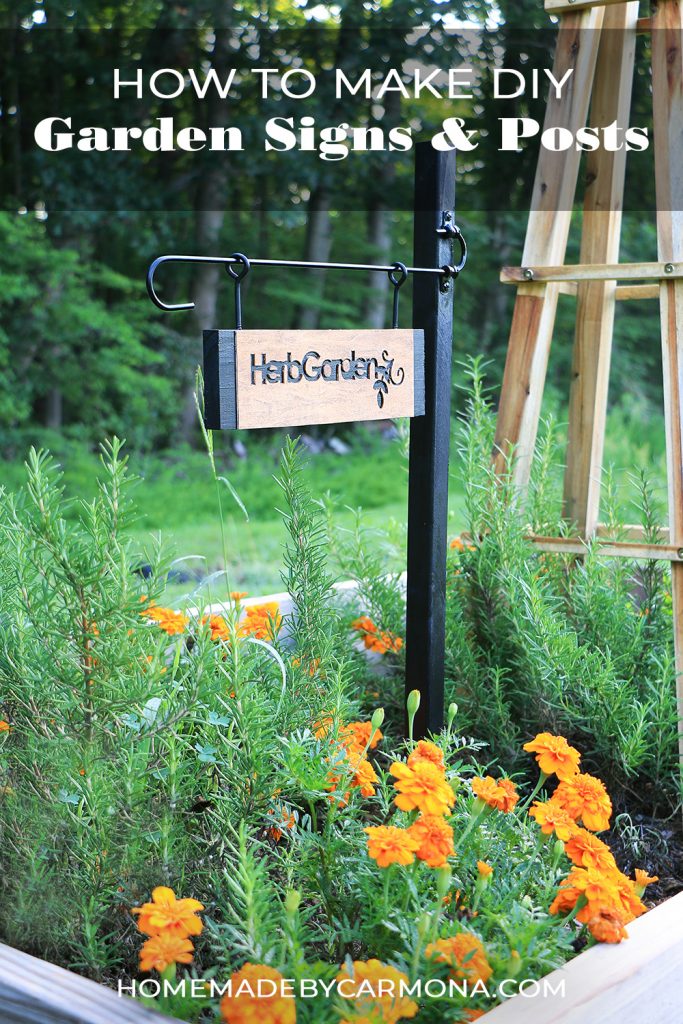
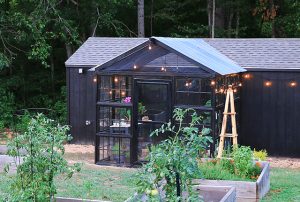
Ever since I finished building my DIY greenhouse a few weeks ago, all I can think about is adding all manner of cute customizations to my garden and greenhouse. What better way to do that than to add some adorable garden signs to each of my raised beds?
Why I Chose The Cricut Maker
Let’s just say I’m well acquainted with cutting tools. I’ve used a number of different saws, routers, and handheld tools throughout the years of DIY’ing, but nothing for fine work. So, for me the Maker was a no-brainer!
This beauty is the ultimate smart cutting machine for your crafting and fine-work DIY projects. It cuts over 300 material types. I love that the Maker can cut thicker material such as basswood, leather, and matboard.
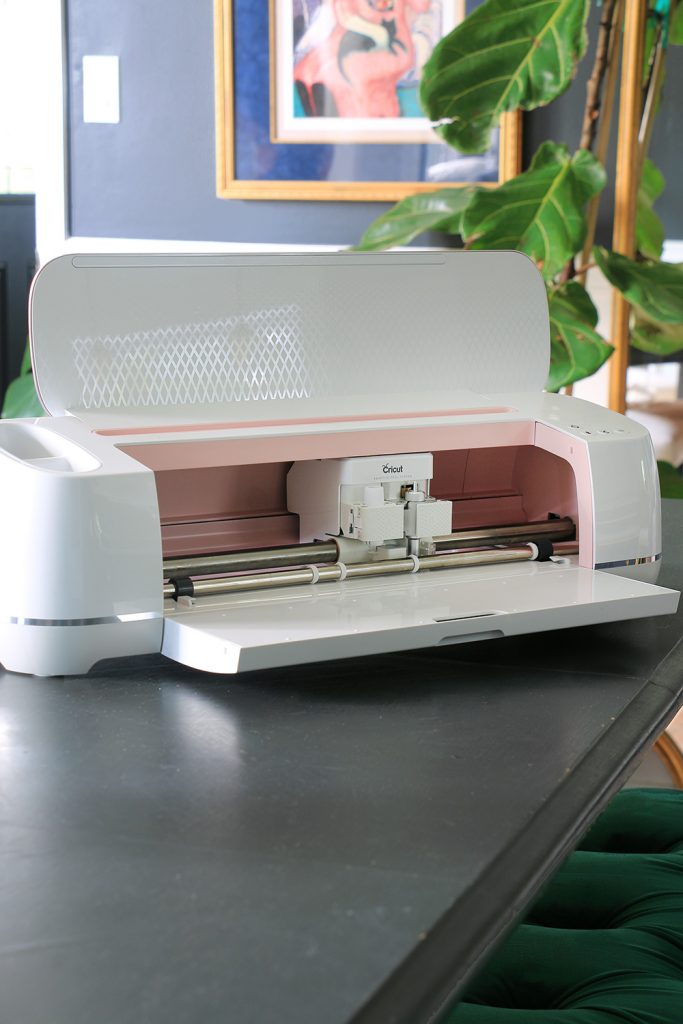
I ‘m pretty excited about the leather, wood, and aluminum based projects, but I’m incredibly impressed with the range of other materials it can cut as well.
For those who are not familiar with the Cricut Maker, it can accurately cut material as fine as crepe paper. It cuts fabric, vinyl, cardstock, and so much more…perfect for whatever you can dream up. I think it has even my imagination beat, because frankly, I can’t think up a big enough list for some of these materials. Haha! See the full list here
Design The Sign Lettering
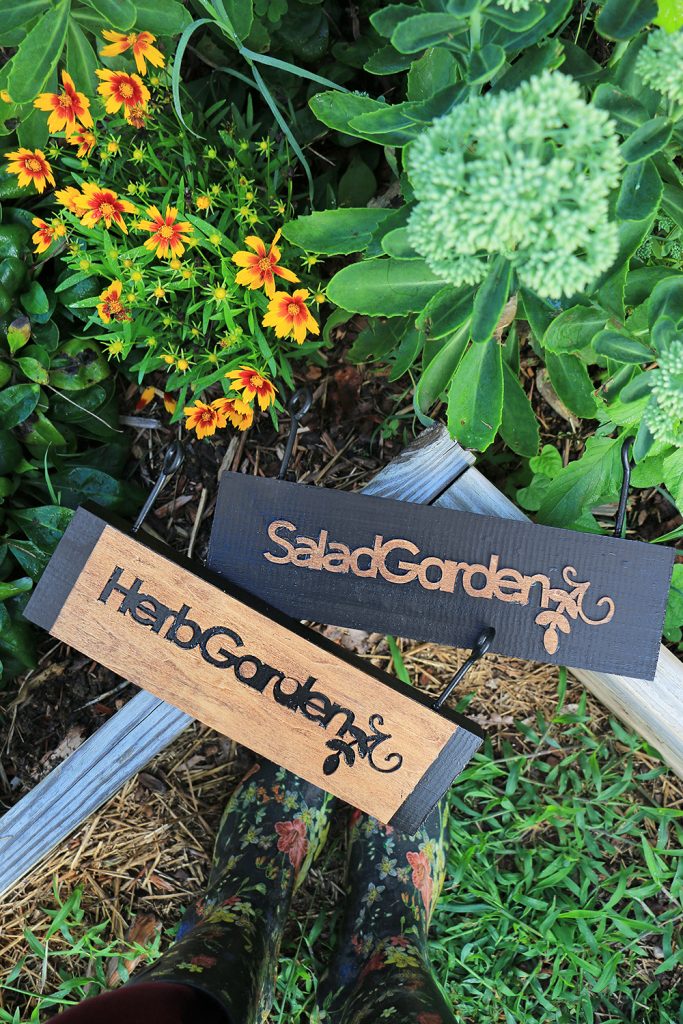
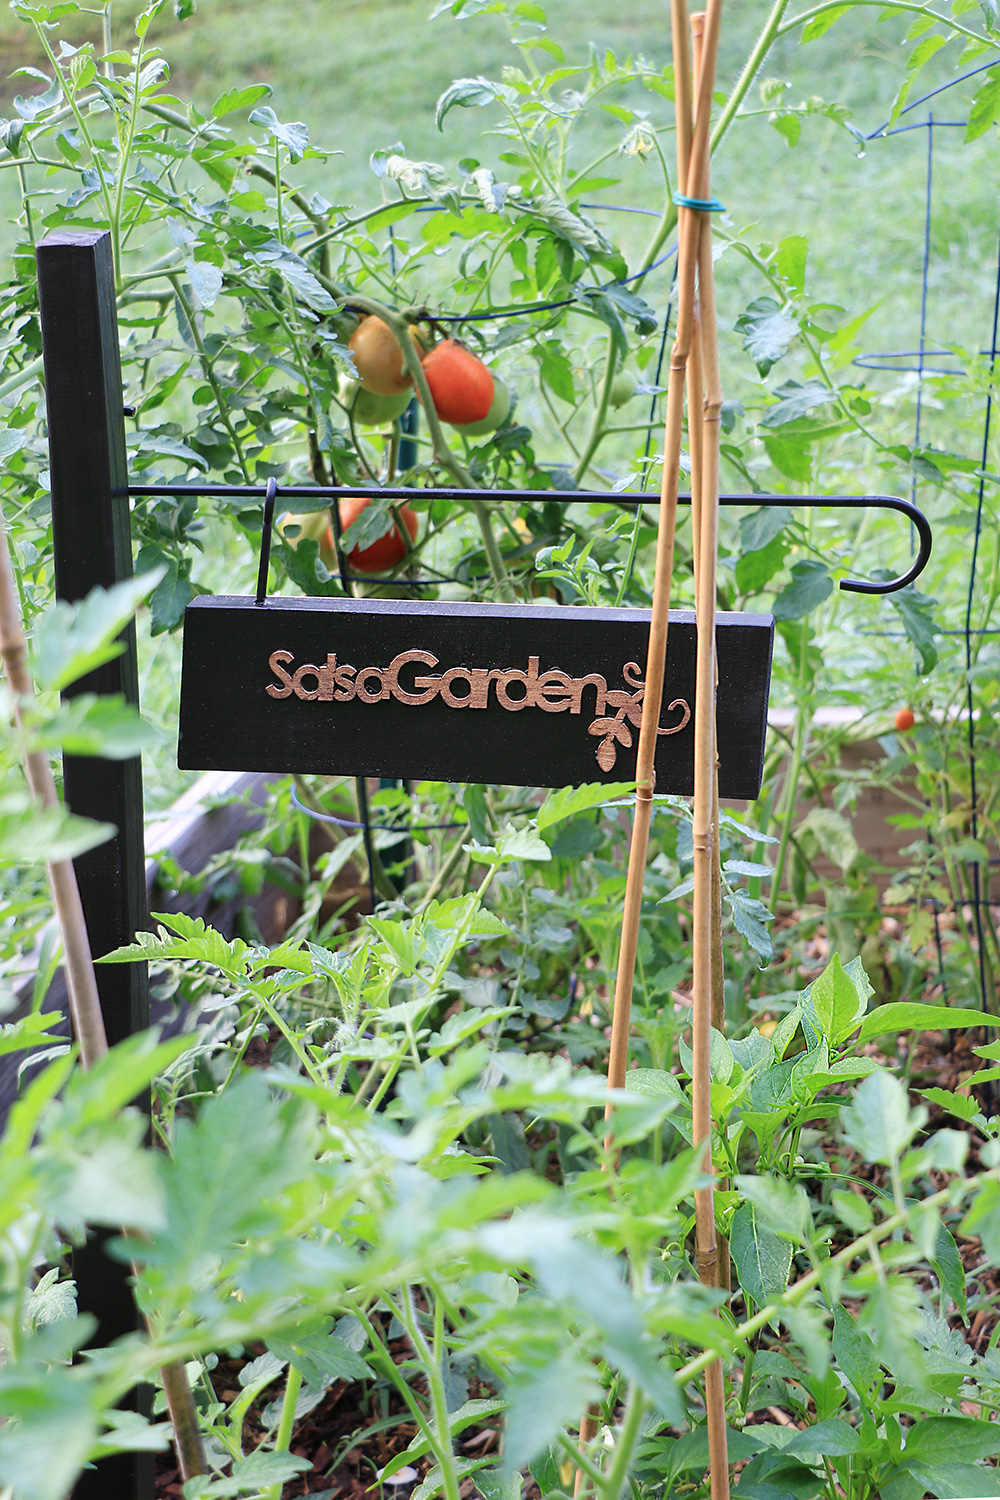
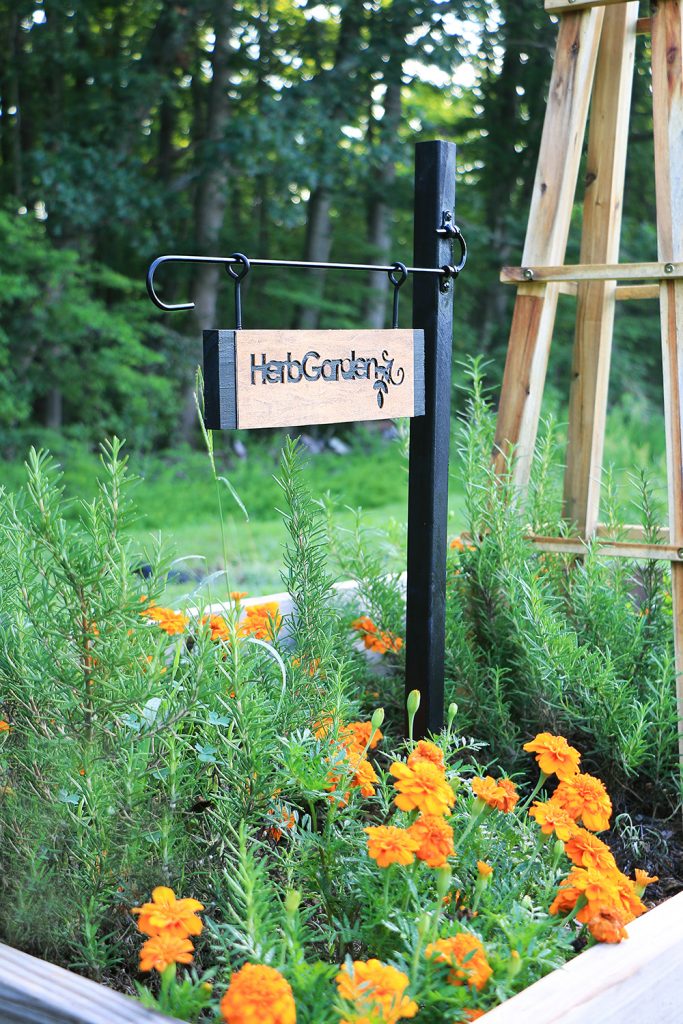
Every raised bed in my garden has a dedicated function. I have a salsa garden, an herb garden, the flower cutting garden, the bean patch, the strawberry patch, and the salad garden.
For this project, I’ll be using basswood to create the prettiest lettering for my signs, and then adhering those to a wooden frame and stake.
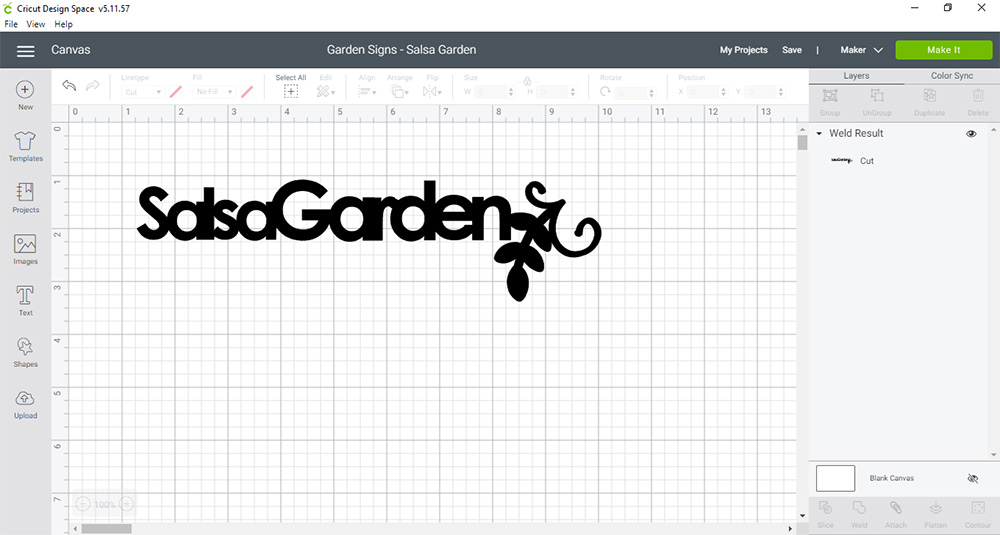
Starting on the Cricut design space, I’m using the simple Cricut San’s font and a vine flourish to create my garden signs.
Be careful not to use a font that has a lot of detail work or thin areas that will break easily after being cut. You’ll also have to smoosh the letters together so it will work as one continuous cutout. Overlap any added images, and when you are done, select all the elements and combine them using the weld button.
Here’s What You’ll Need:
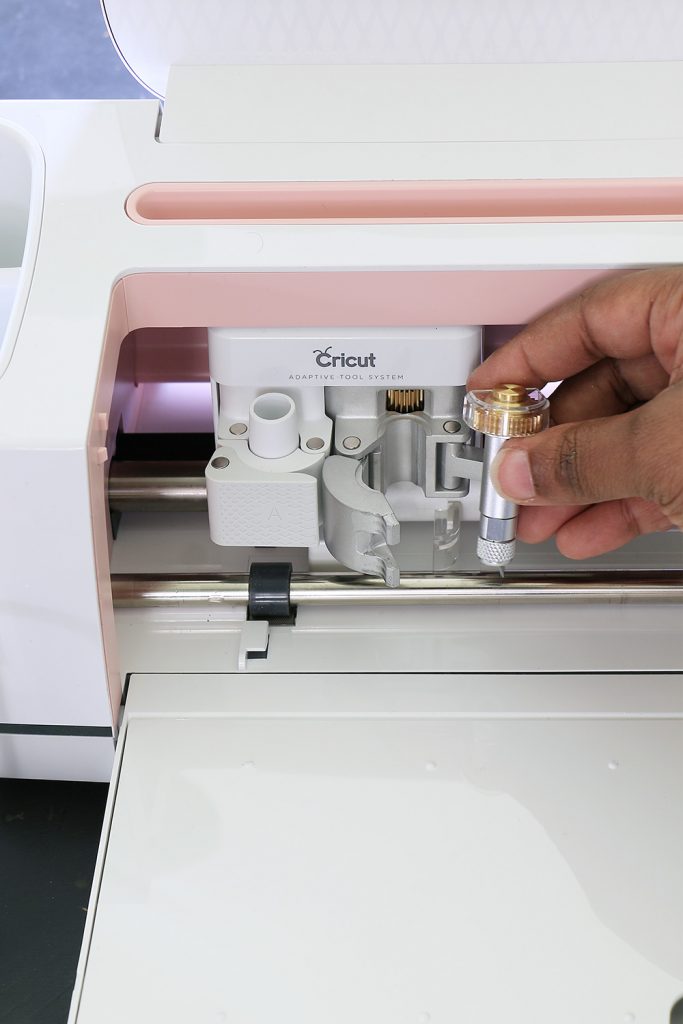
For this project, you’ll need the the Cricut Maker and the knife blade in addition to the rest of this list. (Affiliate links below)
- Cricut Maker
- Cricut knife blade (for use only in the Maker)
- Purple strongest grip machine mat
- 1/16″ Basswood
- 3/4″x4″x12″ wood for signs
- Screw eye hooks (2 per sign)
- 18″ Plant Hanger/Extender
- 2″x2″ Garden Stake
- Wood glue (that dries clear)
- Paint or stain of choice
- Varnish/sealant
Preparing The Basswood Cutouts
Be prepared for the machine to take longer than normal to cut out your lettering onto basswood. Each of these signs took almost an hour for the machine to do it’s thing, but it was incredibly precise! I worked on the rest of the garden sign while the Cricut cut, and checked on it from time-to-time.
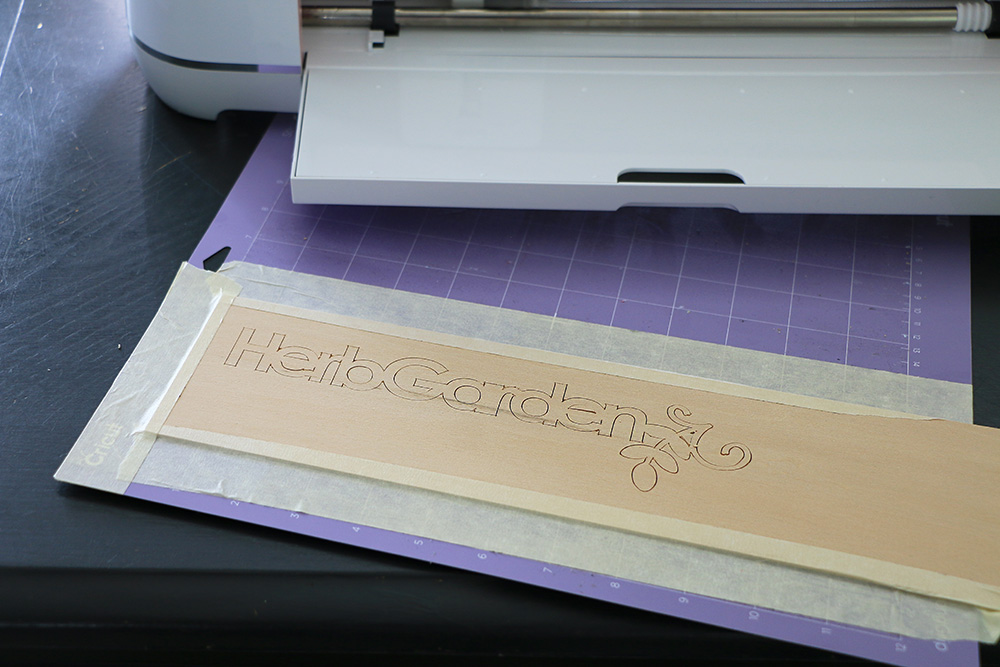
There will be instruction prompts to use the strongest grip mat, tape the basswood onto the mat, and move all three roller pads to the far right before starting. As a newbie, I found the steps easy to follow and intuitive, so I whizzed through the setup.
Here it is! My very first project cutout on the Cricut, and it turned out pretty amazing!
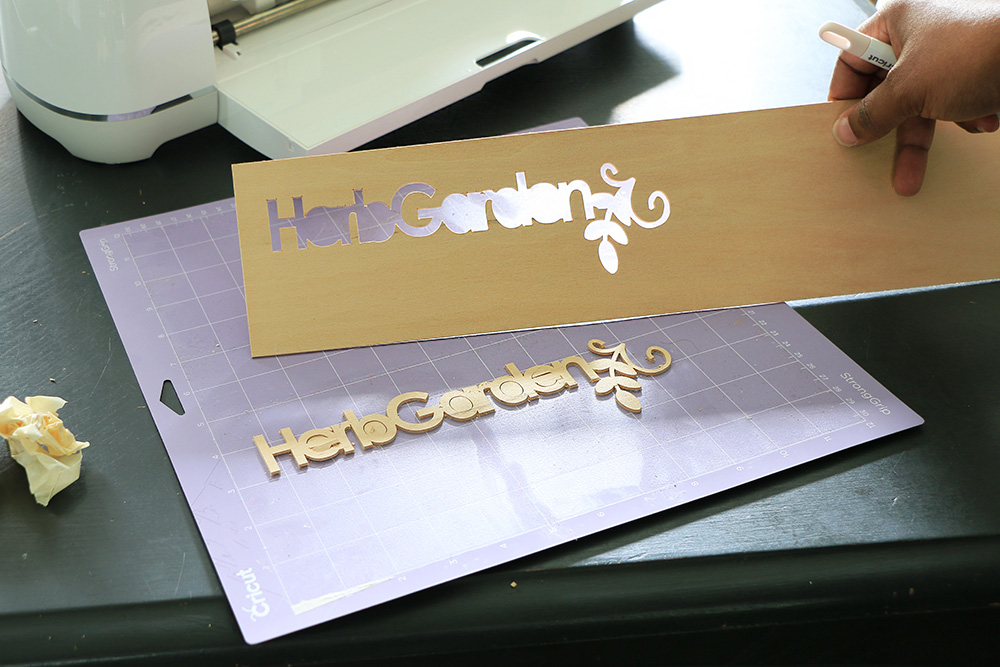
Carefully remove the lettering by bending back the mat and gently pushing the letters through. If any pieces break, that’s okay. Save any little bits, and you’ll glue them in place later. I am using both the letters and the cutout for a front and back to my sign, so I’m saving every single piece.
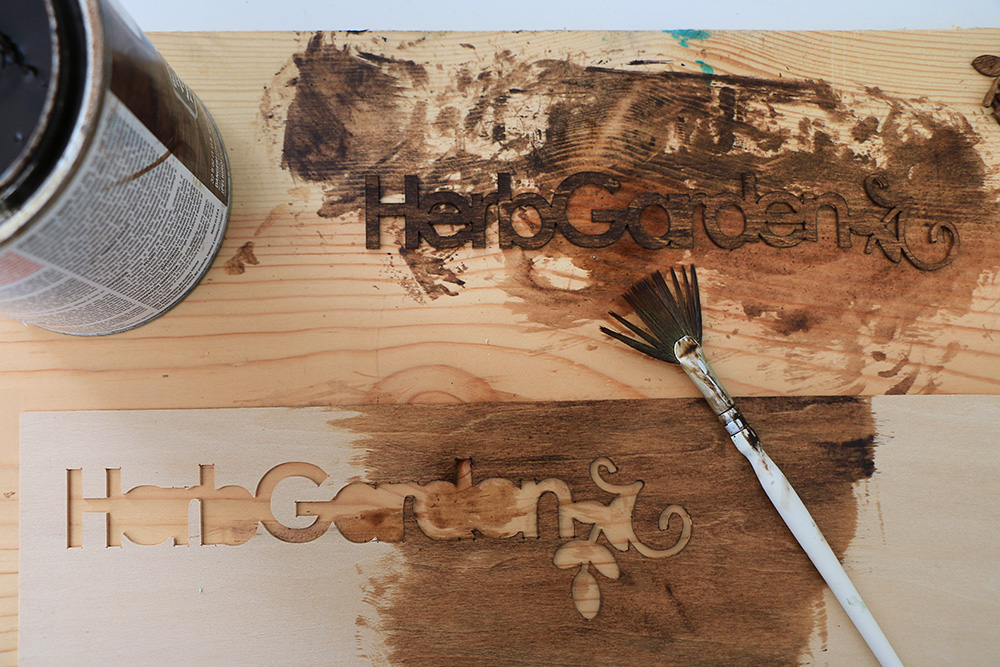
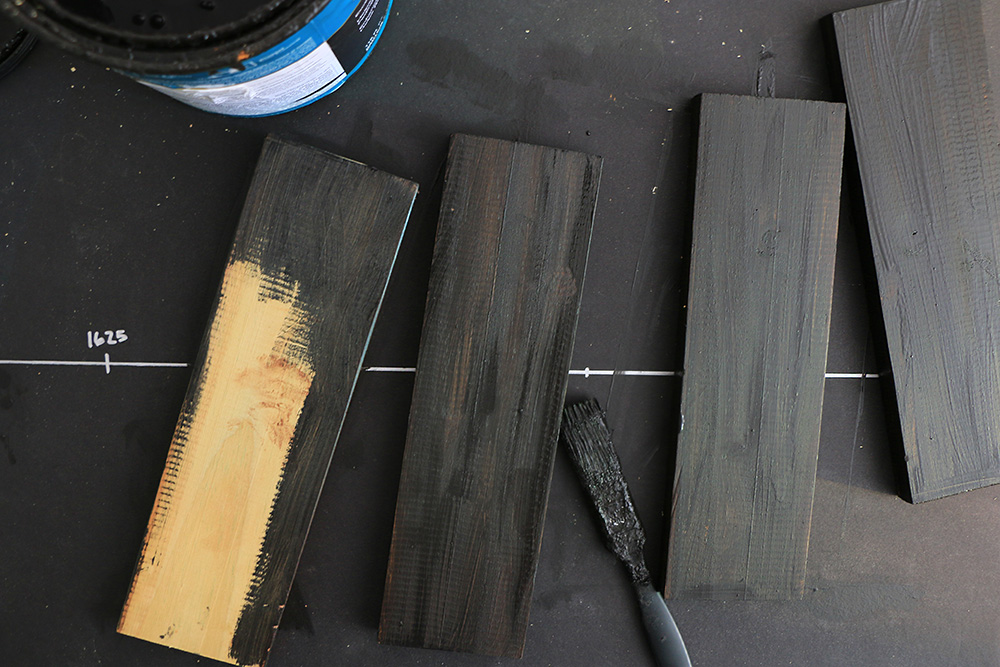
Paint or stain the letters, cutout, and inside letter pieces.
While that dries, and your Cricut cuts another sign lettering, you can start on your sign backing.
Creating The Signs
I’m using 3/4″x4″ pressure treated scraps from another project, and cutting them into 12″ lengths. But you can make it whatever size works best for your lettering. Paint or stain your wood pieces and leave them to dry.
Once everything is dry, I am using the wooden sign over top the basswood to score and cut it to the same width.
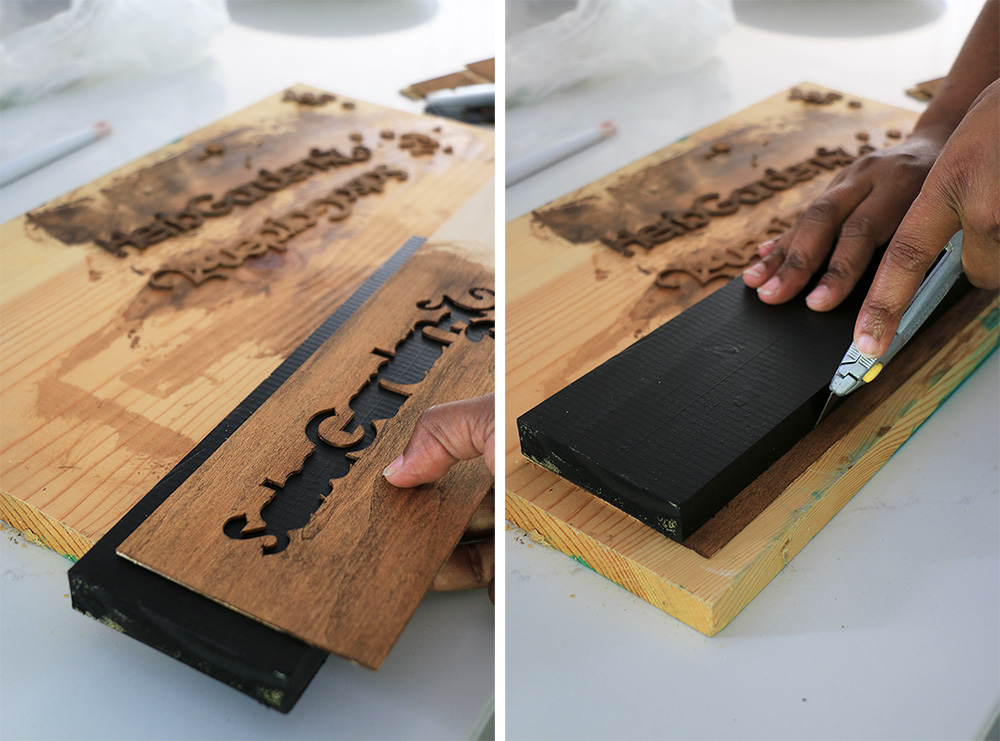
Use wood glue that dries clear, and adhere the lettering/cutout onto the wooden sign. Be sure to glue all the little flourishes really well. Then place the sign on top of another piece of wood and gently clamp it down so it all dries flat without the basswood curling up.
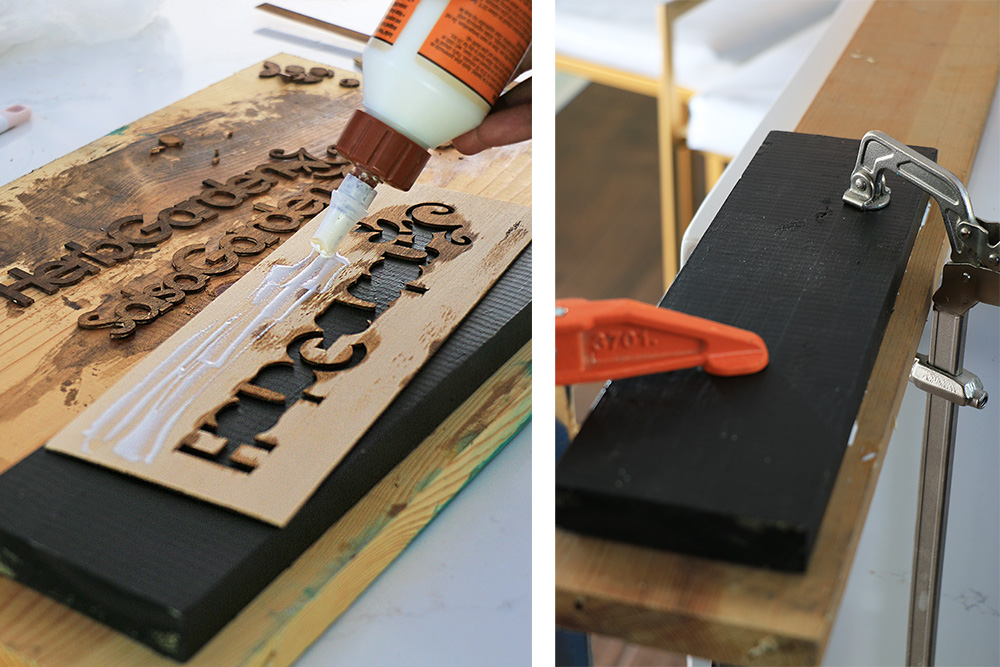
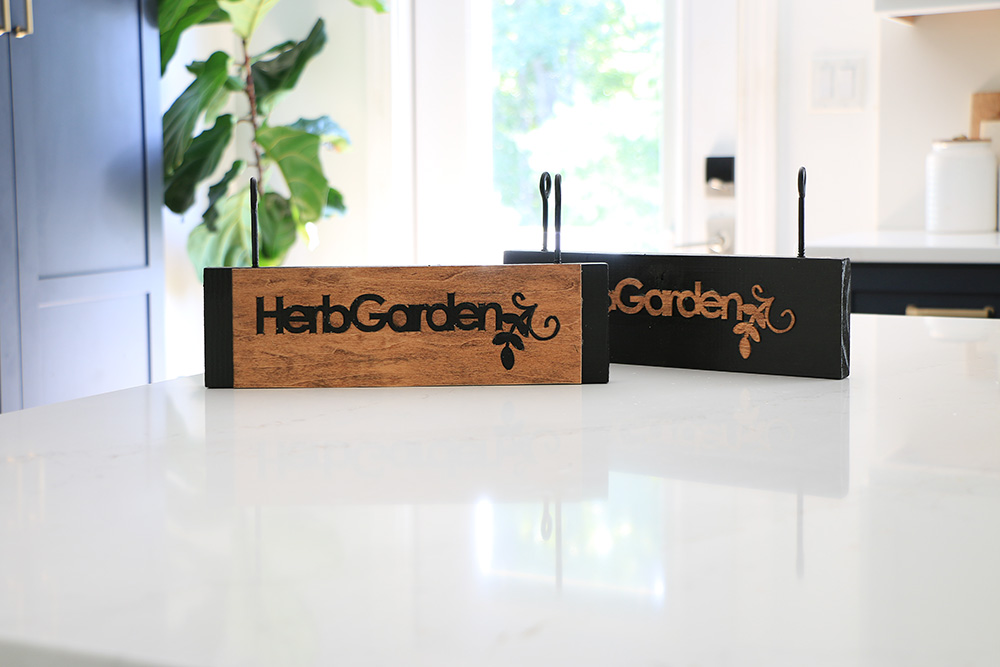
Once the glue is dried, do the back of the sign so it will be double sided. One side will be lettering, the other side will be a cutout, but both sides will be gorgeous!
Pour hard drying triple layer varnish inside the lettering pieces and seal the entire sign really well. You can also use clear drying ModPodge to seal the insides of the letters. Sealing it and protecting the basswood from the outdoor elements is important.
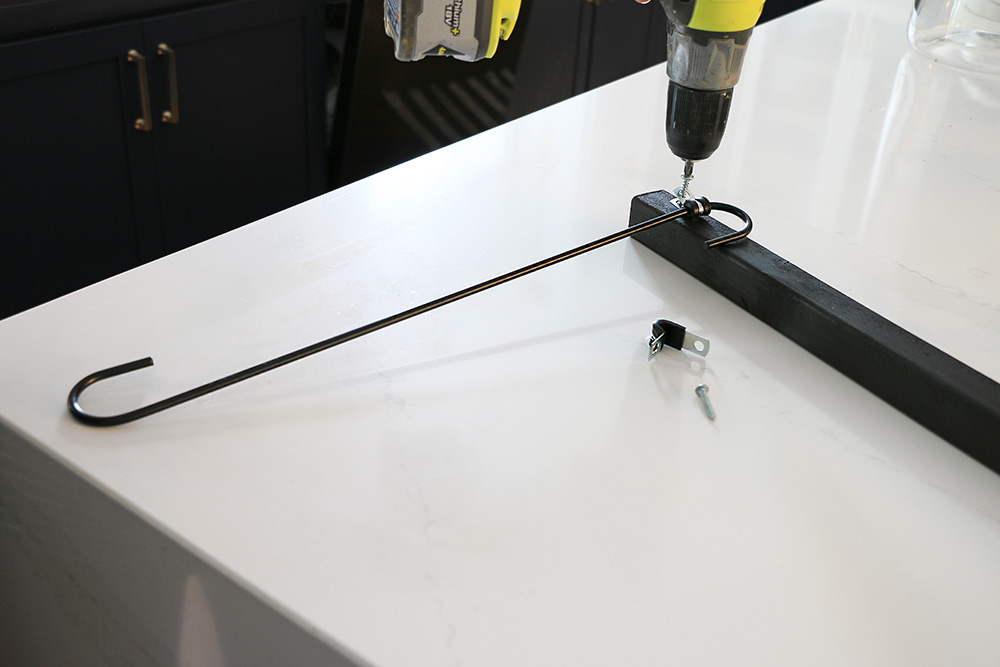
Screw on your eyehooks, and they are ready to go on your garden post/sign holder!
Making The Sign Holders
To make the garden posts/sign holders, cut 2″x2″ wooden stakes, or make your own stakes by cutting an angled base.
Attach plant extender hooks to the wooden stake using rubber lined clamps. Spray paint everything to match, and presto! You’ve got a garden sign holder!
You could also use a yard sale sign, or buy sign holders like this online, but this is a much cheaper and sturdier solution! Once you hammer those bad boys into the ground, you’ll hang your newly made garden signs.
There is a bit of a trick to attaching the signs, you’ll need to be able to rotate the eye hook as you pivote the sign, sliding it onto the extender hook.
Your Garden Will Never Look Better!
Our garden’s are going to be the stuff dreams are made of! I loved doing this project, and I think it’s the small personalized touches that make any space charming.
For other creative project ideas, be sure to visit Cricut’s blog at inspiration.cricut.com.
*Special thanks to Cricut for sponsoring these amazing garden signs, and starting a lifelong obsession with the Cricut family of products.
Like This? You’ll Love These!
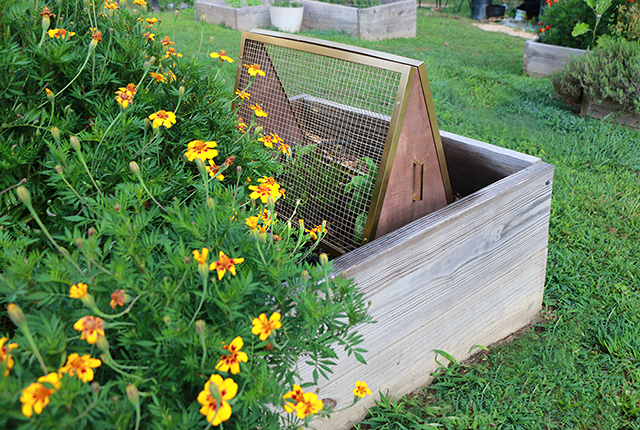
Build a plant cover to keep rabbits away!
Learn how to build a modern, easily removable, garden cover to protect your seedlings from animals.
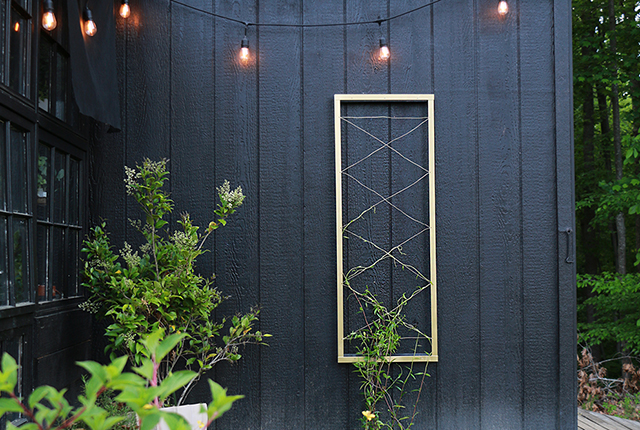
Make a simple trellis for vining plants
Add a bit of style and flair to your garden with a DIY metal trellis, designed to your taste!


These are so cute!
One note of warning about your dedicated garden bed plan, though: You don’t want to plant tomatoes in the same place every year. It’s best to rotate tem so you don’t have a nematode problem.
I purchased my Circut last year. I’ve done some very basic projects: vinyl labels for water bottles, cutting glitter paper and cardstock. I found some drawer divider projects, so I ordered a scoring wheel.
Speaking of drawer dividers, I first learned of your blog when you did a guest post on IHeartOrganzing years ago on your DIY Acrylic Drawer Dividers.
Oh wow, thank you for following my DIY adventures all this time!
Hi Ursula can you let us know what you have in the beds, Thank you
Absolutely! It changes every year, so I recommend following me on @carmonaacres on Instagram or Facebook for updated details of what I’m growing. At the time this was photographed, you’ll see rosemary, French double dwarf marigolds, multi-color peppers, beefsteak tomatoes, lavender, autumn joy sedum, and some other flowers.