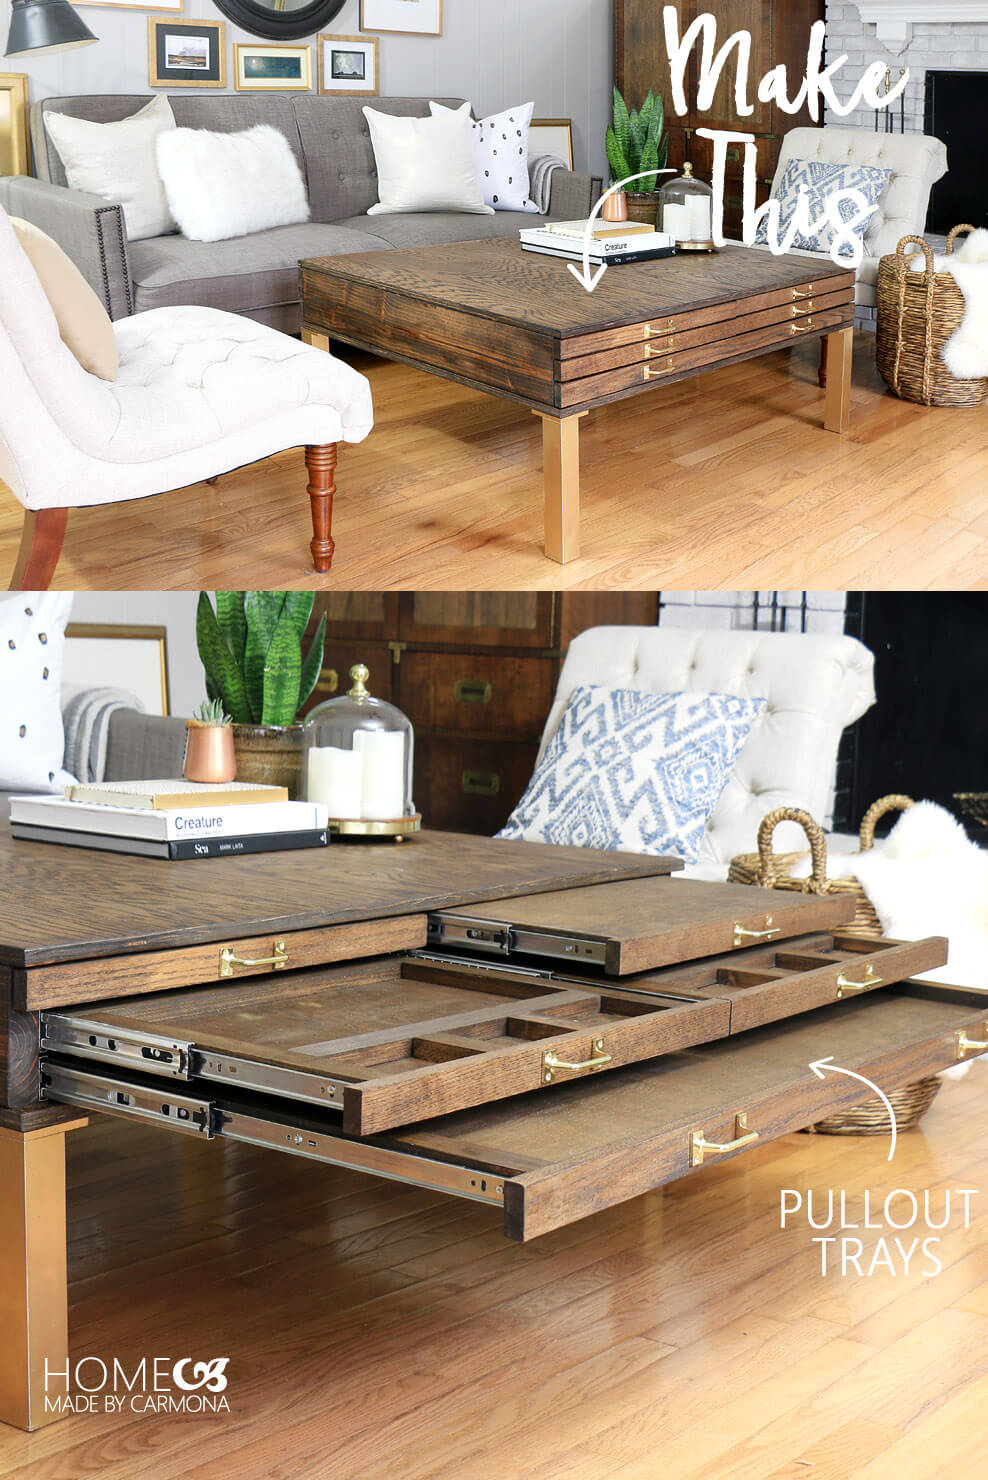
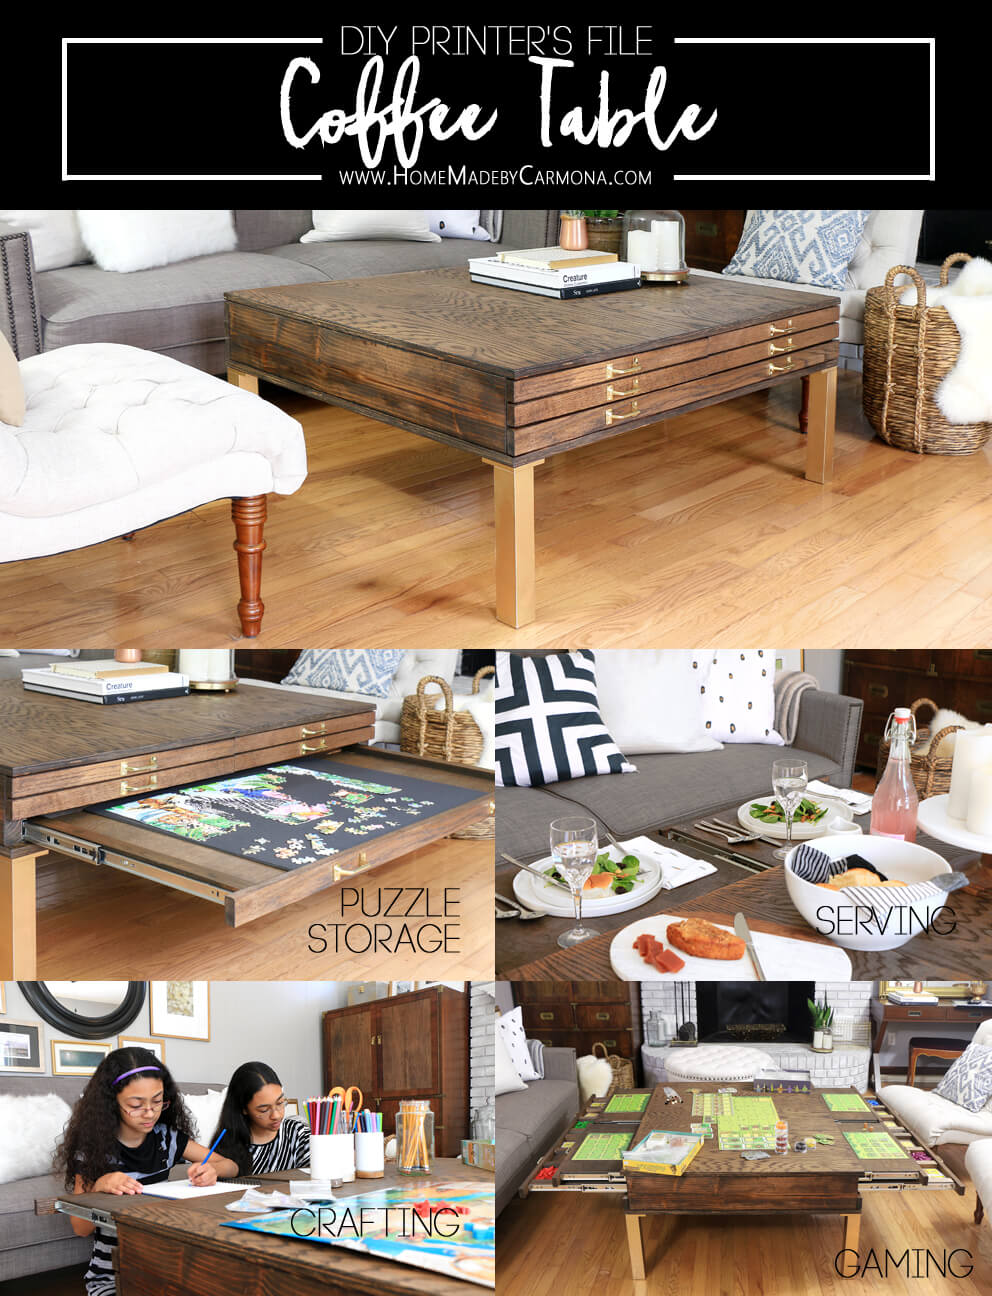
Learn how to make this multi-functional coffee table! Great for puzzles, games, or just serving!
 *This post is awesomely sponsored by Kreg! Woop!
Oh great, the movers totally destroyed my coffee table. What in the world would posses them to rip out the legs instead of unscrew them? Now I need a new coffee table…good thing I partner with Kreg each month to build my dream furniture.
The great thing about building your own furniture, you get everything you want. I’m sharing my full build plans on BuildSomething.com, Kreg’s awesome user powered site.
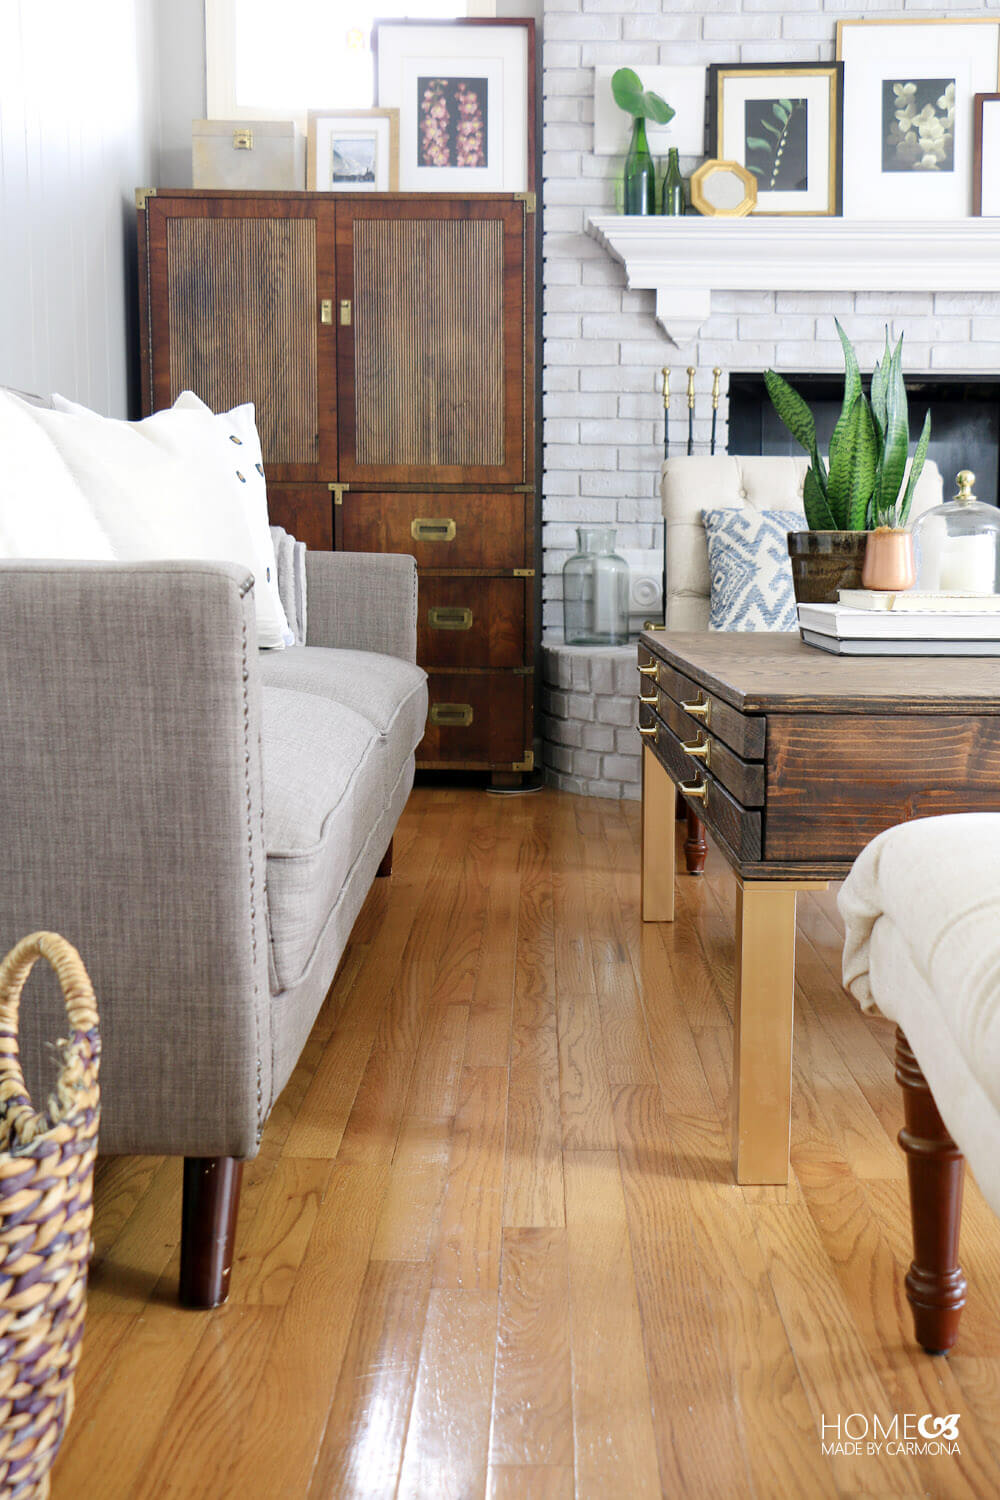
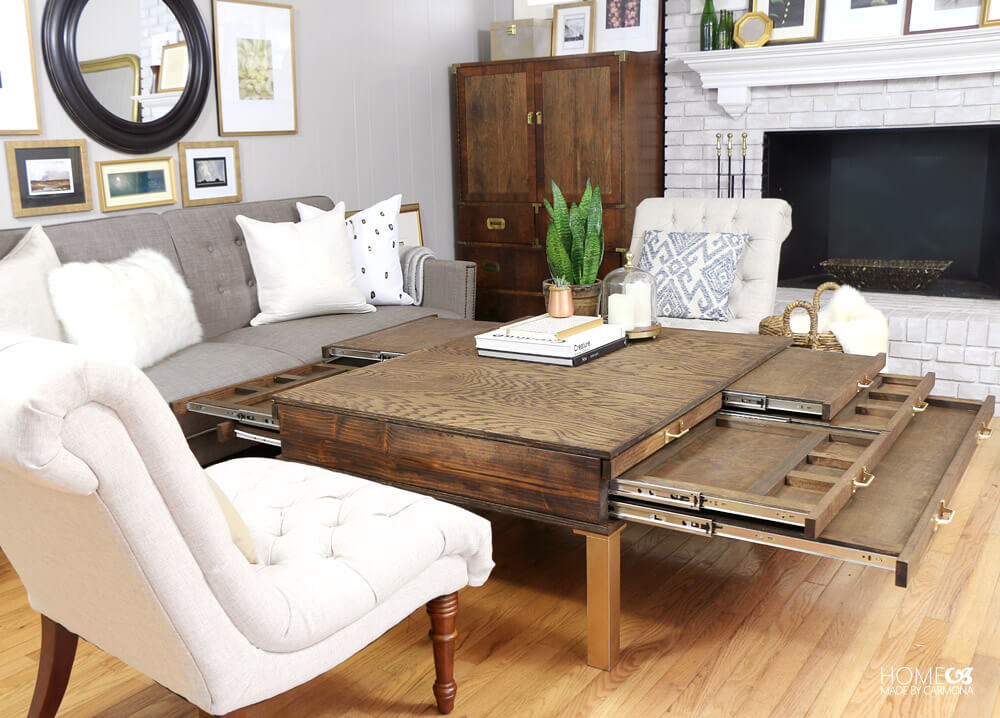
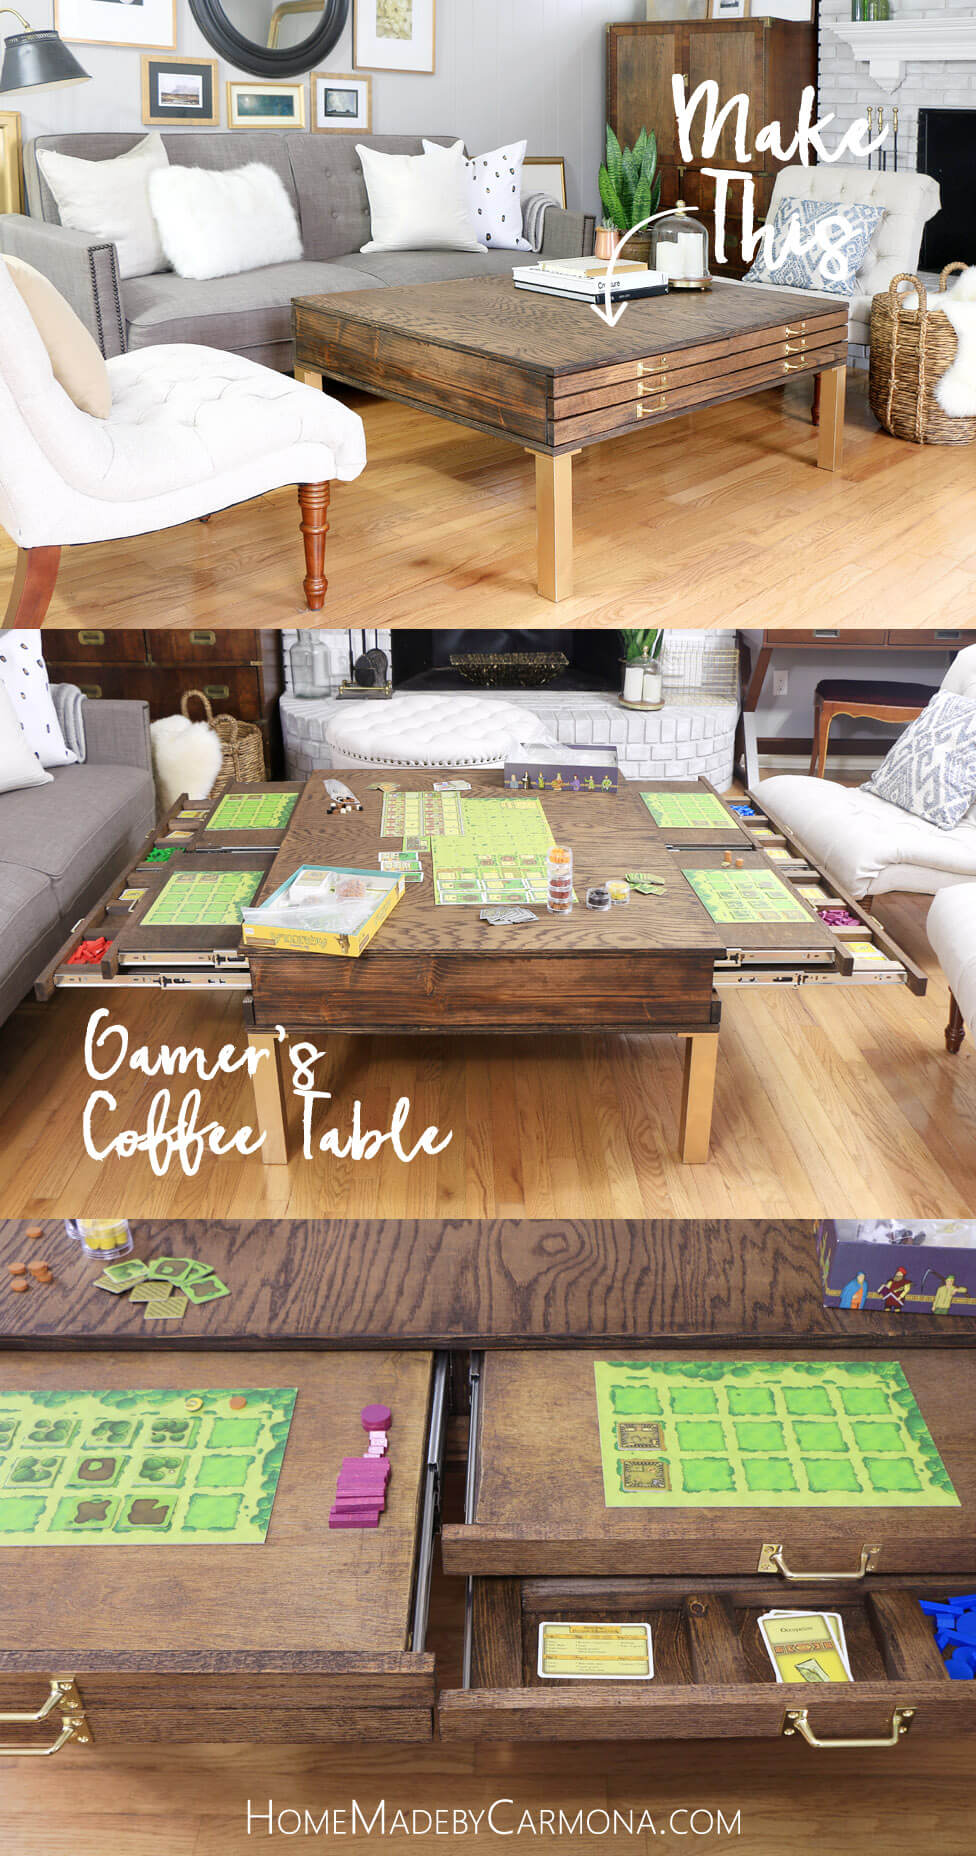
For this coffee table I decided to go with a style similar to a printer drawer style; it has the chic look I desire, but with all the storage I could need.
This coffee table would be the one my family would spend the most quality time gathered around. It has to function like a dream, but blend in with my decor as well!
Let’s talk about some of the ways you can use a coffee table like this:
Puzzle Storage
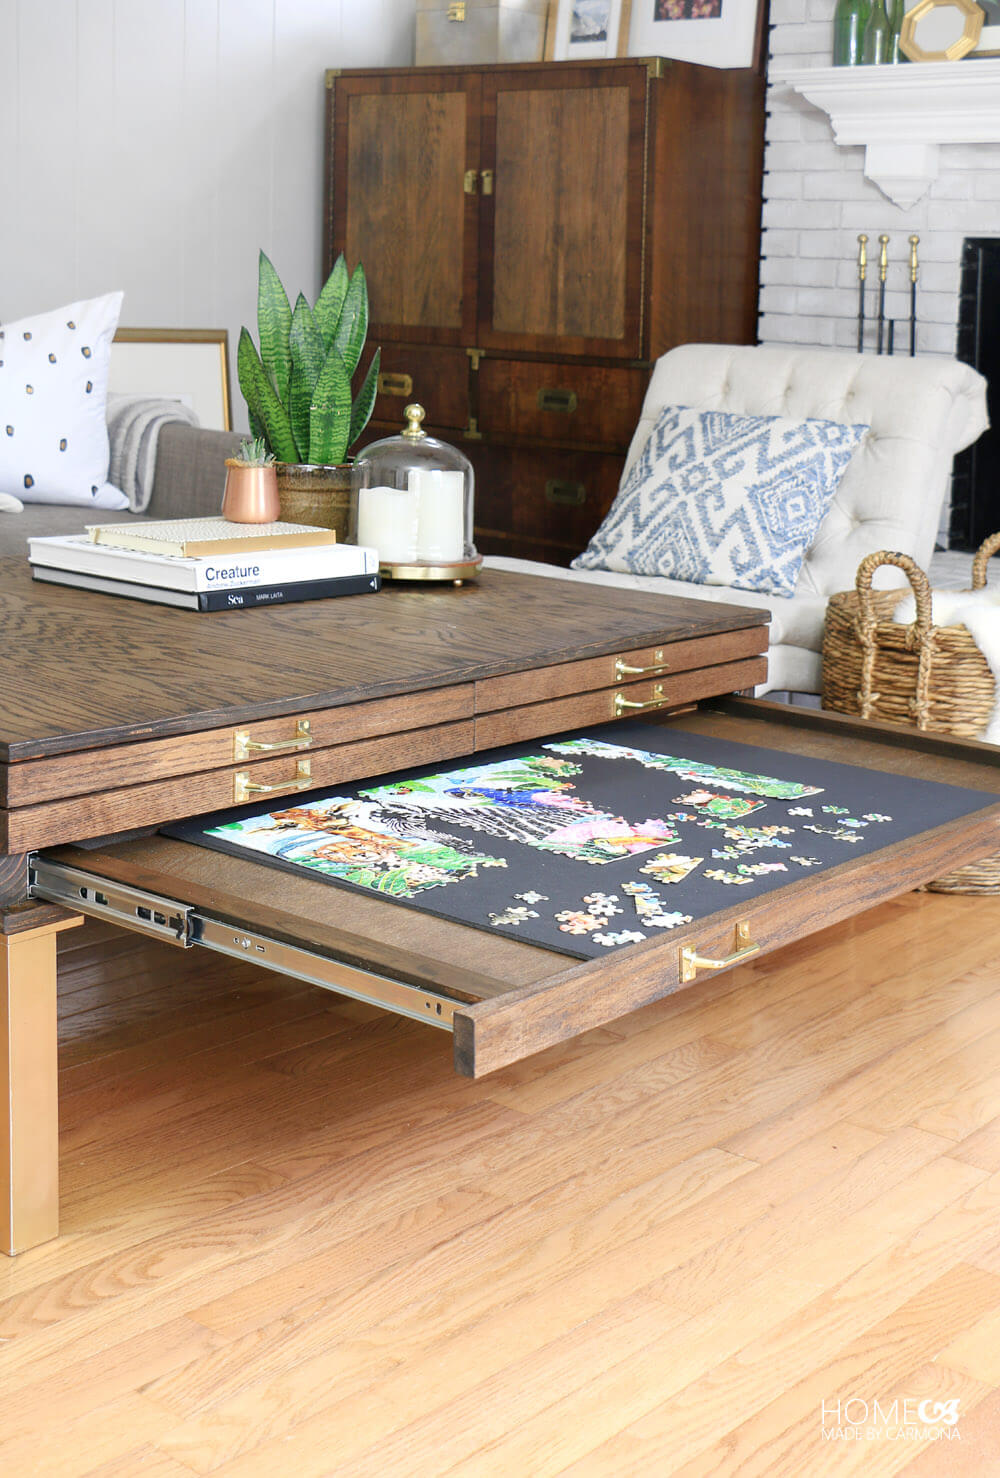
Nothing is worst for a puzzle lover than to discover your family has accidentally bumped the puzzle you have been working on for weeks, and now you are missing a few pieces.
For a mom, nothing is worse than constantly finding puzzle pieces while vacuuming, when all you want is a tidy room. Haha!
The solution? This bottom drawer has shallow sides that ensures no pieces are lost, and it is large enough to hold a variety of puzzles sizes. My daughter can do her puzzle right there on the pullout or she can pull the whole drawer out and move it to another space. Just to make the process easier, I also put a foam board inside (which is lighter than the drawer), and she can pull it out of the drawer while actively working on it.
Tabletop Gaming
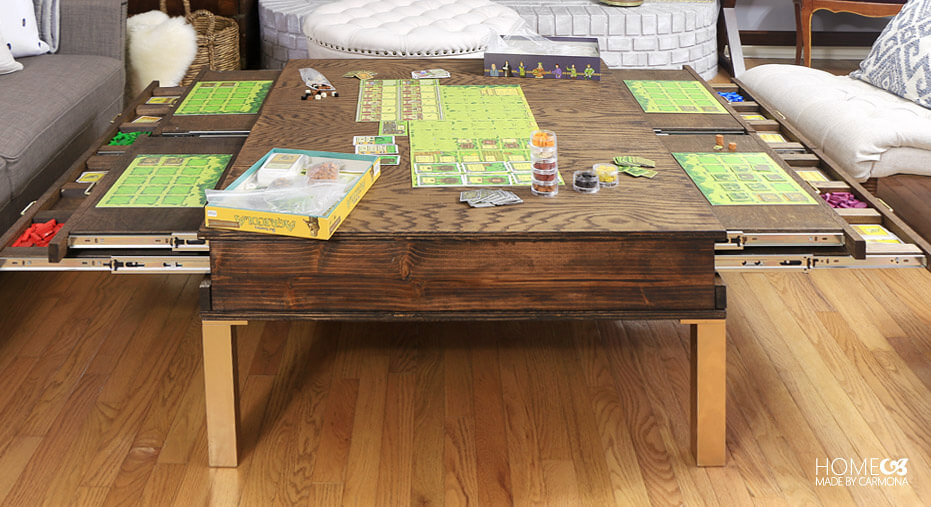
I’m a total board game geek, and our family plays Eurogames, also known as “tabletop games” or “modern board games”. These are not your mama’s board games my friend! This one pictured below is one of my favorite games, “Agricola” by Uwe Rosenberg, and it needs more room than the average coffee table can provide.
Many Eurogames take up a lot of space (even more than this one!), and although I designed this coffee to be a hefty 4ftx3ft tabletop, it still isn’t big enough for some of our games. Especially once all set up, cards all out, and pieces…these games need lots of room.
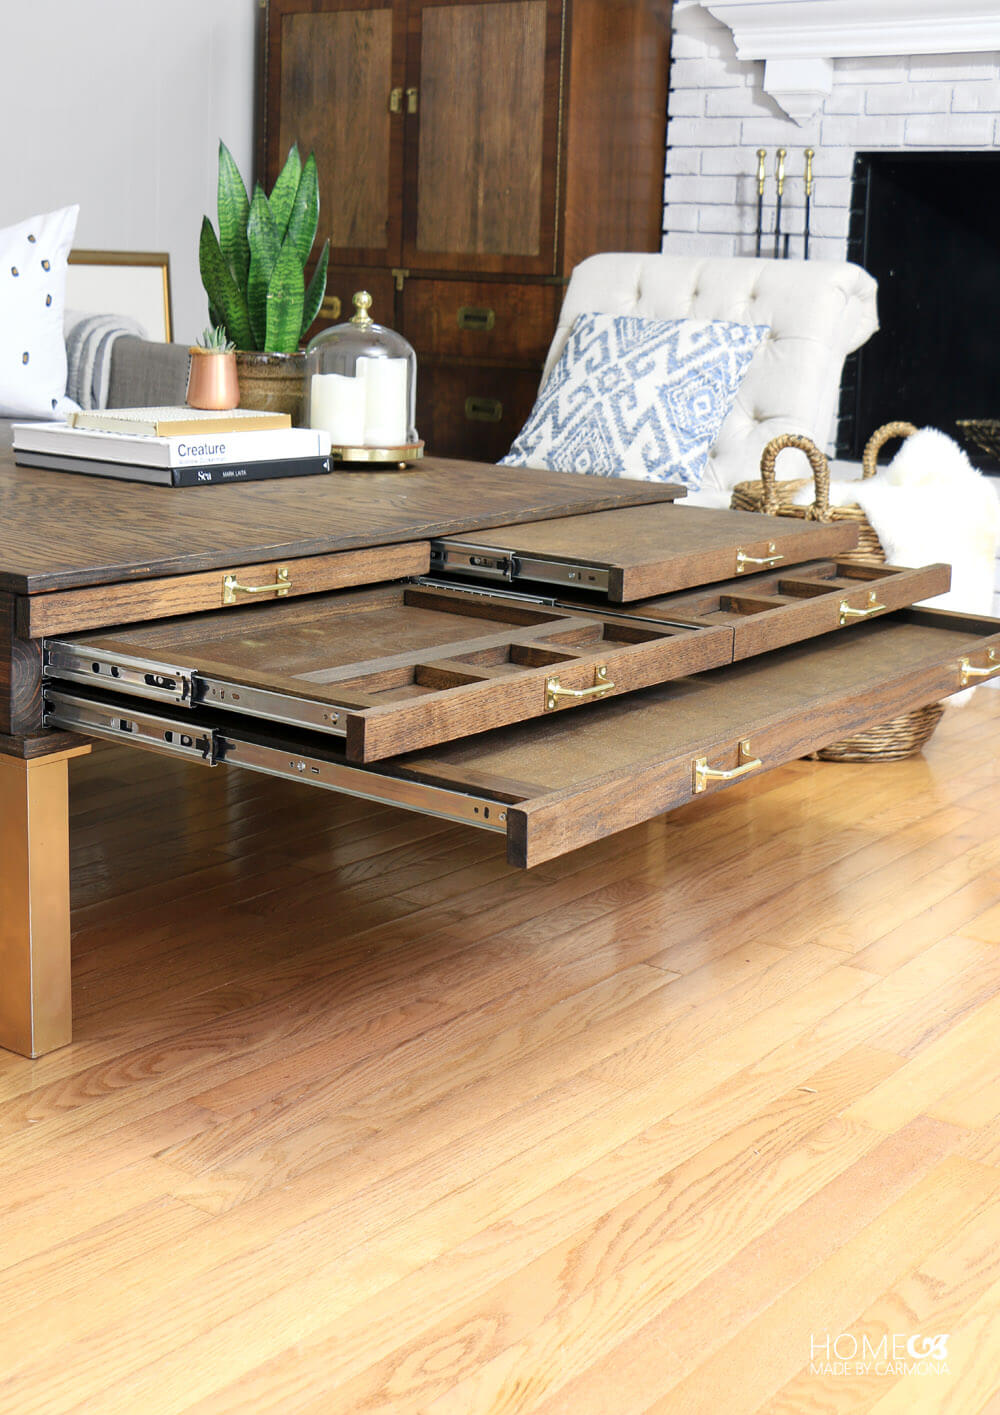
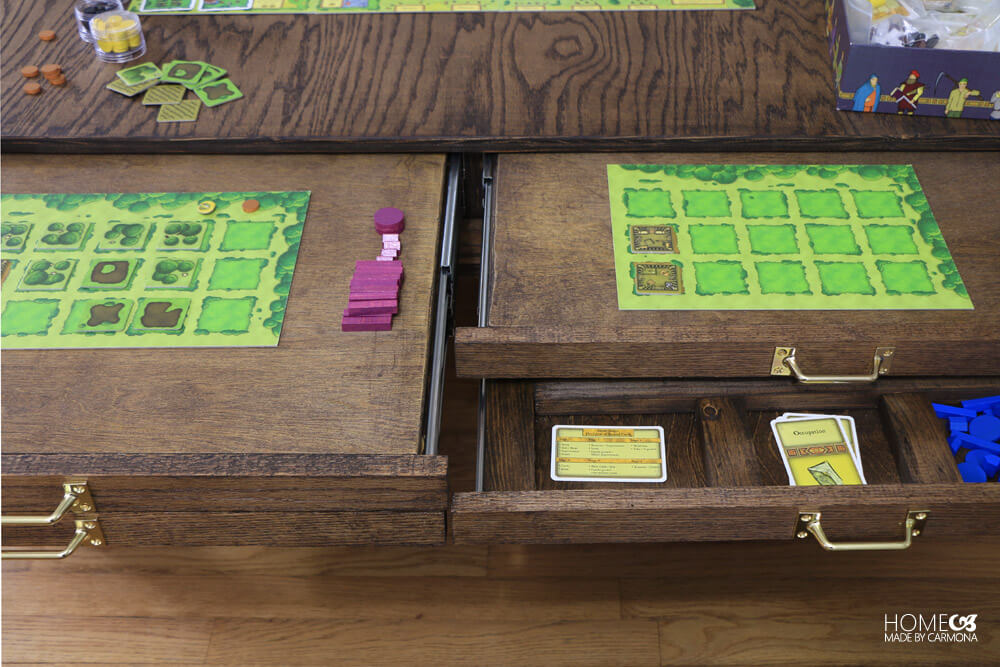
These pullouts were designed to be individual gaming trays, with the option of a compartment drawer below for miscellaneous pieces, cards, or pieces that are suppose to be hidden in some games.
For the Gamers: A few important details to consider if you build your own
- Height: This coffee table is actually higher than the average coffee table. Measure for the perfect gaming height for those who want to be comfy from a couch, but shouldn’t strain their backs leaning down, only across.
- Flush Pullouts: It may be tempting to make the top pullout a drawer…don’t. In some games the players need to be able to easily see the full gameboard and all their opponents materials. If this isn’t that type of game, then use the second drawer down. It has small compartments for gamepieces, and a larger compartment for gameboards.
- Extras: Cup holders are a fun extra…my husband doesn’t allow drinks near our games…but you could add a cup holder to the second pullout, or even the third!
Crafting
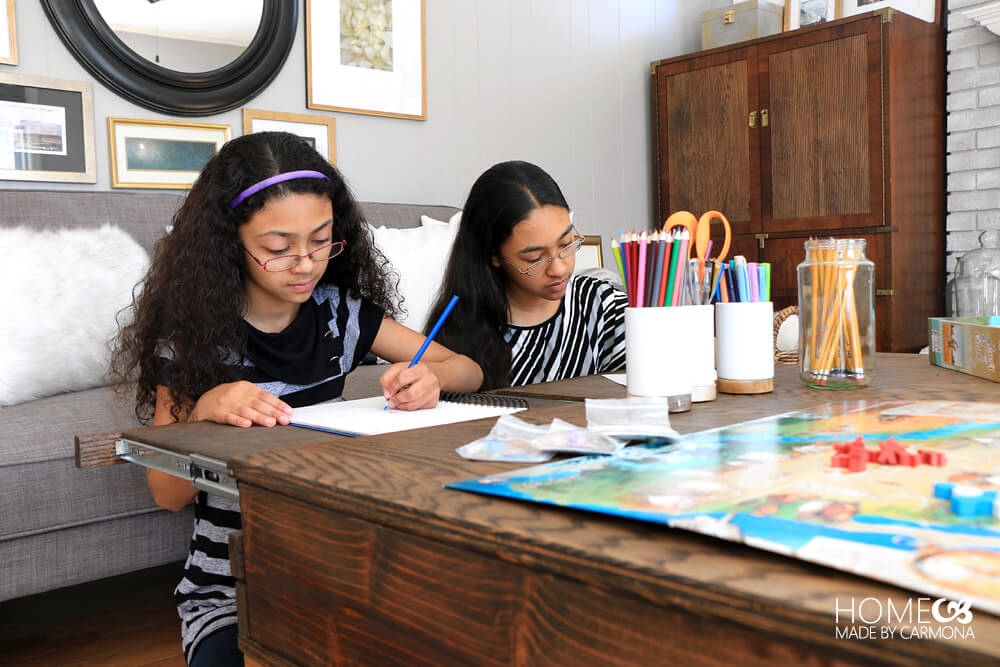
Sometimes the coffee table can get a little crowded, whether it is my decorative items, or maybe the hubs and I are playing a game that the kids would rather sit out and draw instead… either way, the pullouts can serve as extra space the kids can use for whatever project they are getting crafty with.
Serving / TV Trays
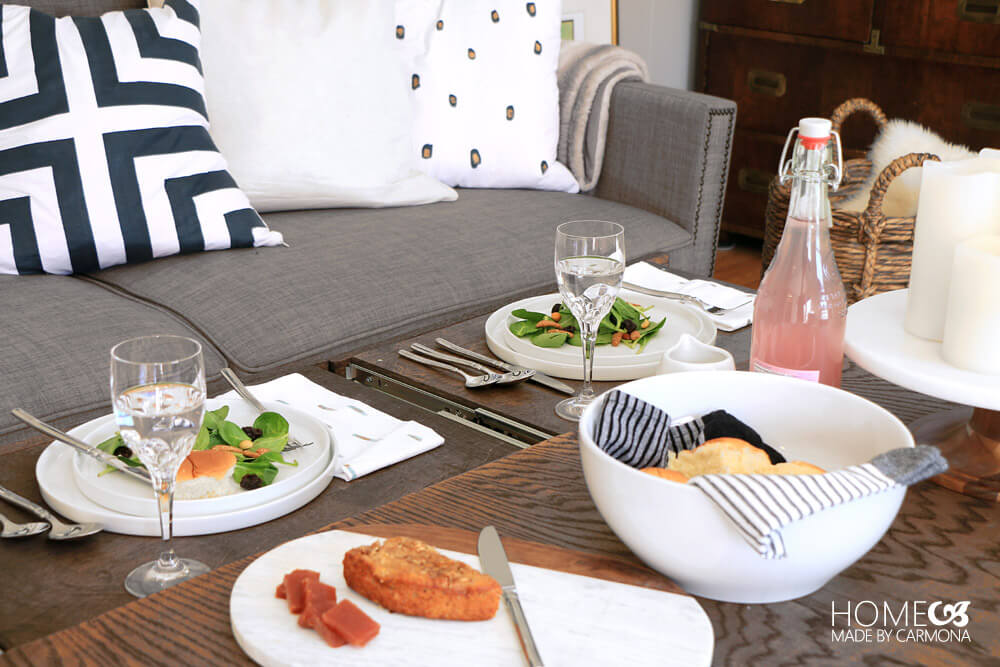
Then there are the big gatherings, whether it is over the holidays or just a social gathering with all our friends. Inevitably the TV trays have to be brought out from the basement because there are just too many people to seat in any one place. With this coffee table, who needs TV trays?
However you like to use your coffee table, whatever you need to store, this one has it all!
Want to Build Your Own?
The concept behind this build is quite simple, and if you’re even a little handy it’ll be a breeze!
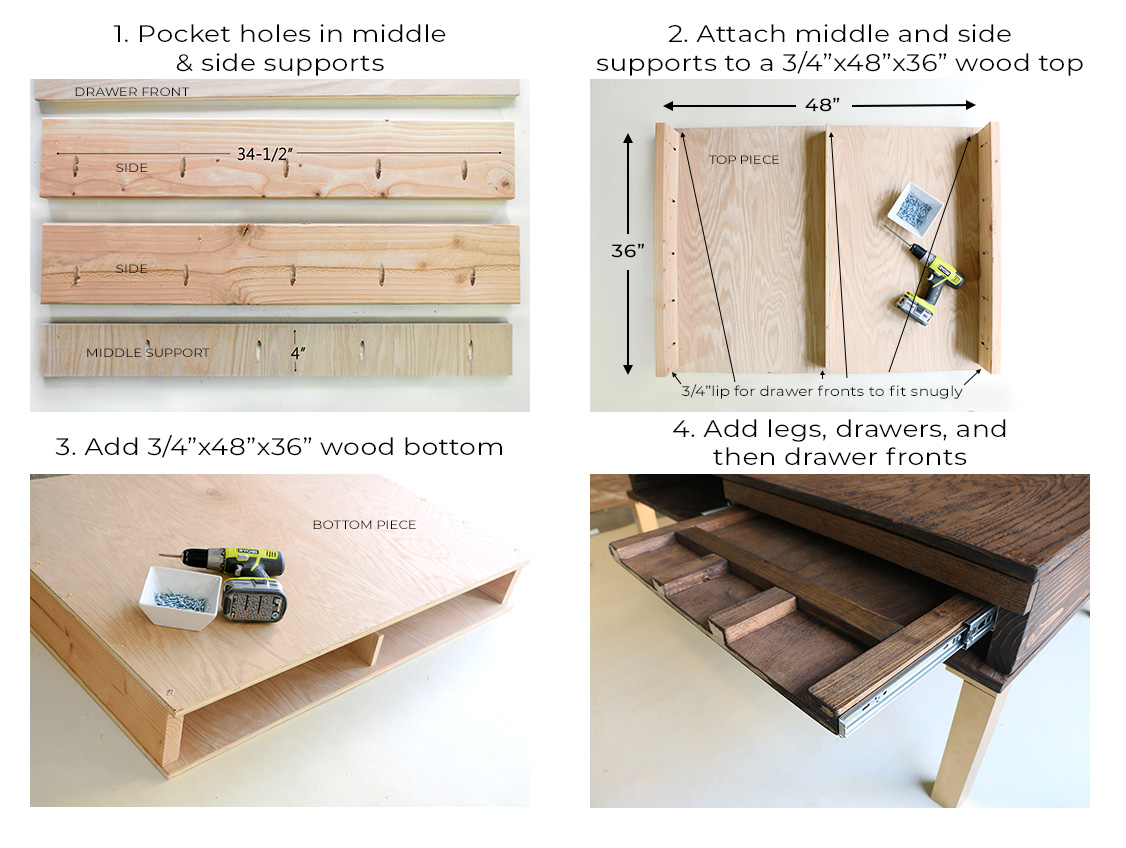
It’s basically just two thick hardy pieces of wood, the same size, with some side supports sandwiched in between.
TIP: If you can add the drawer slides in step 2, it will be easier to install…harder to get the spacing exact, but definitely MUCH easier to install!
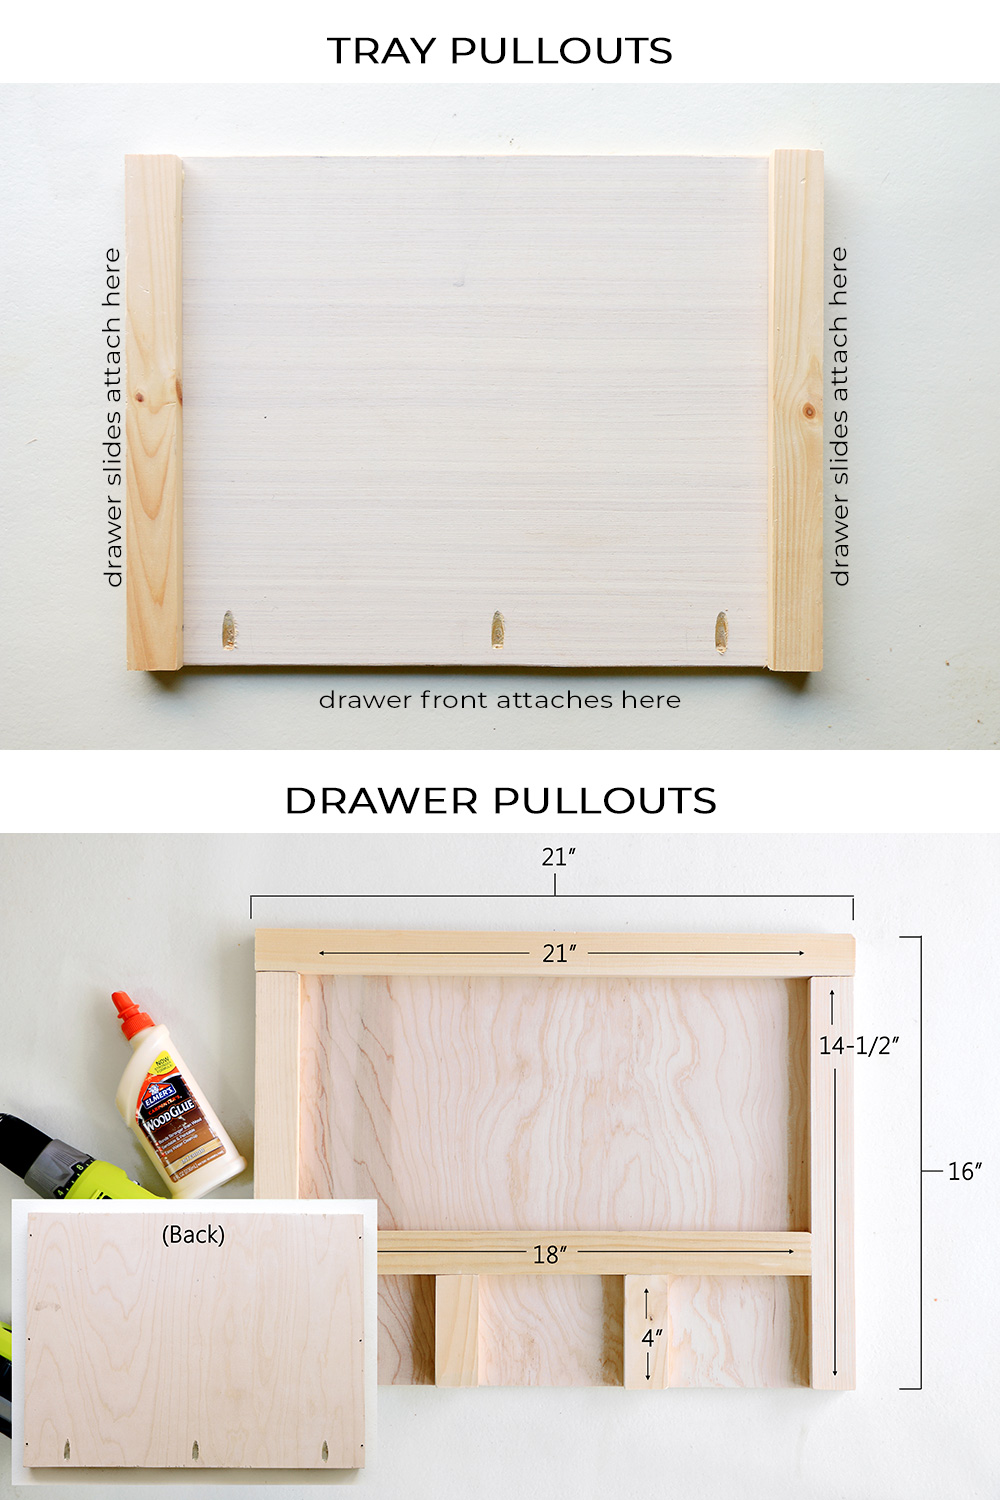
The drawers and pullouts are just simple plywood with a grid glued on (screws can be added from underside for extra sturdy support).
Need more details? You’ll find more detailed build instructions on my BuildSomething profile. But if you have any questions, please come back and ask here, because I don’t check that profile very often.
If you love this, or built it yourself, please share with me over on Instagram or Facebook by tagging me!
See this coffee table in action here>> “How To Create A Tabletop Game Room”
>FOR THE GAMERS<<
*This post was awesomely sponsored by Kreg. I received product and compensation for this post, however all the opinions, projects, and plans are my own.



Hi! I was wondering where you got your drawer pulls from. I love the look and want to use the same one on mine!
Wish I could attach a photo to show you the result! 😍 Thank you so much for the plans 🥰🥰 We modified it slightly and created our own “look”. We LOVE this table and so does everyone else!!! This design is incredible; we are so grateful you shared it ❤ Congrats on that stellar brain of yours 🧠😉
Just found this post and I’m so glad I did. What a truly BRILLIANT build! This is the next DIY on my list. Thank you so much for featuring and for the free plans linked above. I really appreciate it. Cannot wait to explore more of your DIYs/website!
The tray pullouts are 1×2’s on their side on top of 1/2″ plywood if I am correct. When I look at the photos, it looks like the sides are even a little taller than the drawer slides.
All of the slides I have found are about 1.77″ tall. 3/4″ wood plus 1/2″ plywood is only 1.25″ tall. That means the drawer slides are actually just over 1/2″ taller than the drawers, but your photos look like the opposite.
What am I missing?
(BTW: I love the plans and am so excited to build one for my wife for this Christmas!)
Hi,
Whats the dimensions of the coffee table?
I loved your post. What would be the height of your coffee table in feet ? You did specify that the table was a rectangle of 3 by 4 feet. That helps to get an idea of what’s the most comfortable dimensions while playing.
Thank you! You can place legs of whatever height you prefer, mine happen to be about 11.5″, so to total height of my table comes to 18.75″…just a couple inches higher than my sofa.
I love this coffee table! You are a genius! Can’t wait to make it!
Thank you! I hope you love it. 😉
Hi! I am looking at these plans and I am curious how you attach the slides to the inside of the table. The steps shown make it seem like the top and bottom of the table “box” are both in place before the slides get attached. But the slides must attach on the inside, way in that box…not sure how hands and tools (and eyes) can fit in there to attach them? Maybe I should put them on before attaching the top on the box?
Thank you for this Plan, I built if for my Daughter in Law and she loves it.
I’m so happy to hear it! Such a great Father-in-law… 🙂
I must appreciate your superior taste for this design is really amazing. Especially in a home where there are many members staying together, such a coffee table can stay memorable among the good times. It can also store lot more in the little space. Well designed indeed. Thanks for sharing the pictures.
Love this table so much! Hoping that my husband will make it for me! Can I ask where you purchased the legs and drawer pulls? I love them! Thank you for the DIY plans!
Thank you! The legs were salvaged off an old roadside piece of furniture and spray painted gold. The drawer pulls you can find at Lowes.
I LOVE this table and want to try to make it! However, someone posted a comment on the buildsomething website that leaves me wary to buy all the material and begin. Have you received any feedback from people who have followed these directions? Any updates to the measurements? I actually tried to find something similar to buy and no such amazing thing exists. You’re good!! LOL Thank you!
Hi Ana,
Thanks so much for pointing out that comment. I hadn’t noticed it and appreciate the opportunity to respond to him.
Of course no plan is infallible…there may be some small thing I have overlooked or mistyped. However the commentator in this case pointed out what he thinks is measurement problems simply because he is not familiar with nominal versus actual wood sizes. I try to keep things simple to follow for the non-builder, so I state the size as you will see it in the store and on the sticker (so there is no confusion)(most build plans state in nominal sizes), however the actual size of the wood is smaller than the sizes stated by the hardware store. So for example all the 1″x2″ boards are actually 3/4″x1-1/2″ boards… So either he forgot about that in his calculations or he doesn’t know. Lol!
People who don’t build don’t always realize that there are nominal and actual sizes.
Oh and Ana, one final tip if this is your first build… Instead of cutting everything right at the beginning, always take a plan piece by piece. I have learned in following others and even my own plans is that you have to factor in user imperfections. So for example if I screw in my 2×4 sides to the coffee table top, but when I drive in the screws it pulls the wood slightly in an 1/16th of an inch on either side rather than being 100% aligned with the edge of the wood, I don’t sweat it…because I double check to see what measurement I will need after my user error for the next set of steps. Maybe that means one of my drawers will end up needing an 1/8th of an inch less to fit. That is okay and normal when building. Because NO ONE can build or cut 100% to the Nth degree. So start by cutting your coffee table top and sides, and assembling that FIRST, then move on to each drawer…that will also reveal if a plan has any errors as you go. 😉 Good luck my dear!
Hi all.. wana ask please. Do you sell this table puzzle? Do have sizes for the table? And how misch will cost me ??
Hi! No I’m afraid I do not sell these coffee tables, just share the tutorial on how you can make it. 😉 Thank you!
Oh my gosh, I just found you via Pinterest and you have totally made my week with these plans. We have a dog that insists on sitting in the middle of our games all the time! Thank you so much, buying materials asap.
LOL! You have one awesome dog, in that he is a gamer dog. He just wants to play. Hahahaha! Thanks for following along!
This looks like a fun project. Can’t wait to try it.
Additionally, those chairs next to the table are beautiful. I love the detail on the legs. Where did you get them?
Thanks! I ordered these chairs from Walmart here: http://bit.ly/2ynu2qN (affiliate link)
The design of this table is amazing! You thought of everything! I especially like the board game and puzzle functions
I love this coffee table. It’s easily the best DIY project I’ve seen in a long, long time. You are so talented.
That’s so sweet! Thanks for stopping by!
You are a ROCK STAR!
I really need to learn my Kreg Jig and be even half as awesome as you are.
Aw shucks *blush* I do love my Kreg Jig! I still have lots to learn about it too! 😉
Straight up brilliant and beautifully executed.
I LOVE THIS! we are a family that loves all those euro games and my husband loves to puzzle. I am going to have to try to build this! So cool!!!!
Woo hoo, another eurogamer! <3 Thanks cutie!
This is the coolest I have seen in a very long time!! I have a Hemnes table from IKEA that probably can be altered by adding pullouts. Can’t wait to try it!
Thank you! That is a great idea, to alter an existing piece! 😉
Great thinking! Removers are never careful; we’ve had to replace/restore several special items since our move. Love this table and ‘one day’ when the renovations are done it will move from wish list to the To Do List.
Ok this is AMAZING!!! Off to check out the instructions!!!
Great design. A bit above my skill set but I hope to catch up soon. Thanks for sharing. Love ur ur blog!